
Adding an Unsubscribe Link in Mail Designer 365: Step-by-Step Guide

By Team equinux Preparing your Design for Sending

The unsubscribe link is a key component of every successful - and legally compliant - email campaign. With Mail Designer 365, you can easily add this link to your email templates, allowing unsubscribes to be handled automatically while giving your recipients full control over their data. In this guide, we’ll show you step by step how to correctly add unsubscribe links and explain why they are essential for the success of your email campaigns.

Jump to Section:

Why an Unsubscribe Link is Important

An unsubscribe link is not just legally required—it offers numerous benefits for your email marketing:

  • Reduces spam complaints: Recipients who can easily unsubscribe are less likely to mark your email as spam.
  • Improves sender reputation: Email providers reward clean lists and ensure better deliverability.
  • Enables targeted optimization: In the analytics view, you can see who unsubscribes and adjust your content or email frequency accordingly.
  • Builds trust with your recipients: Transparency and control increase subscriber satisfaction and loyalty.

Adding an Unsubscribe Link in Mail Designer 365

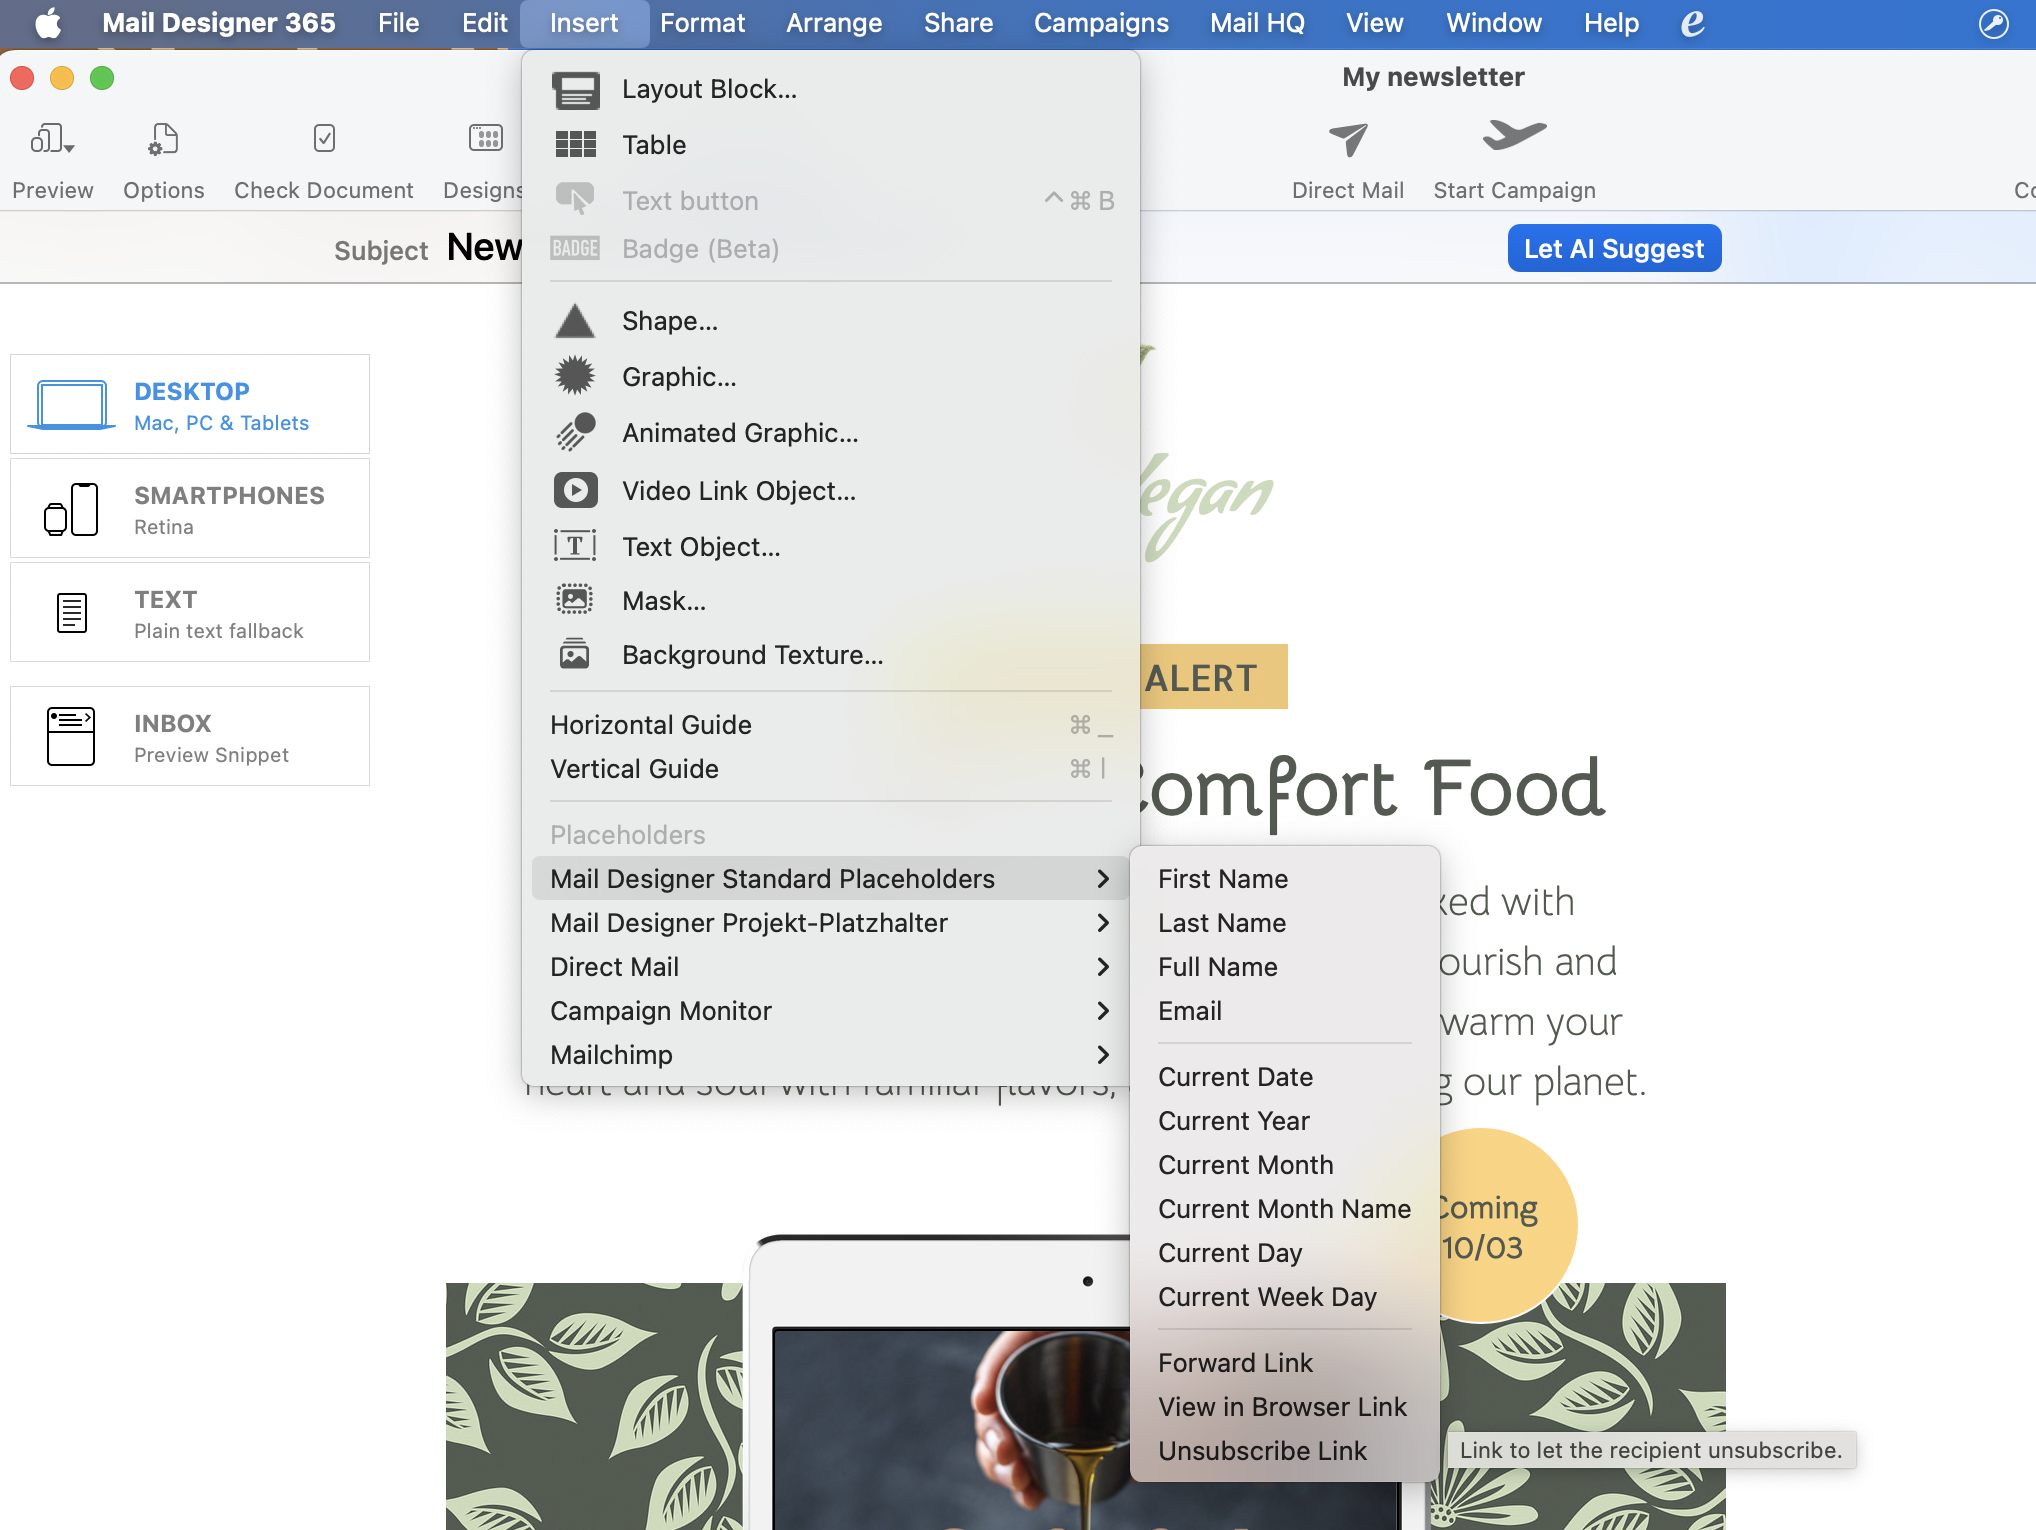
Here’s how to insert an unsubscribe link into your template:

  1. Open your template in Mail Designer 365.
  2. Go to the menu and select Insert > Mail Designer 365 Campaigns.
  3. Choose the Unsubscribe Link placeholder.

Adding an unsubscribe link via the placeholder menu in Mail Designer

Automated Unsubscribes and Reporting

Once the unsubscribe link is added, unsubscribes are handled automatically:

  • The recipient clicks the unsubscribe link, and the system automatically removes them from the mailing list.
  • No manual follow-up is required.
  • In your newsletter overview, you can see how many recipients unsubscribed via the link and view the contacts who unsubscribed.

Conclusion

Unsubscribe links are an essential part of professional email campaigns. They protect your sender reputation, improve email deliverability, and build trust with your recipients. With Mail Designer 365, you can automate this process while keeping track of all important unsubscribe information. This way, you can optimize your email marketing and ensure happy, well-informed subscribers.

A Quick Tour of Mail Designer 365

Background

Layout Blocks

TextScout

Editing Text

Links and Buttons

Configuring Text Styles

Tables

Image Areas

Images

Using Retina Images with your Design

Graphics and Other Objects

Creative Tools

Advanced Design Techniques

Blend Modes

Optimizing your Template for Mobile

Plain Text

Preview your Design

Feedback and Sharing

Preparing your Design for Sending

Contacts and Audiences

Sending Emails

1:1 Emails

Email Analytics

HTML Export

Other Sharing Options

Insert placeholders for sending with Mail Designer

By Team equinux Preparing your Design for Sending

Mail Designer 365 supports the use of placeholders to automatically insert personalized information into your template.

What are placeholders?

Placeholders are special text areas in your email that are automatically replaced with personalized information from your contacts when sending. For example, you can insert the recipient’s name or other individual data without manually adjusting each email. This ensures a more personal approach and saves time when creating your email campaigns.

This article covers the use of placeholder for sending with Mail Designer Delivery. You can also insert email placeholders for:

Inserting placeholders for Mail Designer sending

‣ Select a text area in your design

‣ Go to "Insert" in the toolbar and choose Mail Designer Standard Placeholders

‣ Choose the placeholder you would like to add:

A placeholder will be inserted into your text, which will be replaced with information from your Mail Designer contacts after uploading.

Managing contacts

With the placeholder feature, you can insert information from your contact list stored in Mail Designer. Learn more about contact management in Mail Designer 365 in the following articles:


Using the spell check and grammar check

By Preparing your Design for Sending

Spell and grammar checking

Like any emails that you send, you always want to check your spelling and grammar. Sometimes, we place too much focus on the design that we forget to proof read. Mail Designer 365 makes it easy to check your spelling and grammar. You can select a specific text area or highlight specific sentences or paragraphs that you want checked. Then choose "Edit" > "Spelling and Grammar."

You have the option of checking your spelling while typing, checking your grammar with spelling, or automatically correct your spelling.

In addition, you can choose to check the entire document by choosing "Check Document Now."

Choosing your language

We understand that language is important in communication. There are also regional differences that can make spell check a bit tricky. However, with Mail Designer 365, you can choose your own language. Mail Designer 365 will understand that there are spelling differences between American English and British English.

To select your language of choice, choose "Edit" > "Spelling and Grammar" > "Show Spelling and Grammar:"

A pop up will appear that will let you choose a language. Just click on the "Automatic by Language" drop down menu:

You can choose from one of the listed languages:


A Quick Tour of Mail Designer 365

Background

Layout Blocks

TextScout

Editing Text

Links and Buttons

Configuring Text Styles

Tables

Image Areas

Images

Using Retina Images with your Design

Graphics and Other Objects

Creative Tools

Advanced Design Techniques

Blend Modes

Optimizing your Template for Mobile

Plain Text

Preview your Design

Feedback and Sharing

Preparing your Design for Sending

Contacts and Audiences

Sending Emails

1:1 Emails

Email Analytics

HTML Export

Other Sharing Options


Checking your design for issues

By Preparing your Design for Sending

It's always good to review your email

Mail Designer 365 is continuously scanning your design for issues that can occur. For example, too many animated graphics or other things in your template can affect the experience
of your design.

As soon as Mail Designer 365 finds an issue you will get a notification in the top right corner of the Mail Designer 365 window. The badge shows you how many issues Mail Designer found.

Open the check window, to see the issues Mail Designer 365 found. You will also get a description about the issues found, so you can make the necessary changes.

In the example the link is incorrect and might not work:


A Quick Tour of Mail Designer 365

Background

Layout Blocks

TextScout

Editing Text

Links and Buttons

Configuring Text Styles

Tables

Image Areas

Images

Using Retina Images with your Design

Graphics and Other Objects

Creative Tools

Advanced Design Techniques

Blend Modes

Optimizing your Template for Mobile

Plain Text

Preview your Design

Feedback and Sharing

Preparing your Design for Sending

Contacts and Audiences

Sending Emails

1:1 Emails

Email Analytics

HTML Export

Other Sharing Options

Saving your design

By Team equinux Preparing your Design for Sending

There are many scenarios where you will want to save the latest version of your email design – either to continue editing later, to share with your team, or to send.

Saving a design for the first time

When you first save a design, you will be prompted to give the design a name and can save it in your team's TeamCloud; making it available for all team members and across your personal devices:


Saving to continue editing

If you've finished working on your design for the time being, simply click the X to close the Mail Designer 365 design window. You will then be shown the save dialog:


Using your design with Testmail, Crew Chat or Delivery Hub

When you use your email design with Testmail, Crew Chat or Delivery Hub, Mail Designer 365 automatically updates the latest design version in TeamCloud to use with these services.

For example, clicking on the Crew Chat icon in the toolbar automatically triggers saving.

You can see when a new version is being uploaded whenever the TeamCloud upload icon is displayed in the toolbar:


A Quick Tour of Mail Designer 365

Background

Layout Blocks

TextScout

Editing Text

Links and Buttons

Configuring Text Styles

Tables

Image Areas

Images

Using Retina Images with your Design

Graphics and Other Objects

Creative Tools

Advanced Design Techniques

Blend Modes

Optimizing your Template for Mobile

Plain Text

Preview your Design

Feedback and Sharing

Preparing your Design for Sending

Contacts and Audiences

Sending Emails

1:1 Emails

Email Analytics

HTML Export

Other Sharing Options

Privacy Settings / Datenschutz-Einstellungen