
The splitting audience feature in Mail Designer Campaigns makes it easy to run simple A/B tests for your emails. This guide explains the basics of A/B testing, why it’s valuable, and how you can configure your audience segments to set up an A/B test for your next campaign.
What is an A/B Test?
A/B testing is a commonly used method in email marketing that allows you to try out different messaging and layout options in your email campaigns. For an A/B test, you will need to create two or more versions of your newsletter – each with a different variable – then split your audience accordingly.
Each segment of your audience will receive one version of the newsletter so you can accurately compare results later.
Why is A/B Testing Valuable?
A/B testing takes a lot of the guesswork out of email marketing. When creating content for your audience, it's important to know what they respond best to. Some examples of what you could test include:
- Subject line style (clickbait, serious, motivational, humorous, etc)
- Emoji in the subject line
- Messaging style
- Call-to-action text, position or design
- Sending time
Once you have reliable data for these questions, you can better optimise your newsletters to increase clicks, open rates and engagement.
How to Set Up an A/B Test in Mail Designer
Preparing your audience
Before you set up an A/B test, make sure your audience is set up to exclude anyone who has recently received an email. This prevents contacts from receiving more than one version of your campaign.
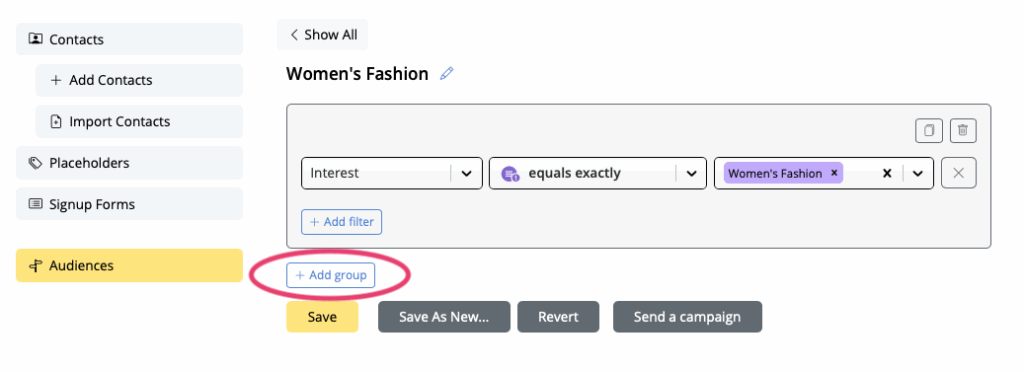
- To do this, go to Contacts > Audiences and select the audience you want to use – in this example "Women's Fashion".
- Click on Add group to add a new rule for your audience:
- In the placeholder dropdown, scroll to the system placeholders and select last_sent_at (this represents the date each contact was last sent an email.)
- Set the operator to not in the last and define your preferred time range, for example 5 days.
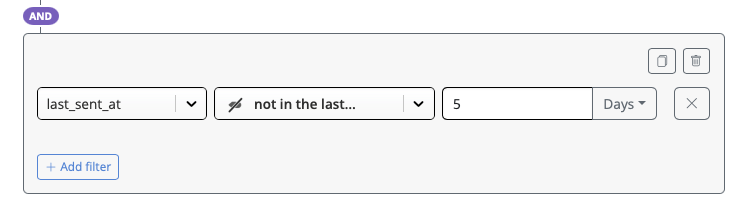
Your audience will now only include contacts who haven’t been emailed within the last 5 days, ensuring no one accidentally receives both versions when you split the audience in the next step.
If you’re running A/B tests across multiple audiences, just repeat these steps for each one.
Splitting your audience
After this, splitting your audience is straightforward.
- Go to Campaigns > New Campaign to set up a new campaign
- Under Template, select the "A" version of your newsletter
- Under Recipents and FROM, choose your audience (i.e Women's Fashion) and open Advanced options:
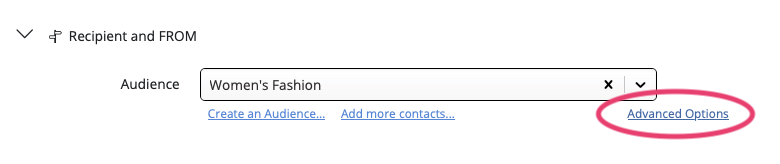
- Use the slider to determine what percentage of the audience should receive this version. For a basic A/B test, set it to 50%

- Schedule your campaign as normal. It will be sent to the selected half of your audience
For the second part of your A/B test, simply repeat the steps above using the "B" version of your newsletter. The email will be sent to the remaining 50% of your audience, allowing you to easily compare results in the next step.
Getting the Results of Your A/B Test
Mail Designer includes useful performance reports so you can see exactly how your email campaigns did.
- Go to Campaigns > Delivered, then find your campaign
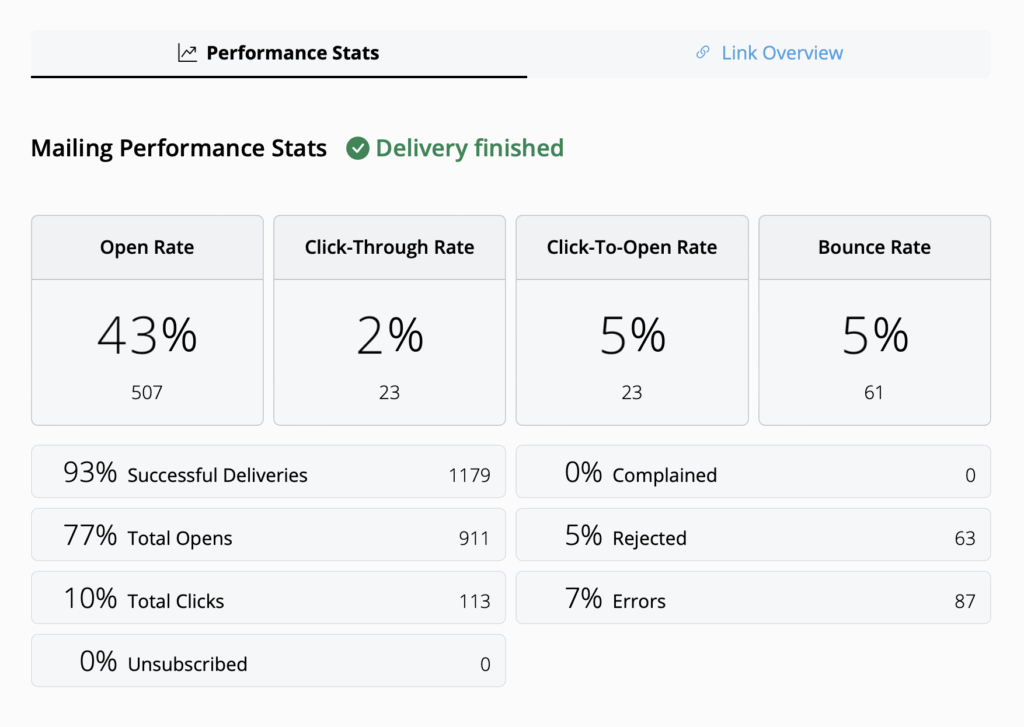
- Click the analytics icon to view the report:
Click to access performance reports for A/B testing results
Here, you can see metrics such as open rate, click-through rate, unsubscribe rate, and individual link performance. Use this information to determine which version of your newsletter performed best.
Need help? Check out this guide for help analysing your campaign statistics →
How Can We Help?