
How to Use Campaign Monitor Email Placeholders
Campaign Monitor email placeholders let you insert recipient-specific information into a Mail Designer 365 email design. When the campaign is sent through Campaign Monitor, the service replaces each placeholder with data from the corresponding subscriber record. Common uses include a recipient name or other fields available for the list.
Use placeholders only when the required data is collected consistently and has been reviewed. Personalization should make a message more useful; it should not expose private information, make unsupported assumptions, or create confusing gaps when a field is empty.
Insert a Campaign Monitor placeholder
- Open the email design in Mail Designer 365.
- Click inside the text area where the personalized value should appear.
- Choose Insert > Campaign Monitor from the menu.
- Select the placeholder that matches the subscriber information you want to use.
- Check the surrounding sentence, spacing, punctuation, and text formatting.
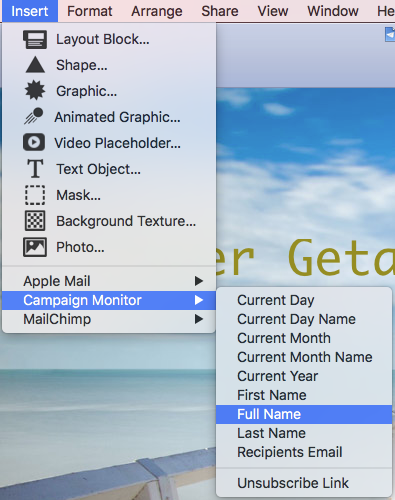
The placeholder appears inside the text area while you are designing. It is a marker rather than the final recipient value. Campaign Monitor performs the replacement later using the data connected to the recipient when the campaign is prepared and sent.
Available Campaign Monitor placeholders
The Insert menu shows the Campaign Monitor placeholder choices supported by Mail Designer 365. Select the field that corresponds to the subscriber data you plan to use. Field availability and naming can depend on the Campaign Monitor list and campaign configuration, so confirm the mapping after the design is imported or uploaded.
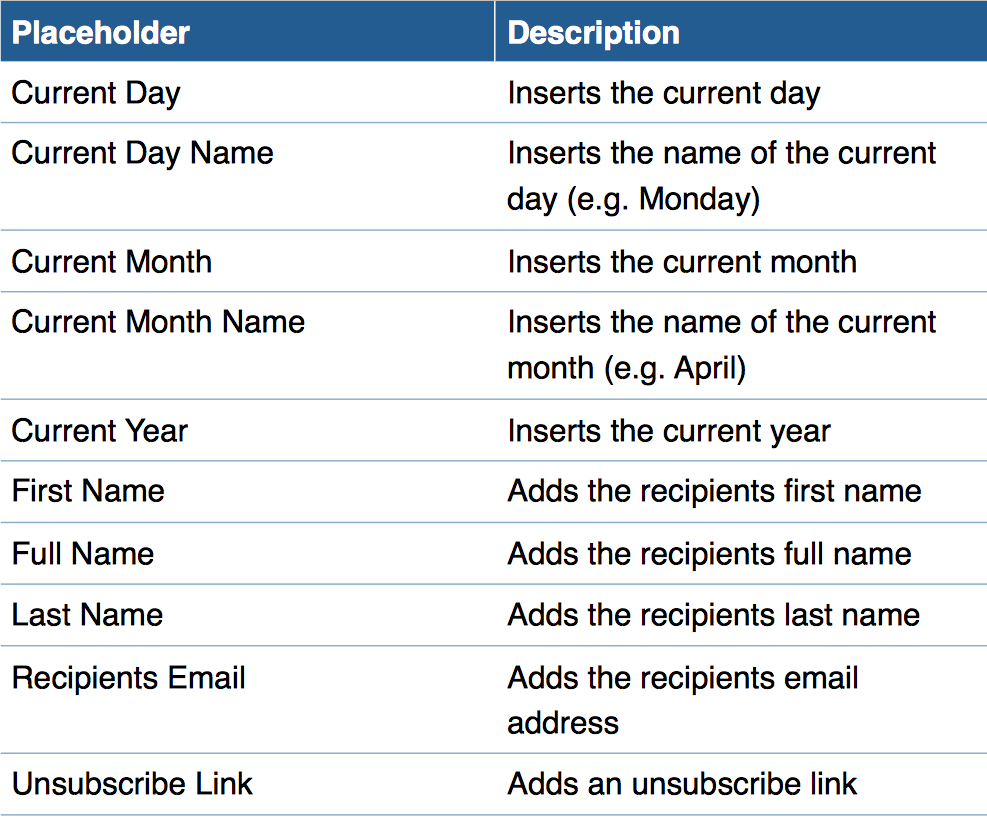
Do not type an assumed placeholder format manually when the Mail Designer 365 menu provides the correct option. Using the menu reduces syntax errors and helps keep the marker intact during design edits.
Write copy that works with personalized data
Placeholders should fit naturally into the sentence after replacement. Check capitalization and punctuation, and avoid adding a second space around the field. A greeting may look correct with a full name but awkward with an empty or unusually long value. Keep the surrounding sentence flexible enough for realistic list data.
Before relying on a field, inspect the relevant Campaign Monitor list. Look for blank values, placeholder text accidentally stored as data, inconsistent capitalization, duplicate entries, and very long names. Decide how the campaign should behave when a value is unavailable, using Campaign Monitor’s supported settings or a non-personalized sentence rather than guessing at syntax.
Test placeholders before sending
- Export or upload the design through the normal Campaign Monitor workflow.
- Confirm that the intended list fields are mapped to the corresponding placeholders.
- Use test contacts with realistic values, including a long value and a missing value where possible.
- Preview or send test messages through Campaign Monitor so the provider processes the personalization.
- Check the rendered text on desktop and mobile and confirm that no raw marker remains.
A Mail Designer 365 preview can verify layout and styling, but provider-side personalization should also be tested in Campaign Monitor. Test the actual campaign state that will be sent, not only a screenshot or copied HTML.
Troubleshooting Campaign Monitor email placeholders
- The placeholder remains visible: Confirm that the message was processed and sent through Campaign Monitor, that the correct provider placeholder was inserted, and that the exported design was not altered afterward.
- The personalized value is blank: Check the recipient record and field mapping in Campaign Monitor. Use a supported fallback or rewrite the sentence so it still works without the optional field.
- The wrong data appears: Verify that the selected placeholder corresponds to the intended list field and that the test recipient record contains the expected value.
- Spacing or punctuation looks wrong: Inspect the characters immediately before and after the placeholder and test both populated and empty cases.
- The layout breaks with a long name: Allow enough width, avoid fixed assumptions about value length, and check the smartphone layout with representative data.
- Formatting changes: Make sure the entire placeholder remains inside one text style and was not partially edited or split across elements.
Campaign Monitor email placeholders: privacy and content checks
Use only subscriber information that is appropriate for the campaign and consistent with your privacy commitments. Avoid exposing sensitive fields or placing personal information in subject lines without a clear reason and review. Limit access to test data and use controlled test contacts rather than real customer records when practical.
Before sending, verify the sender name, reply-to address, subject, preheader, links, unsubscribe mechanism, footer, and all personalized variants. A colleague should review both the default version and representative personalized messages.
Keep this workflow separate from other Campaign Monitor tasks
This article covers inserting and testing Campaign Monitor email placeholders in a Mail Designer 365 text area. It does not cover building a Campaign Monitor subscribe form, uploading an entire design to Campaign Monitor, web-font support, or placeholders for another email service provider. Those workflows should keep their own instructions and focus keywords.
How Can We Help?