
常见问题
 从这里,转到“成员”选项卡,然后单击“邀请成员”。
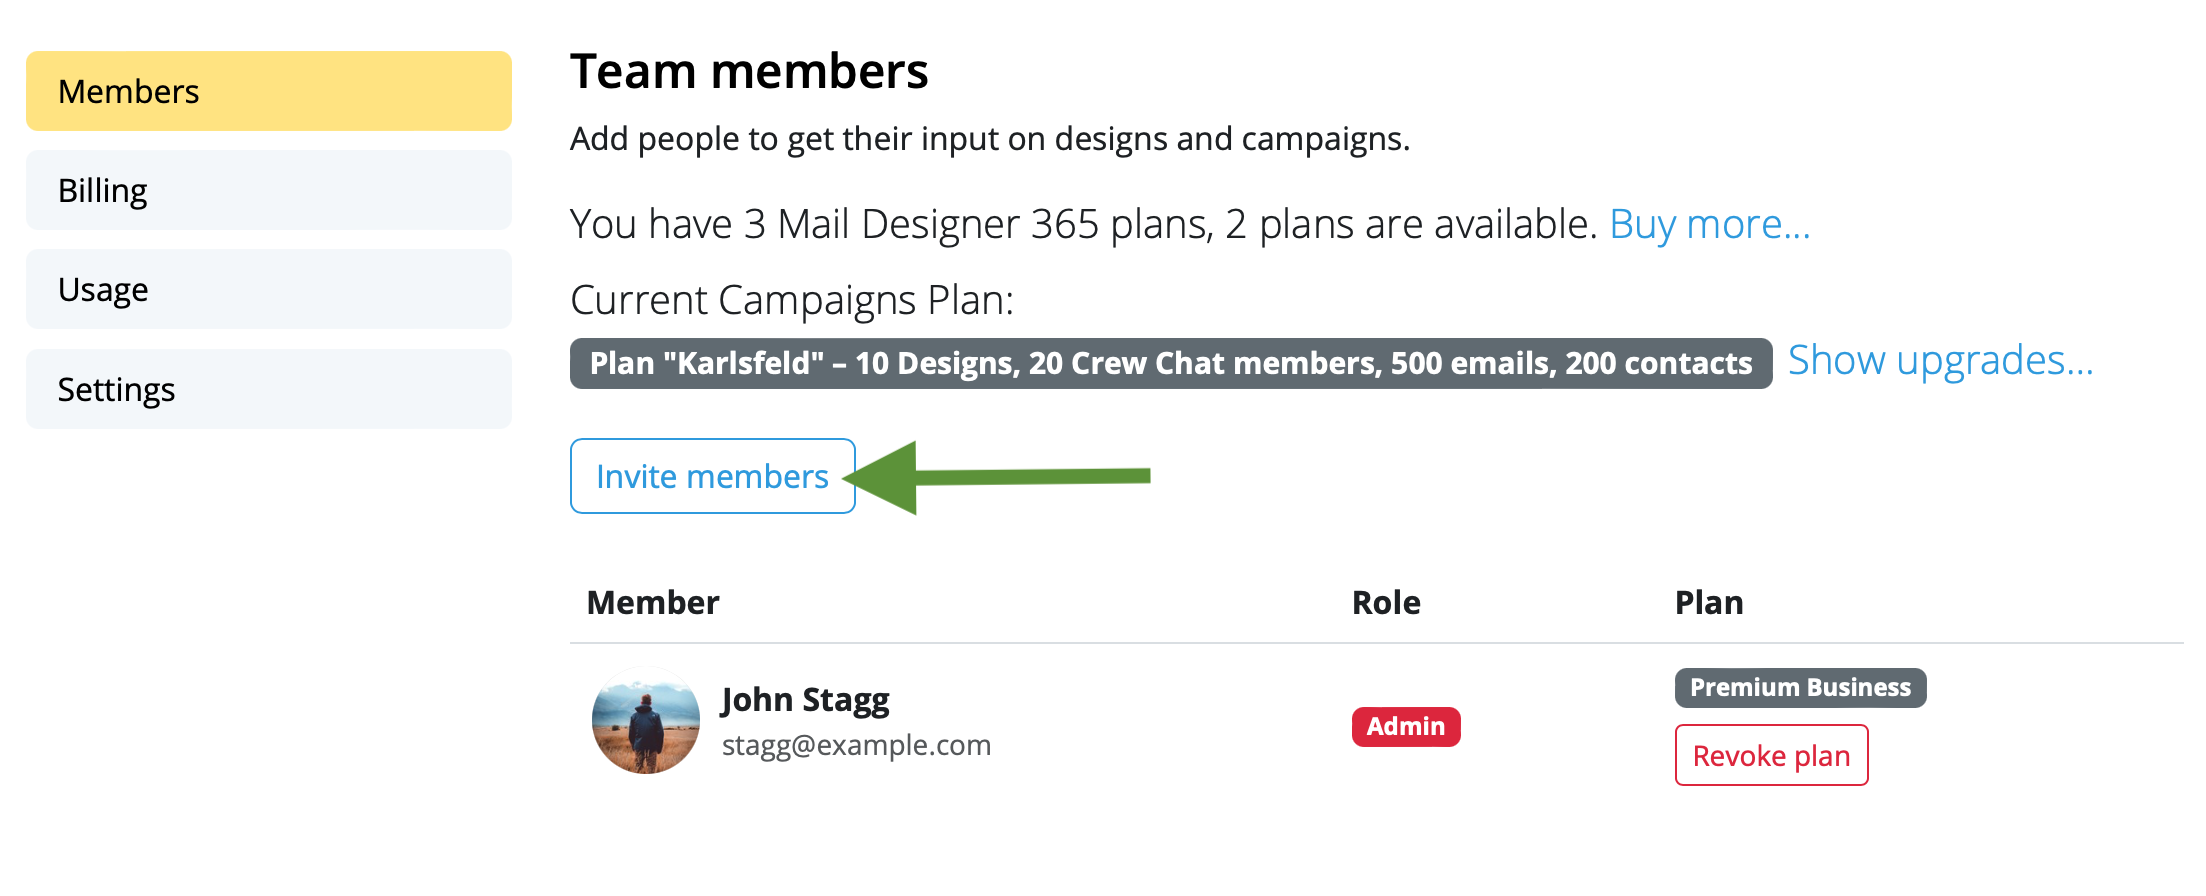 输入您要邀请到团队中的同事的电子邮件地址,然后单击“邀请”。您可以免费邀请最多 10 名团队成员!
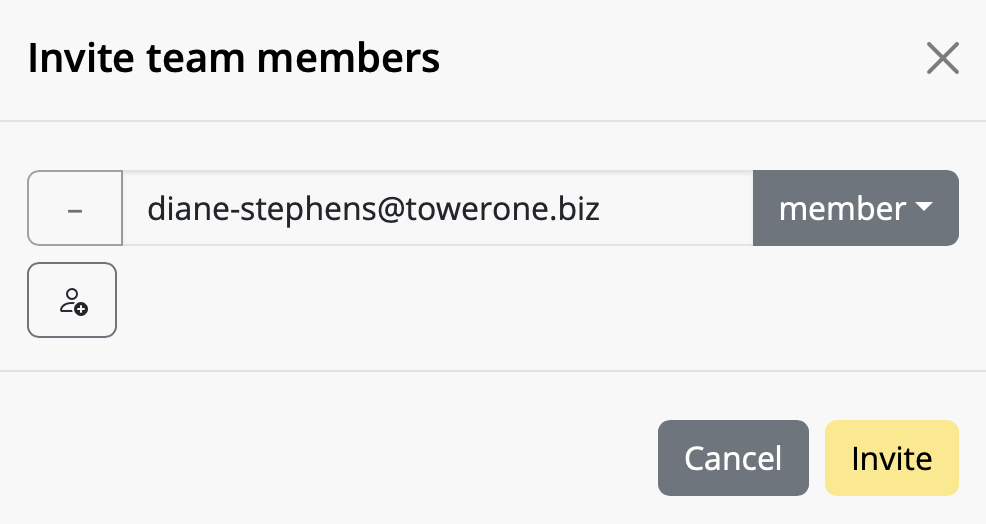 团队成员可以通过单击电子邮件中的链接来接受您的邀请。
在您邀请了新团队成员后,开始使用 Mail Designer 365 Campaigns 来讨论、批准和安排面向您受众的电子邮件营销活动。免费试用!
团队成员可以通过单击电子邮件中的链接来接受您的邀请。
在您邀请了新团队成员后,开始使用 Mail Designer 365 Campaigns 来讨论、批准和安排面向您受众的电子邮件营销活动。免费试用!
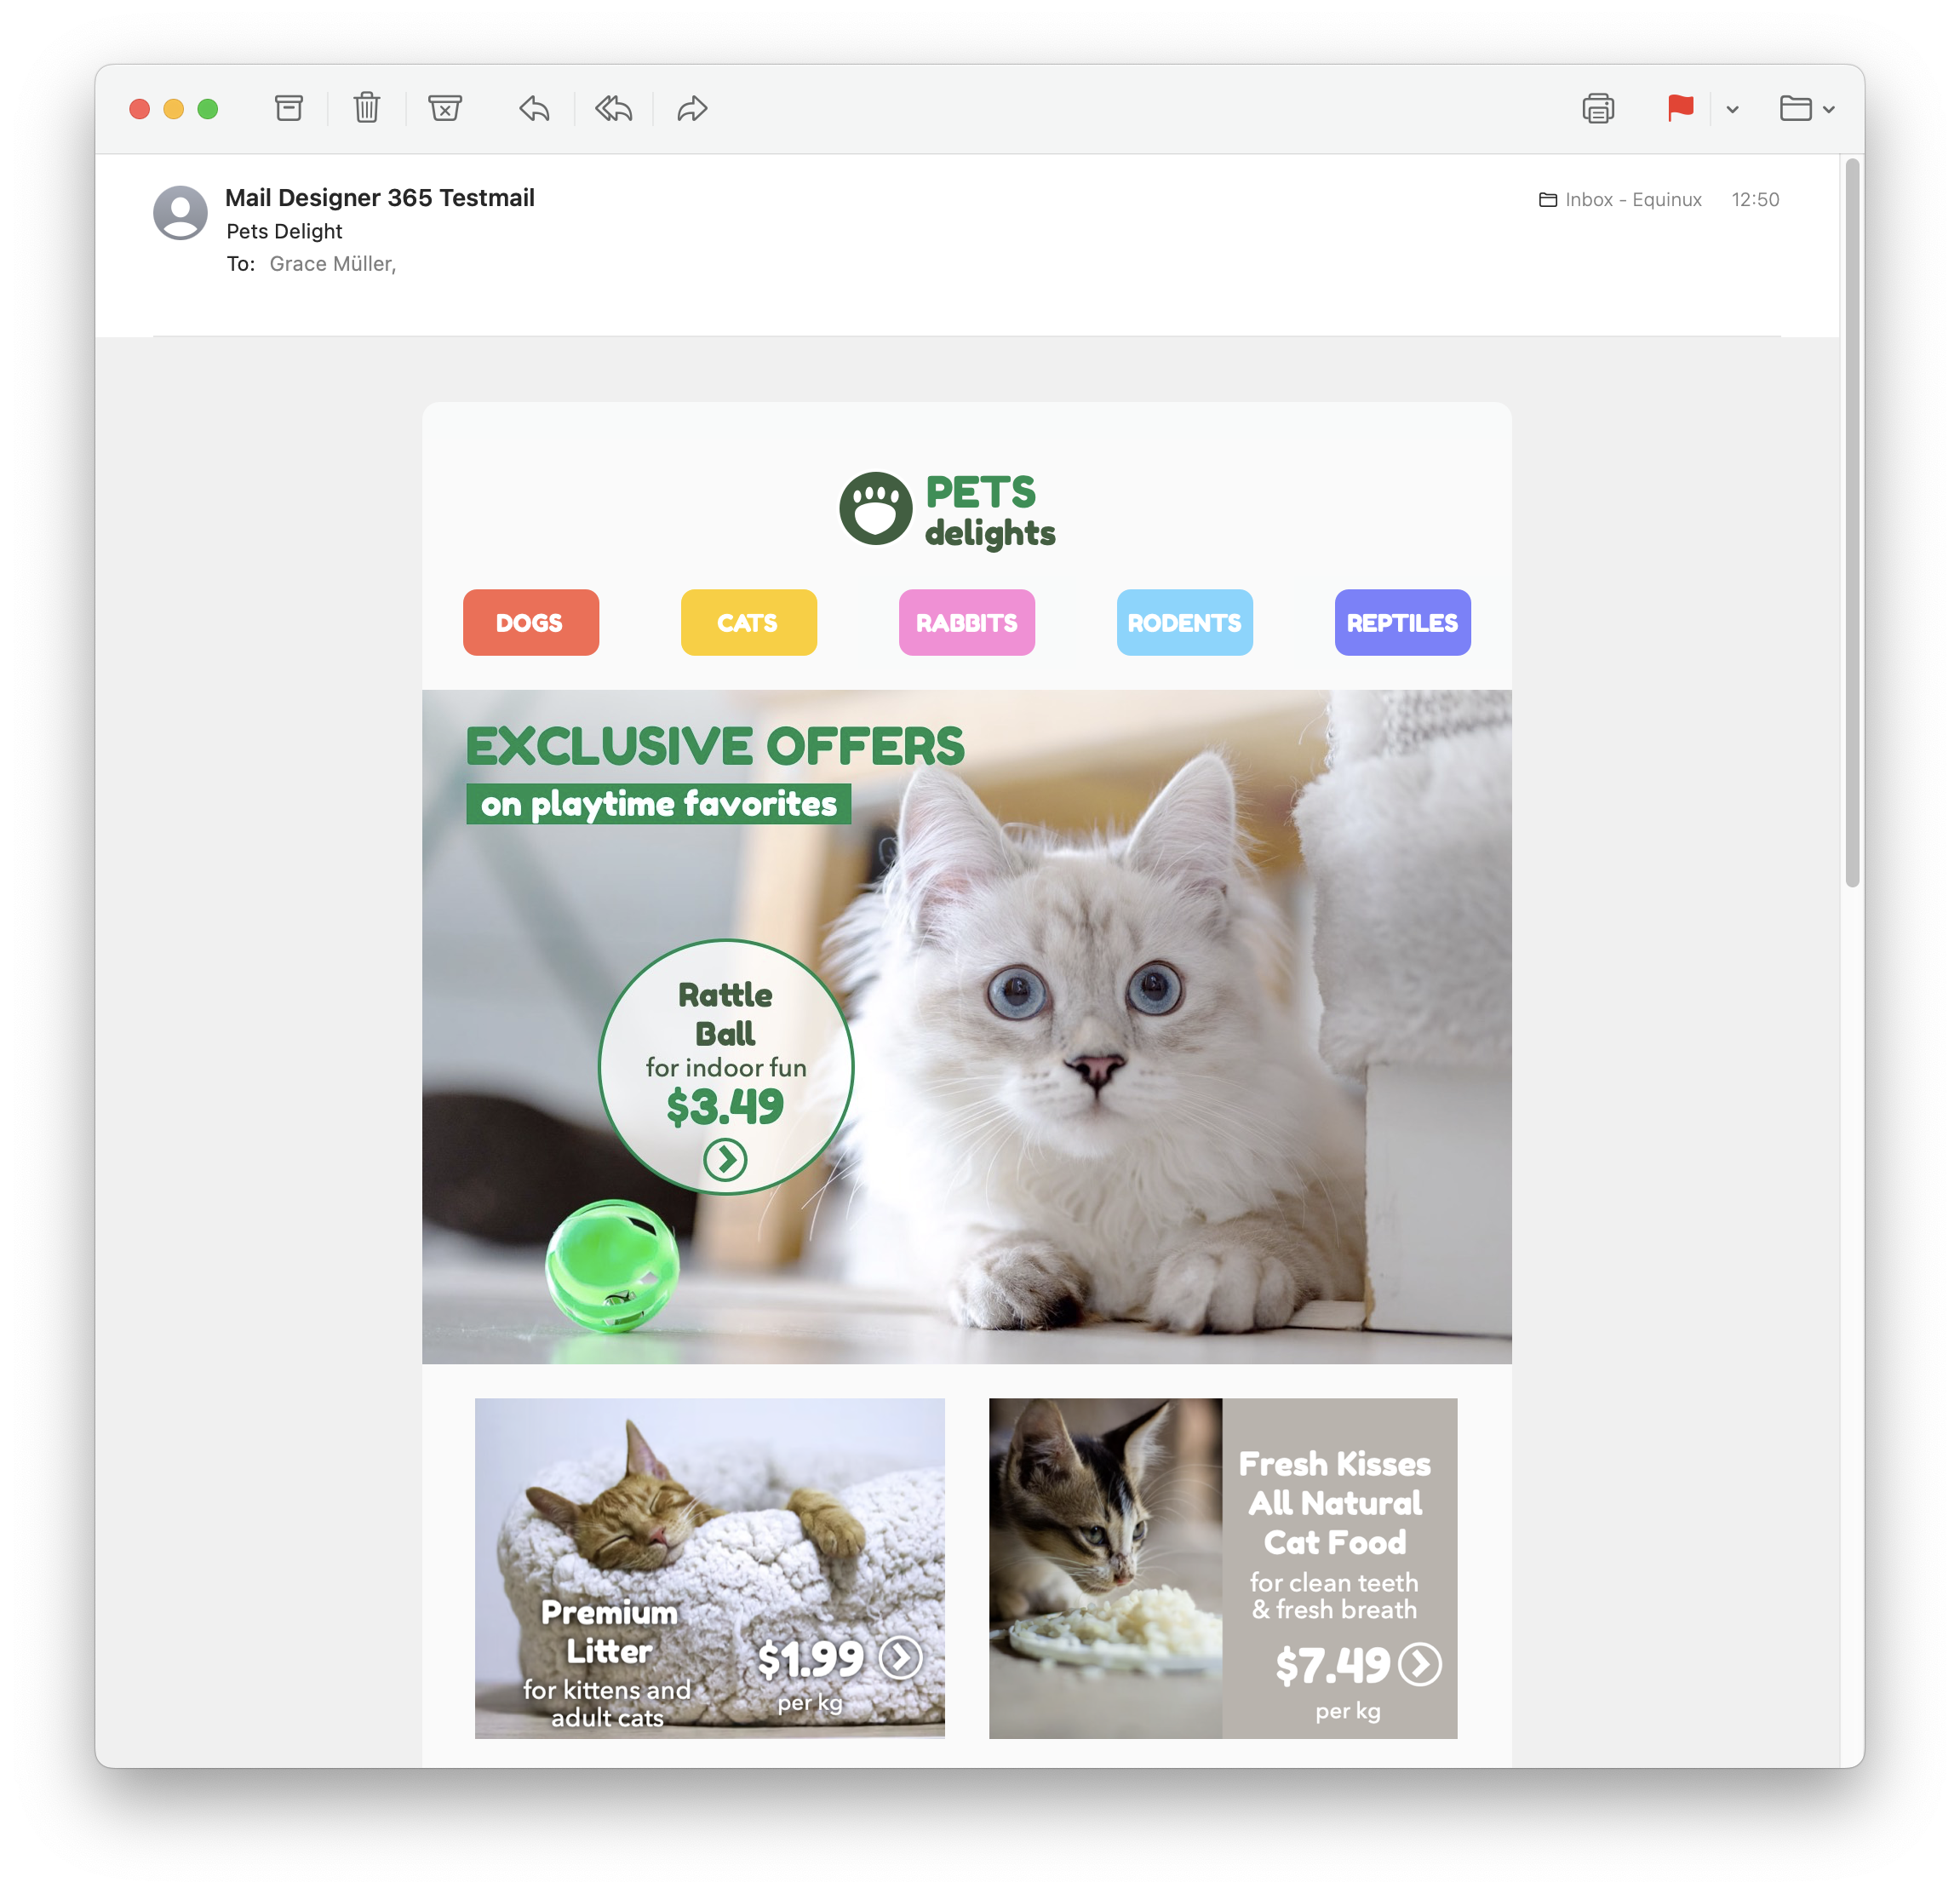
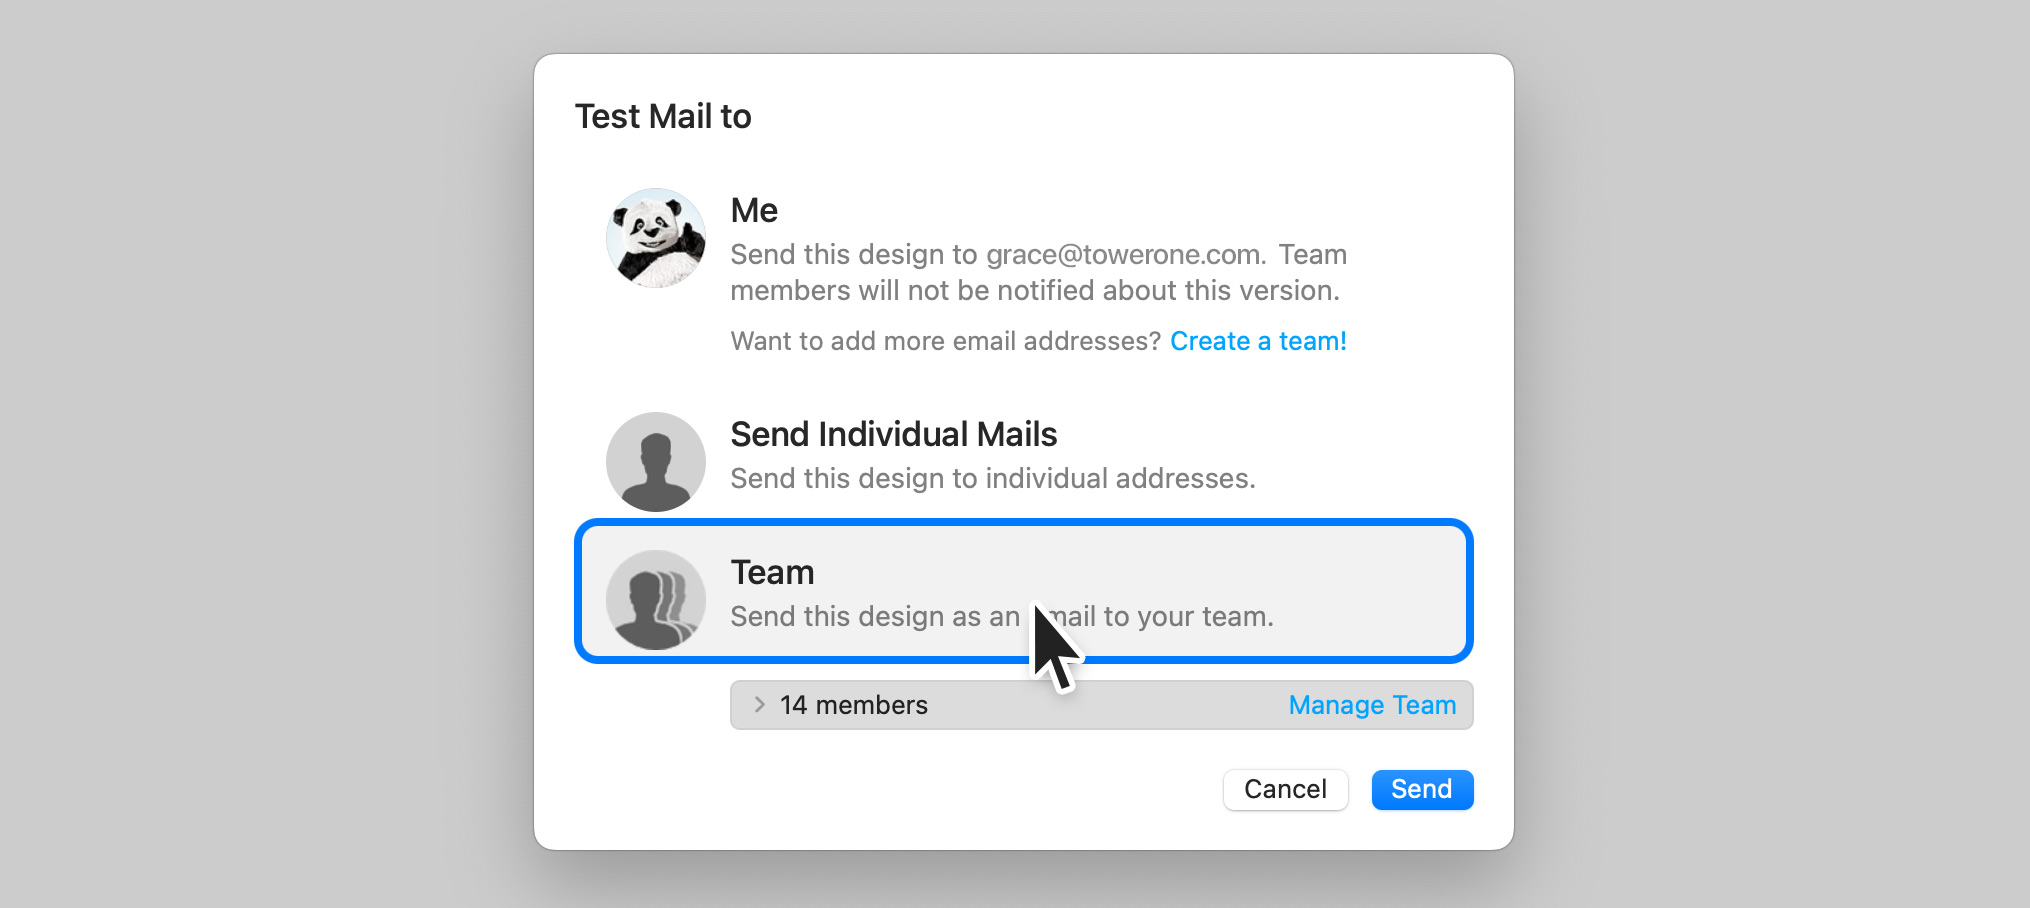
Sending test emails
Mail Designer 365's Testmail service is designed for sending internal test emails to yourself or to your team – i.e. to preview how your finished email design will look in the inbox. Test emails will be sent from the Mail Designer 365 Testmail service via our secure servers.How it works
To get started, click the Test icon in the Mail Designer 365 toolbar.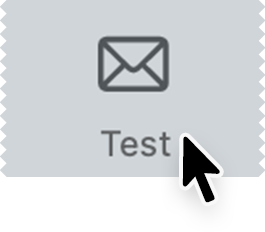 Now choose from the following test mail options:
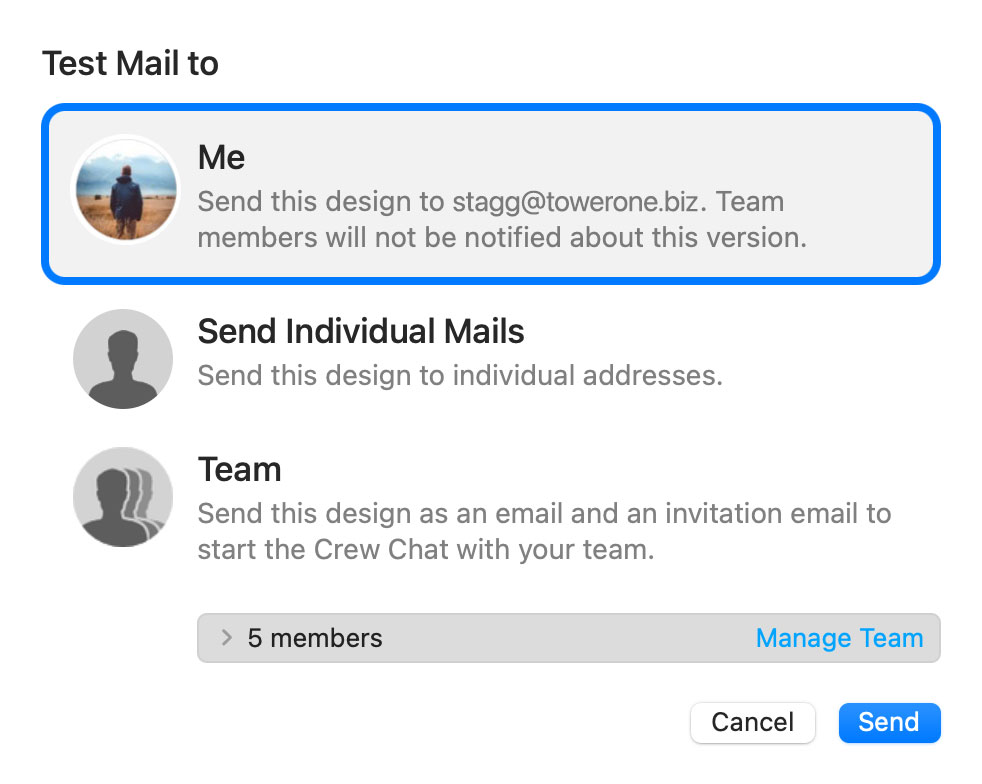
The latest version of your email design will be uploaded via TeamCloud and sent to the selected recipient(s):
Sending individual emails
You also have the option to send your email design as a single email via Delivery Hub. This email will be sent from your own email address. This option is designed for external emails (i.e. sending emails to contacts who are not part of your Mail Designer 365 team) and replaces the legacy "Send via your email account" option.How it works
In this view you can add one or more recipients for your email (e.g. your client's email) and send them your design from your own email address.
On the left of the setup window, you can choose your from address:
Tip: If you have not done so already, follow this guide to set up your "from address" for sending. Finally, send your email by clicking the green "Send" button. It will go directly to your recipient via your email server:
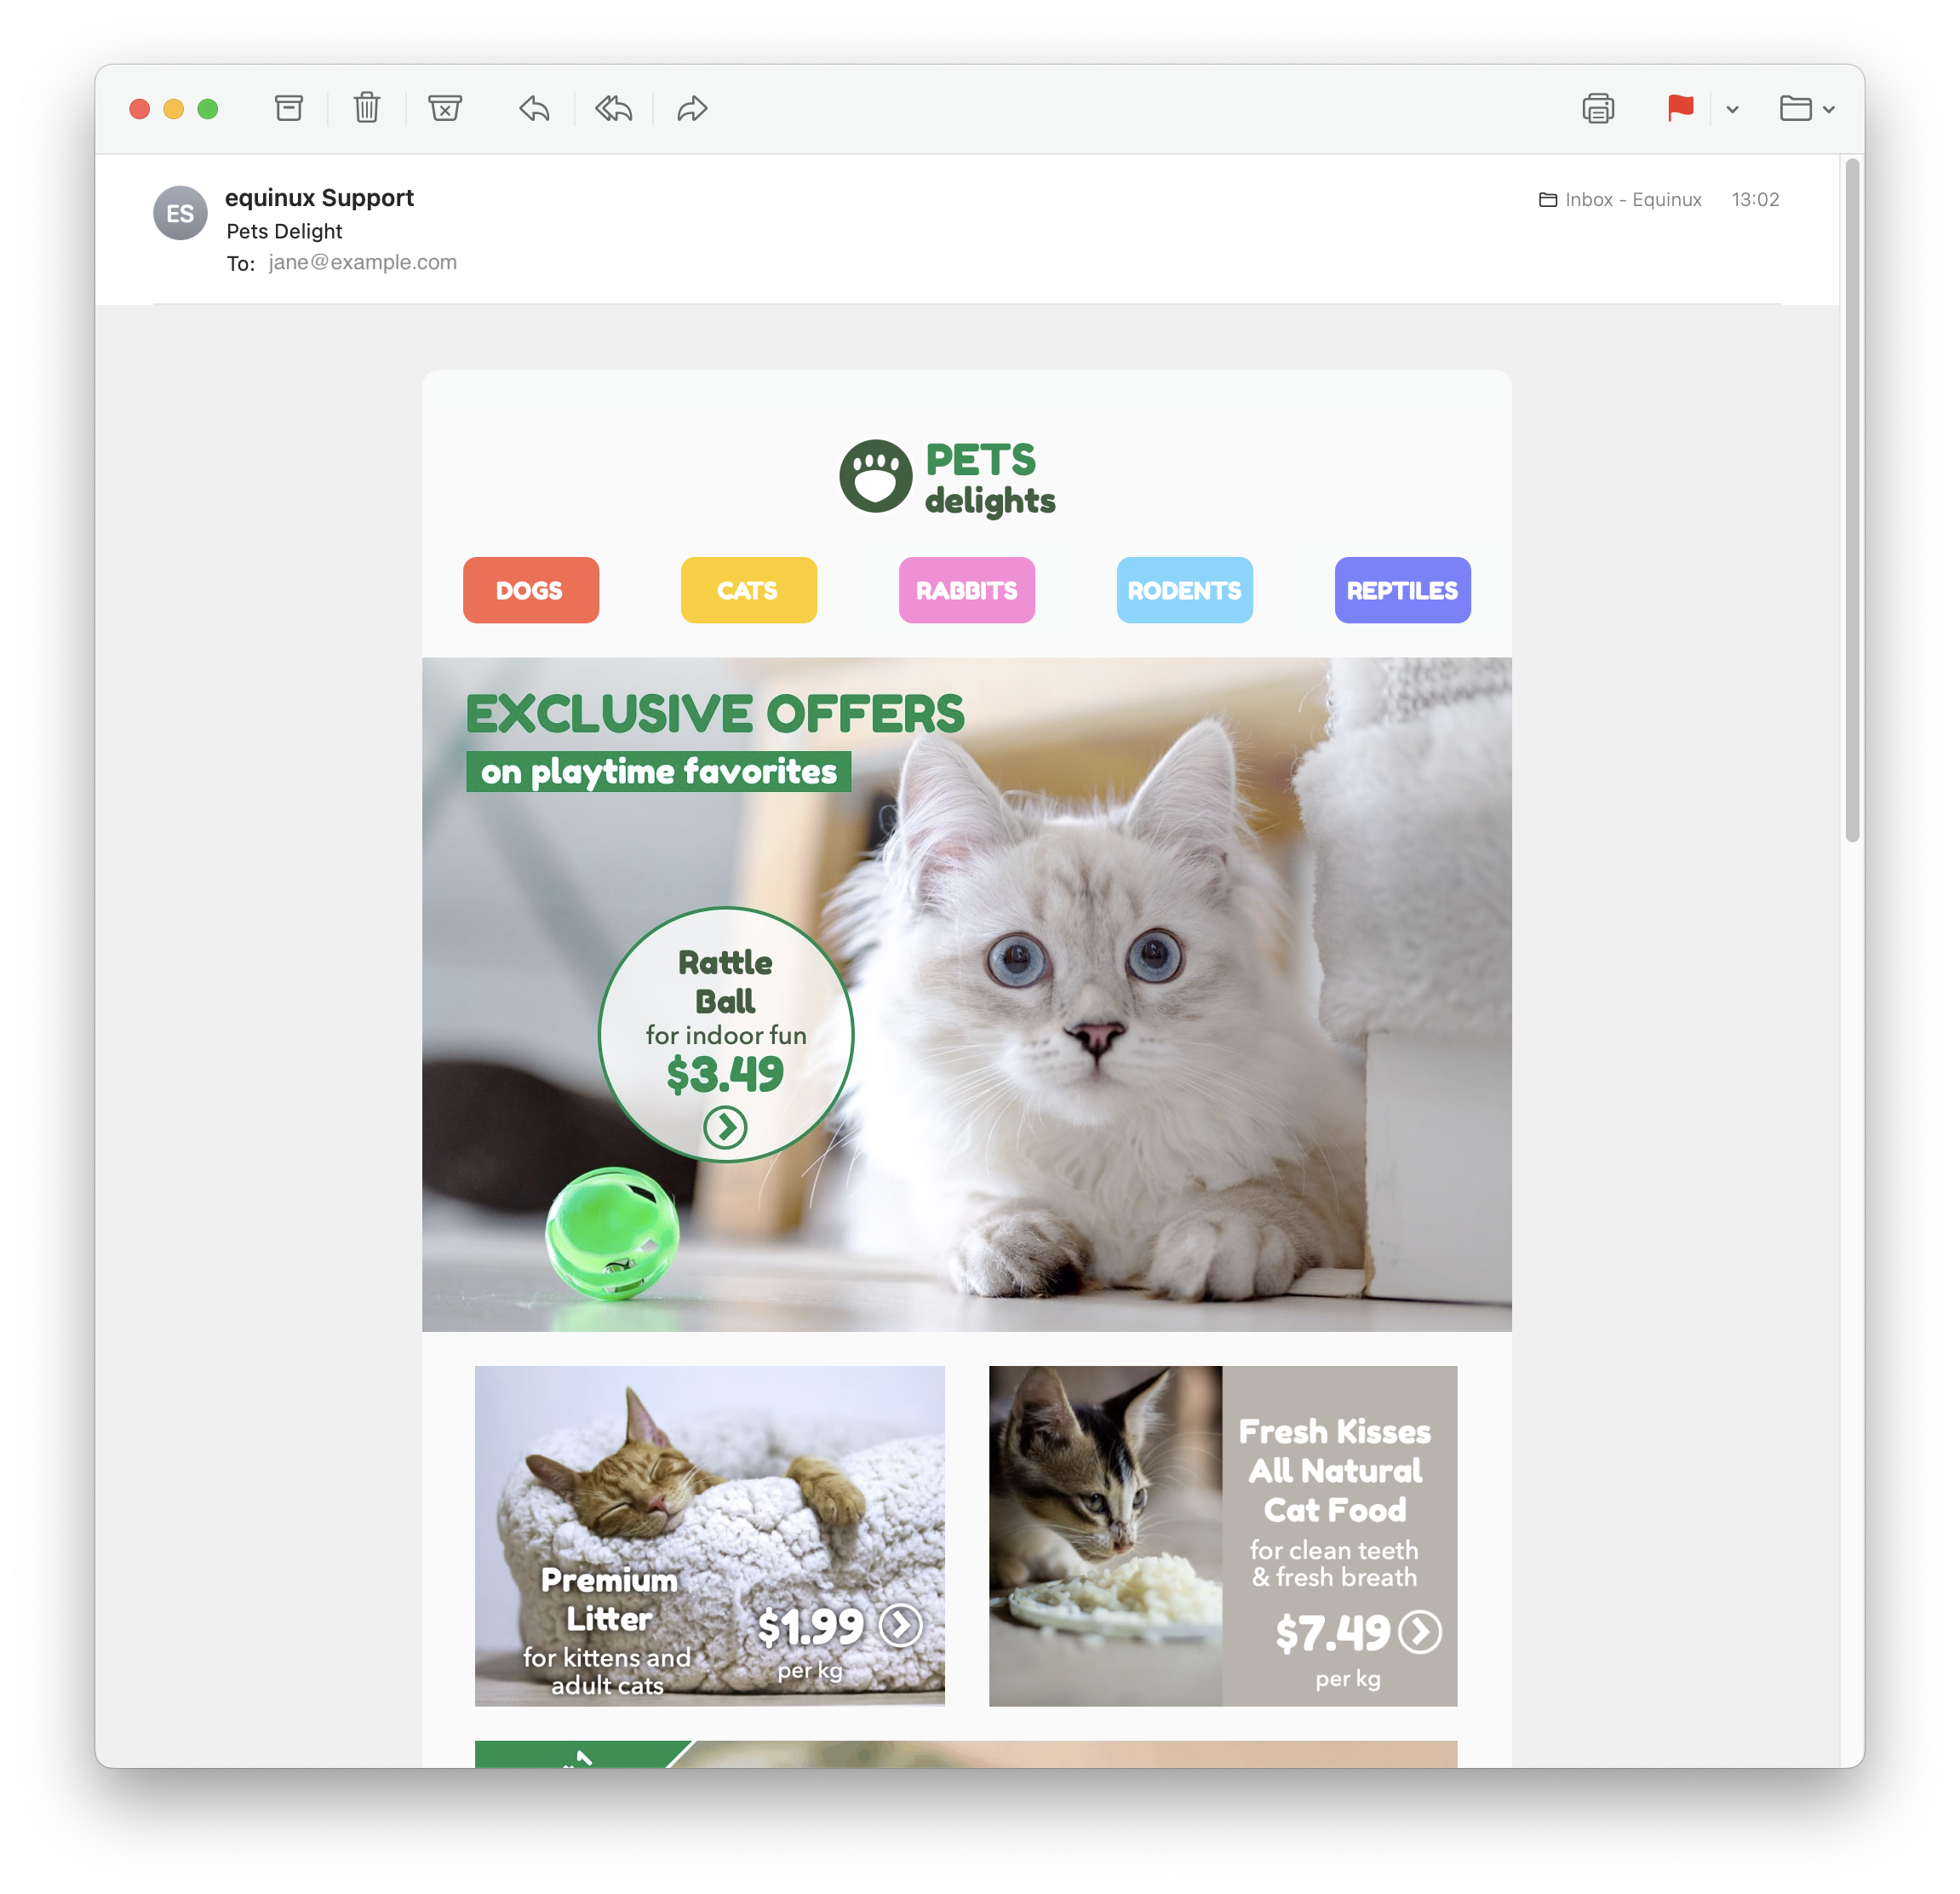
Good to know: Following send, you can easily check if your recipient has received and opened your email by clicking the analytics icon:


The Anatomy of an Email
Before diving into DKIM, let's briefly understand how emails work. When you send an email, it's like sending a digital letter. It travels through various servers and networks before reaching its intended recipient. Each server it passes through can potentially be a point of vulnerability where malicious actors might tamper with the email's content or disguise themselves as legitimate senders.
Enter DKIM: The Email's Digital Signature
DKIM, which stands for DomainKeys Identified Mail, is a security protocol designed to verify the authenticity and integrity of an email message. It does this by adding a digital signature to the email before it leaves the sender's server. This signature is like a seal of approval, assuring the recipient that the email has not been tampered with and genuinely comes from the claimed sender.
How DKIM Works
DKIM relies on a pair of cryptographic keys: a private key kept by the sender and a public key published in the sender's DNS (Domain Name System) records. Here's how it works:
- Email Signing: When an email is sent, the sending server uses the sender's private key to generate a unique digital signature based on the email's content. This signature is added to the email's header.
- Recipient Verification: Upon receiving the email, the recipient's email server retrieves the public key associated with the sender's domain from the DNS records.
- Signature Verification: The recipient's server uses this public key to verify the email's digital signature. If the signature matches the email's content and has not been altered in transit, the email is considered authentic.
- Filtering and Delivery: If the email passes DKIM verification, it's more likely to be delivered to the recipient's inbox. If not, it may be flagged as suspicious or sent to the spam folder.
The Importance of DKIM
- Protection Against Spoofing: One of the most significant benefits of DKIM is its ability to prevent email spoofing. Without DKIM, cybercriminals can easily forge email headers and pretend to be someone they're not. DKIM ensures that the email you receive from a trusted sender is indeed from that sender.
- Email Integrity: DKIM safeguards the integrity of your emails. It guarantees that your message hasn't been altered during transit, ensuring that the recipient receives the content exactly as you intended.
- Enhanced Deliverability: When your emails are DKIM-signed, email providers are more likely to trust them. This means your legitimate emails have a better chance of landing in your recipients' inboxes rather than getting lost in spam folders.
- Reduced Phishing: By reducing the effectiveness of phishing attacks, DKIM helps protect individuals and organizations from falling victim to scams that could result in data breaches or financial losses.
Conclusion
In an era where email fraud and phishing attacks are prevalent, DKIM serves as a crucial line of defense. It's like a digital fingerprint that assures the authenticity and integrity of your emails. While it may operate behind the scenes and go unnoticed by most email users, DKIM is a vital tool in the ongoing battle against cyber threats. Its use should be encouraged and embraced by individuals, businesses, and email service providers to create a safer digital communication environment for everyone. So, the next time you receive an email, remember that DKIM might be silently working to protect you from potential harm in the vast digital landscape.电子邮件已成为我们日常沟通不可或缺的一部分,从个人对话到商务交易。然而,随着这种便利性的到来,也伴随着电子邮件欺诈和网络钓鱼攻击的持续威胁。为了对抗这些威胁并确保您的电子邮件的真实性,有一个简单但重要的工具,称为SPF或Sender Policy Framework。
电子邮件通信中的漏洞
为了理解SPF,我们需要简要了解电子邮件通信的工作原理。当您发送电子邮件时,它会经过多个服务器和网络,然后才能到达预期的收件人。在每个站点,恶意行为者可能会潜在地拦截、修改或伪造电子邮件。
SPF:电子邮件真实性的守护者
SPF,即Sender Policy Framework,是一种安全协议,充当守护者,保护您的电子邮件域免受网络犯罪分子利用以冒充您的身份。SPF通过检查电子邮件是否来自与发件人域关联的授权服务器来帮助验证传入电子邮件的合法性。
SPF的工作原理
SPF的工作原理相对简单:
- 发件人声明:域所有者(您或您的组织)发布DNS记录,指定哪些服务器被授权代表其发送电子邮件。此记录称为SPF记录。
- 接收电子邮件:当电子邮件由收件人的邮件服务器接收时,服务器会检查发件人域的SPF记录,以确认发送电子邮件的服务器有权这样做。
- 验证:如果发送服务器的IP地址与SPF记录中列出的授权IP地址之一匹配,则该电子邮件被视为合法并接受交付。否则,它可能会被标记为可疑或拒绝。
SPF的重要性
- 防止欺骗:SPF在防止电子邮件欺骗方面发挥着关键作用。它确保声称来自您域的电子邮件确实来自授权服务器,从而使网络犯罪分子更难以冒充您的身份。
- 提高电子邮件送达率:实施SPF后,电子邮件提供商更有可能信任您的电子邮件,从而提高送达率。您的合法电子邮件不太可能进入垃圾邮件文件夹。
- 减少网络钓鱼:通过使网络犯罪分子更难以冒充受信任的发件人,SPF有助于减少网络钓鱼攻击,从而保护个人和组织免受潜在损害。
- 品牌和声誉:SPF有助于维护您的电子邮件域的声誉。它向收件人保证您的电子邮件是合法的,从而加强对您的品牌或组织的信任。
结论
在电子邮件成为主要通信方式且基于电子邮件的威胁普遍存在的时代,SPF充当了抵御身份欺骗和欺诈的可靠盾牌。虽然它可能在幕后默默运行,但SPF是打击网络威胁的强大工具。强烈建议个人、企业和电子邮件服务提供商实施SPF,以增强电子邮件通信的安全性。因此,下次您发送或接收电子邮件时,请记住SPF正在努力保护您免受庞大的数字领域中潜在的电子邮件身份欺骗。
电子邮件是现代通信的命脉,但其普遍性也使其成为网络犯罪分子的主要目标,他们试图进行欺骗、诈骗或破坏。为了保护自己免受这些威胁并确保电子邮件的完整性,有一种强大的工具,称为DMARC,即基于域的消息身份验证、报告和符合性。
电子邮件身份欺骗的挑战
在深入了解DMARC之前,重要的是要了解与电子邮件相关的挑战。电子邮件在到达收件人时会经过多个服务器和网络,这为恶意行为者提供了操纵或冒充发件人的机会。
DMARC:您的电子邮件安全守护者
DMARC,即基于域的消息身份验证、报告和符合性,是一种全面的电子邮件身份验证协议,旨在打击电子邮件身份欺骗、网络钓鱼攻击和其他与电子邮件相关的欺诈行为。
DMARC的工作原理
DMARC建立在SPF和DKIM的基础之上,但它将电子邮件身份验证提升到一个全新的水平:
- 策略声明:域所有者(发件人)发布一个DNS记录,其中指定了如何处理来自其域的电子邮件,如果SPF或DKIM检查失败。此DNS记录包含DMARC策略设置。
- 接收电子邮件:当电子邮件由收件人的电子邮件服务器接收时,它会像往常一样执行SPF和DKIM检查。如果这些检查失败,服务器将参考发件人的DMARC记录。
- DMARC验证:DMARC指示收件人的服务器如何处理未通过SPF或DKIM检查的电子邮件。发件人可以选择监视这些失败,将可疑电子邮件隔离或完全拒绝。
- 报告:DMARC通过生成电子邮件身份验证活动报告来提供有价值的信息。这些报告有助于域所有者监控和改进其电子邮件安全性。
DMARC的重要性
- 防止身份欺骗:DMARC是一种强大的防御手段,可以防止电子邮件身份欺骗。它可确保声称来自您域的电子邮件确实是合法的,从而大大降低了网络犯罪分子冒充您的难度。
- 提高电子邮件可靠性:实施DMARC可以提高电子邮件的可靠性。电子邮件服务提供商更有可能将您的电子邮件识别为安全,并将其传递到收件人的收件箱。
- 降低网络钓鱼风险:DMARC是一种有效的威慑手段,可以防止网络钓鱼攻击。通过降低此类攻击的成功率,它可以保护个人和组织免受潜在的损害。
- 声誉管理:DMARC有助于保护您域的声誉。它可确保您的合法电子邮件不会被欺诈电子邮件破坏,从而维护您品牌或组织的信任度。
结论
在电子邮件威胁普遍且复杂的时代,DMARC已成为电子邮件真实性的终极守护天使。虽然它在后台默默地运行,但DMARC是打击网络威胁的强大工具。强烈建议个人、企业和电子邮件服务提供商实施DMARC,因为它为防止电子邮件身份欺骗并提高电子邮件通信的整体安全性提供了强大的防御。
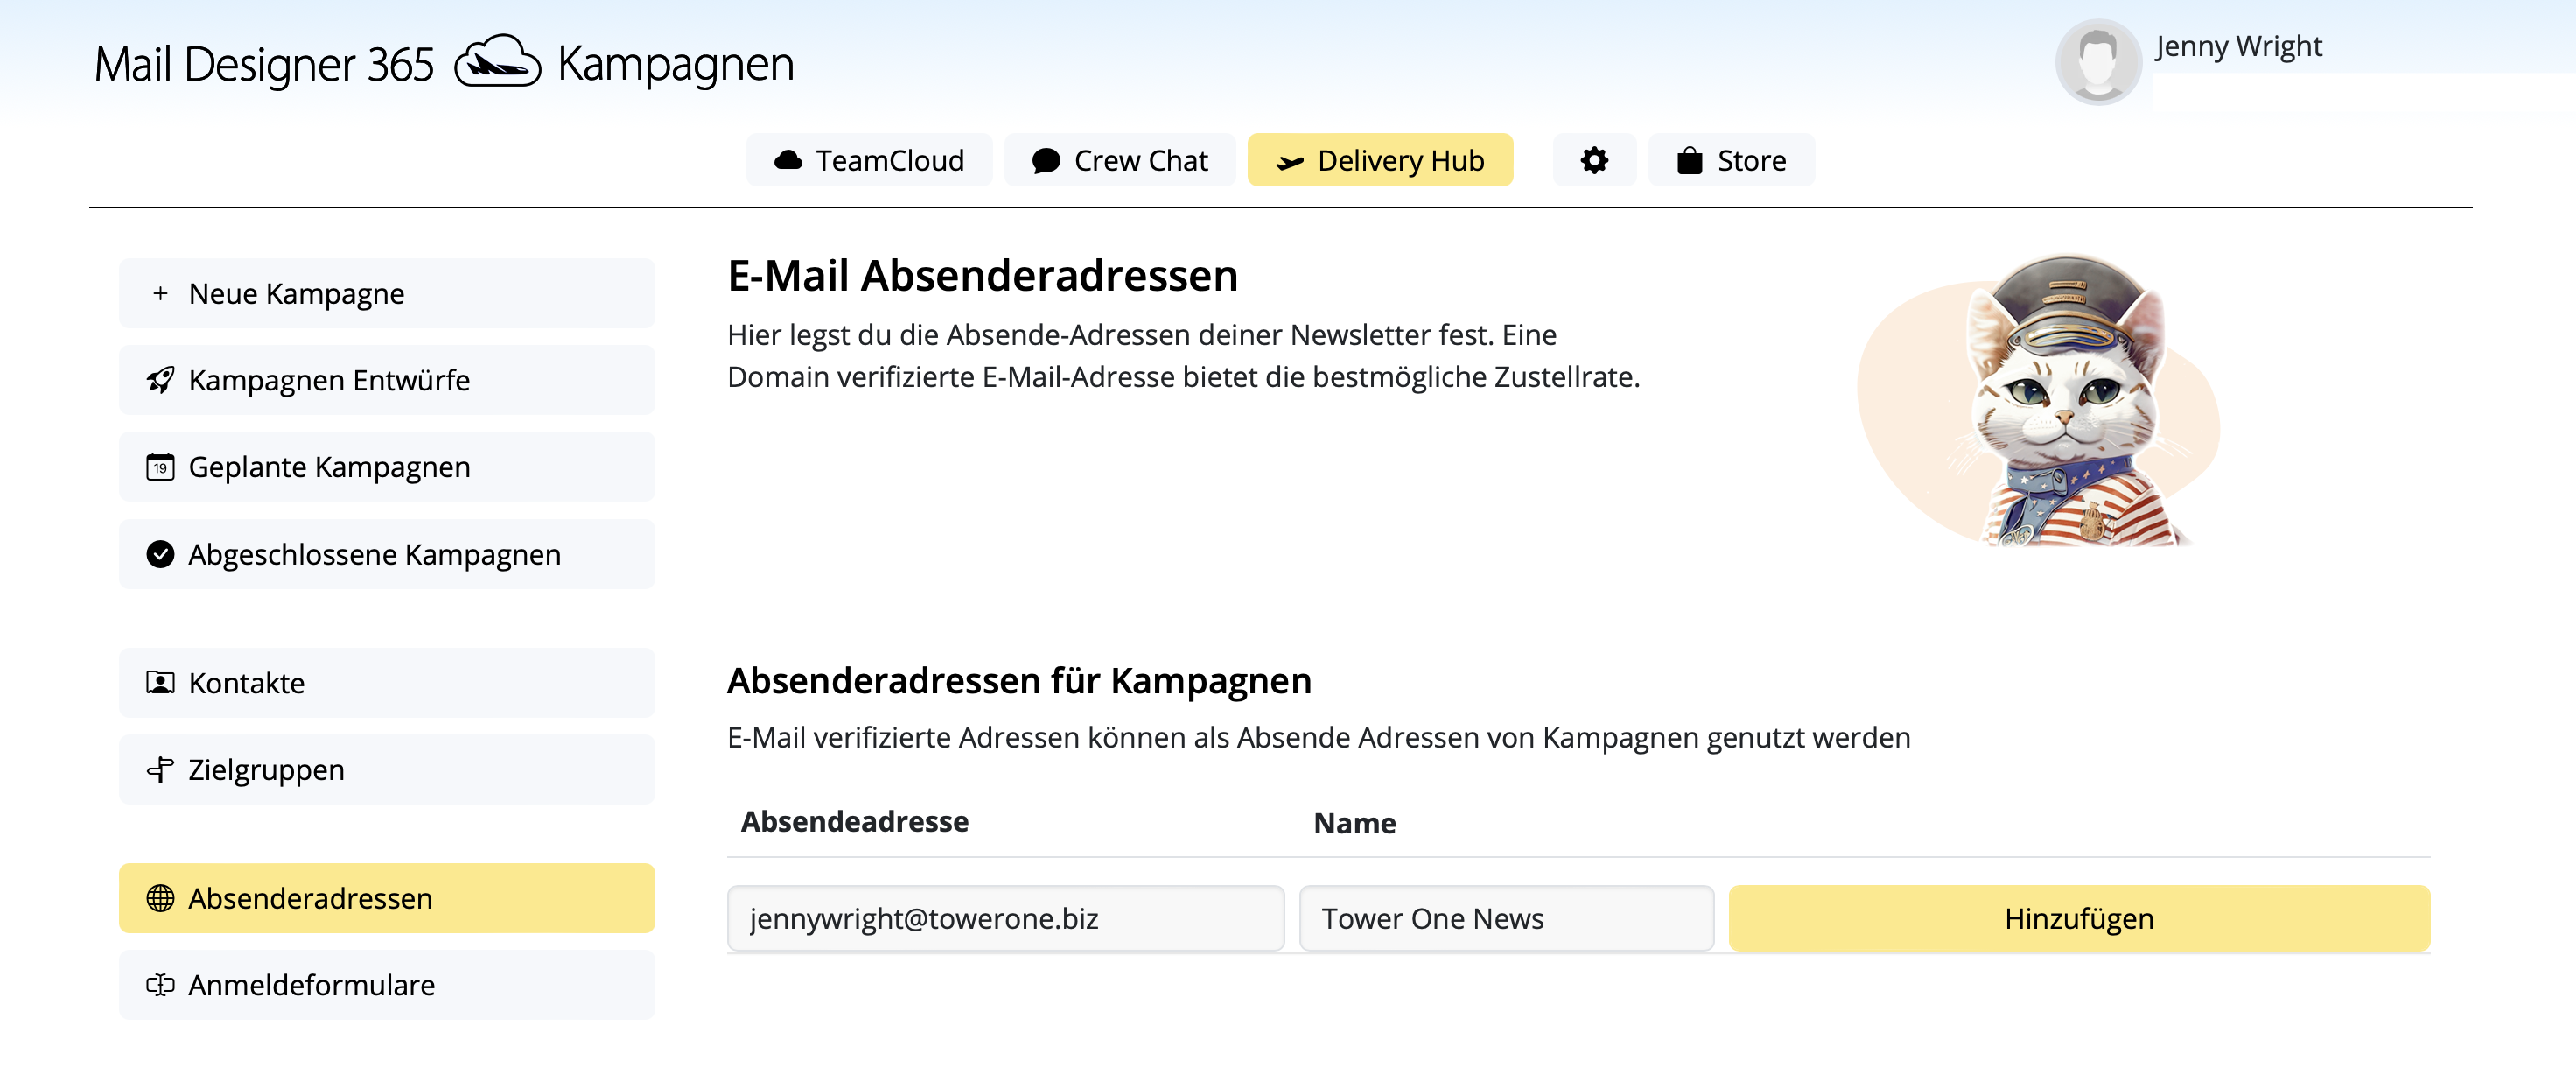
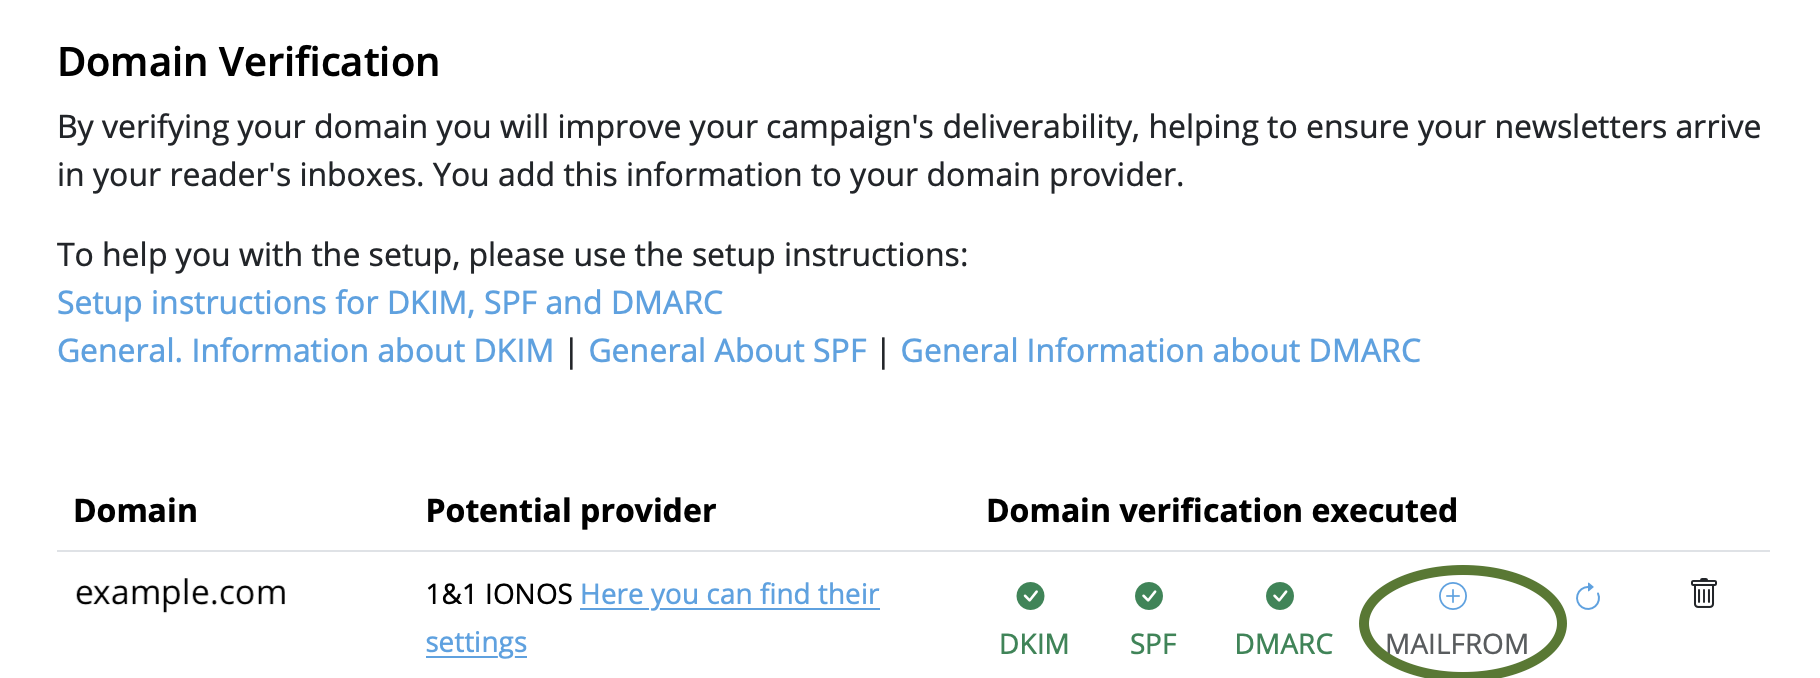
要发送您的第一封电子邮件活动,首先需要配置您的电子邮件地址和域名,以便 Mail Designer 365 Delivery Hub 可以代表您发送电子邮件。
配置涉及几个技术步骤。 这些步骤是必要的,因为主要的电子邮件服务提供商将验证是否配置了 DKIM、SPF 和 DMARC 身份验证以防止垃圾邮件。
我们尽一切努力使配置过程尽可能简单和无忧。 建议您将这三种方法添加到您的域中,以便您的电子邮件能够到达所有收件人。 如果您需要帮助,请联系您的 IT 管理员或我们的支持团队。
准备好了吗? 让我们开始吧!
步骤 1:添加您的电子邮件地址和域名
首先,请确保您已配置您的电子邮件地址和域名。 如果您尚未这样做,请参阅我们的 团队设置指南。
- 转到 设置 > 发件人地址。
- 添加新的发件人,输入您的电子邮件地址和域名。
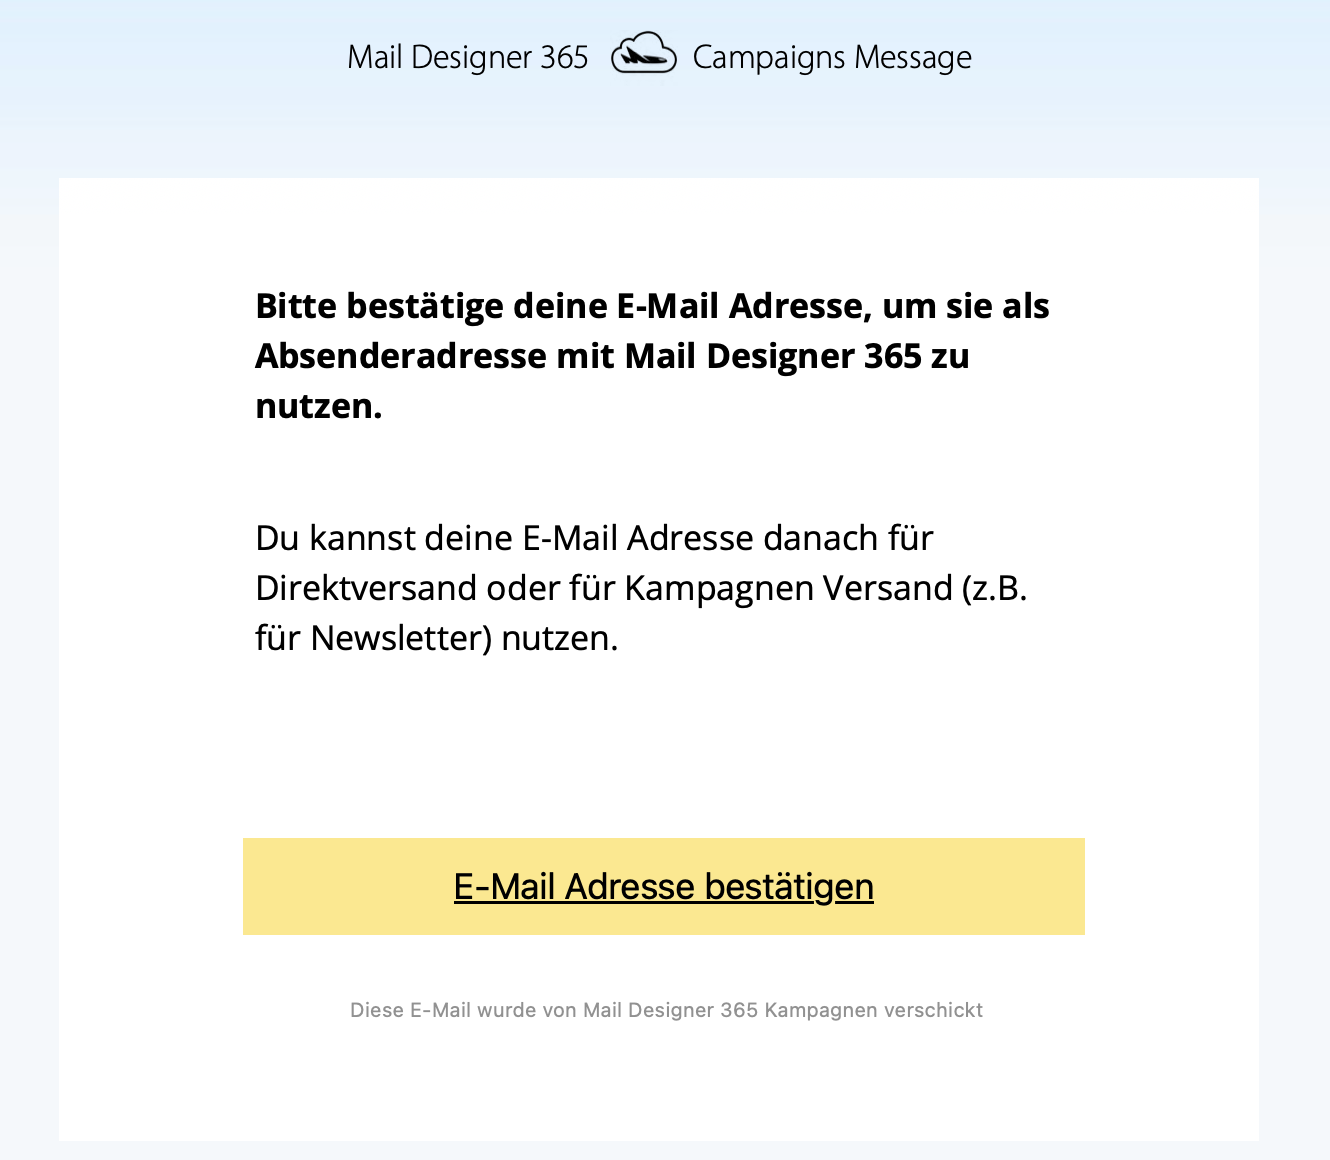
- 您很快会收到一封包含确认您输入的电子邮件地址的电子邮件。 单击链接以确认您的地址以进行发送。
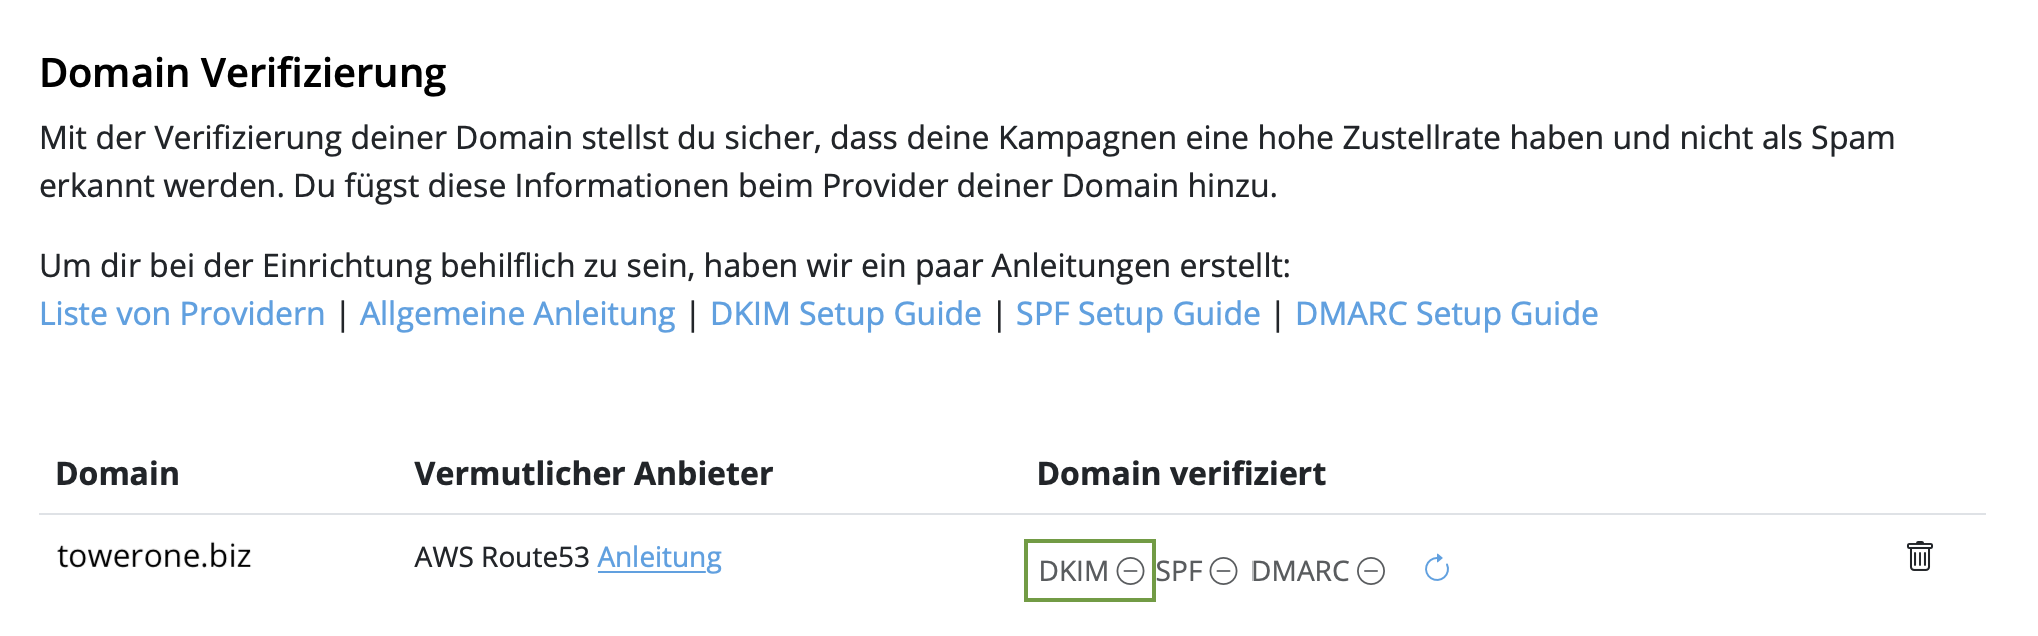
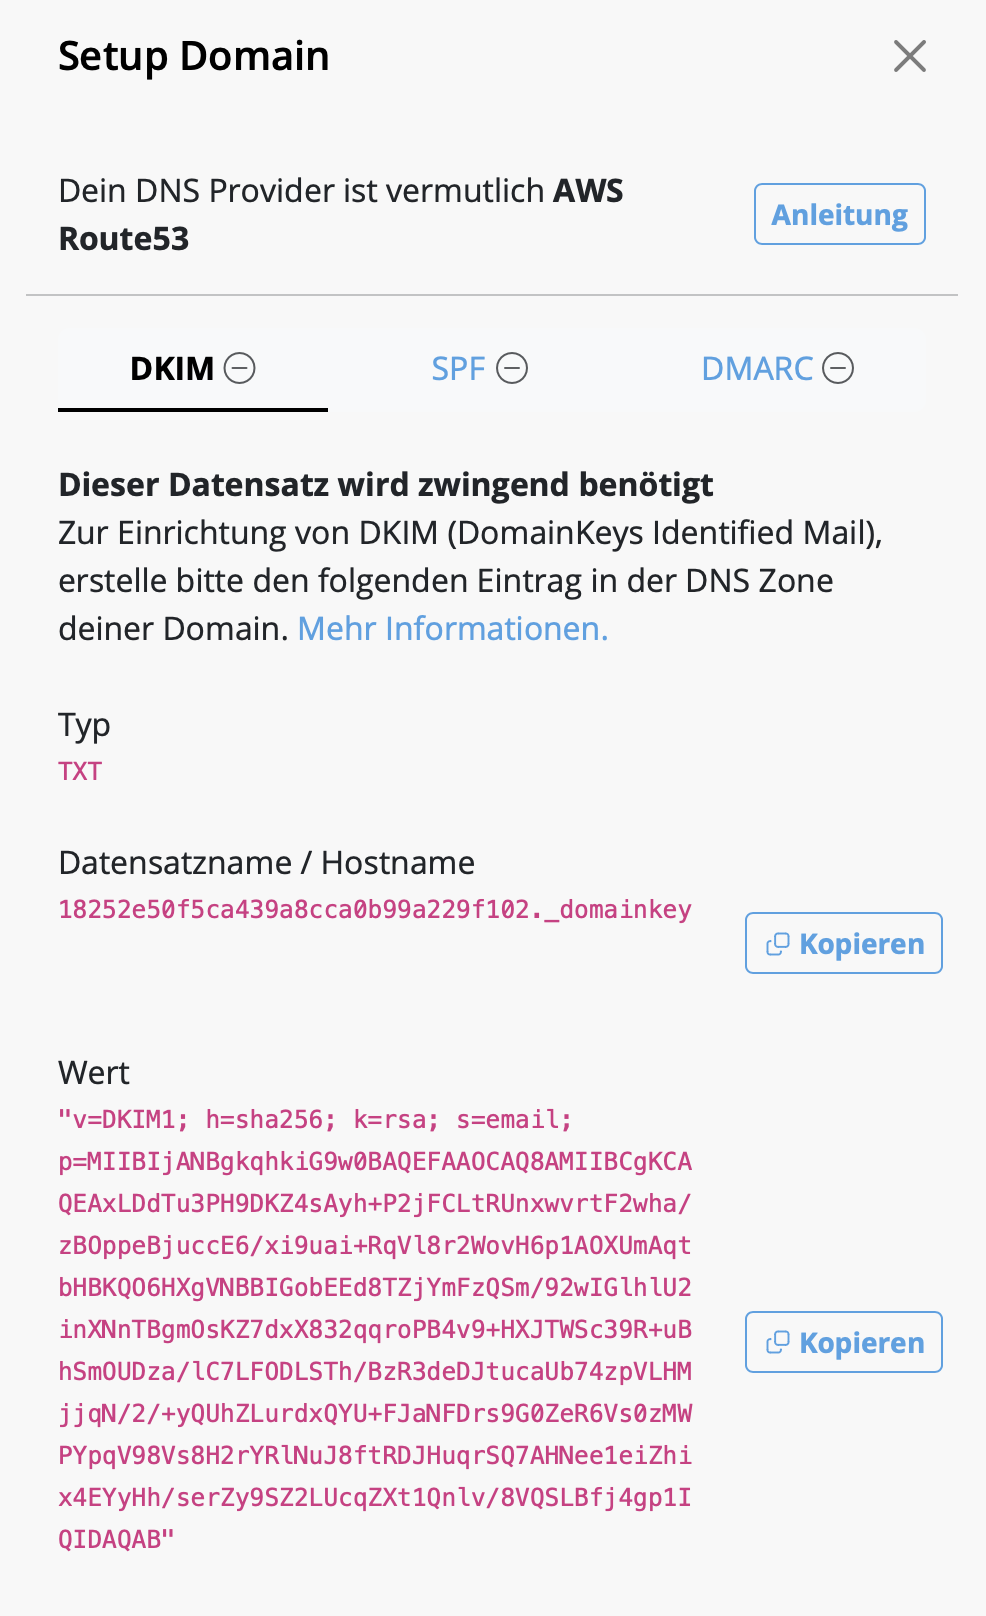
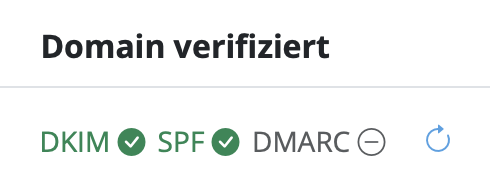
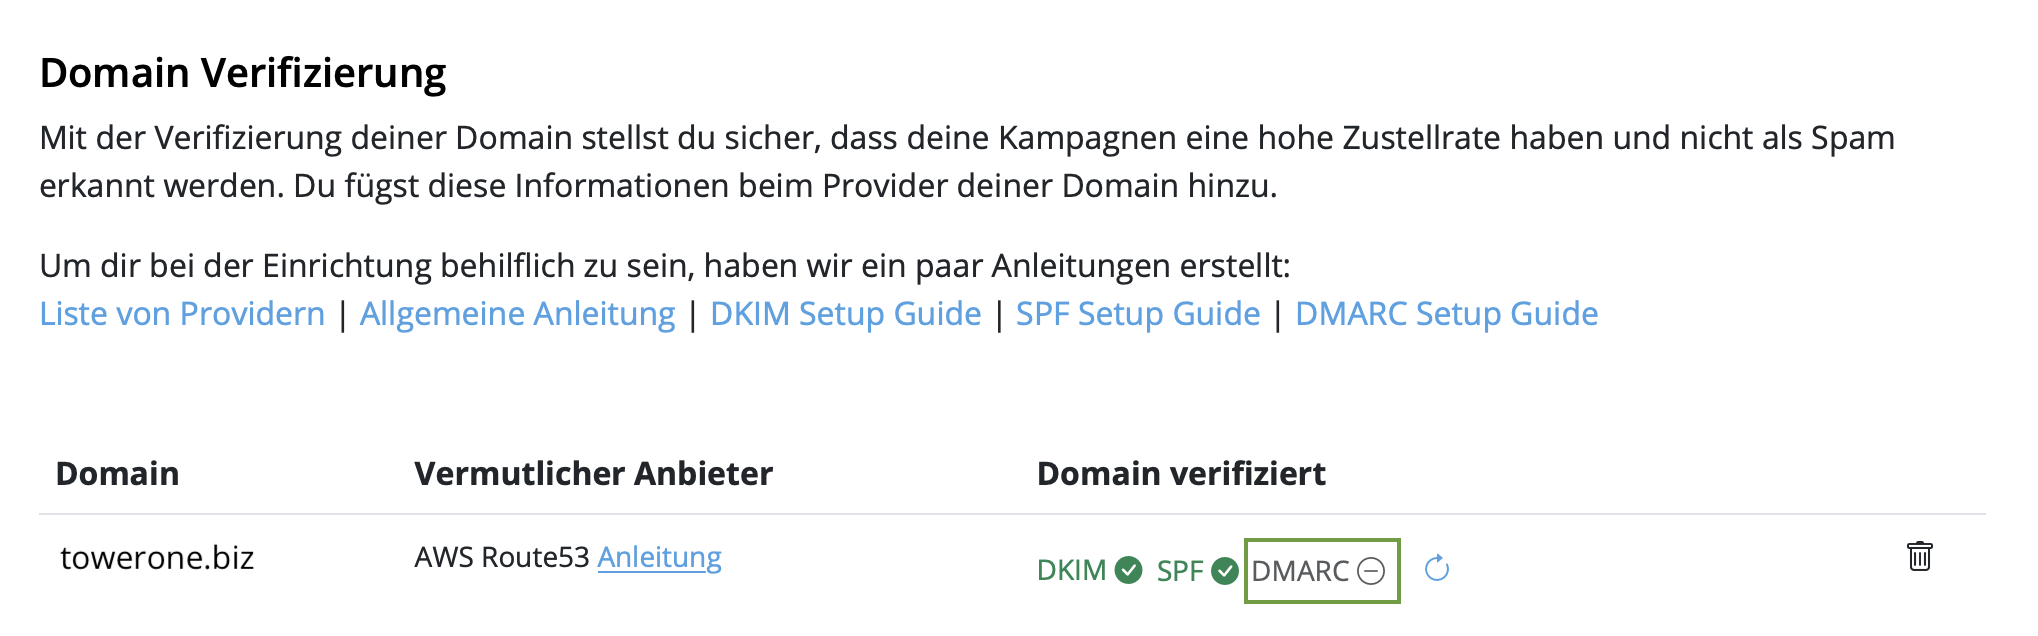
步骤 2:配置 DKIM 以防止您的电子邮件进入垃圾邮件
下一步是为您的域创建 DNS 记录以进行 DKIM(DomainKeys Identified Mail)身份验证。 请务必配置 DKIM,以防止您的电子邮件进入垃圾邮件。 您可以在本文中找到更多信息。。
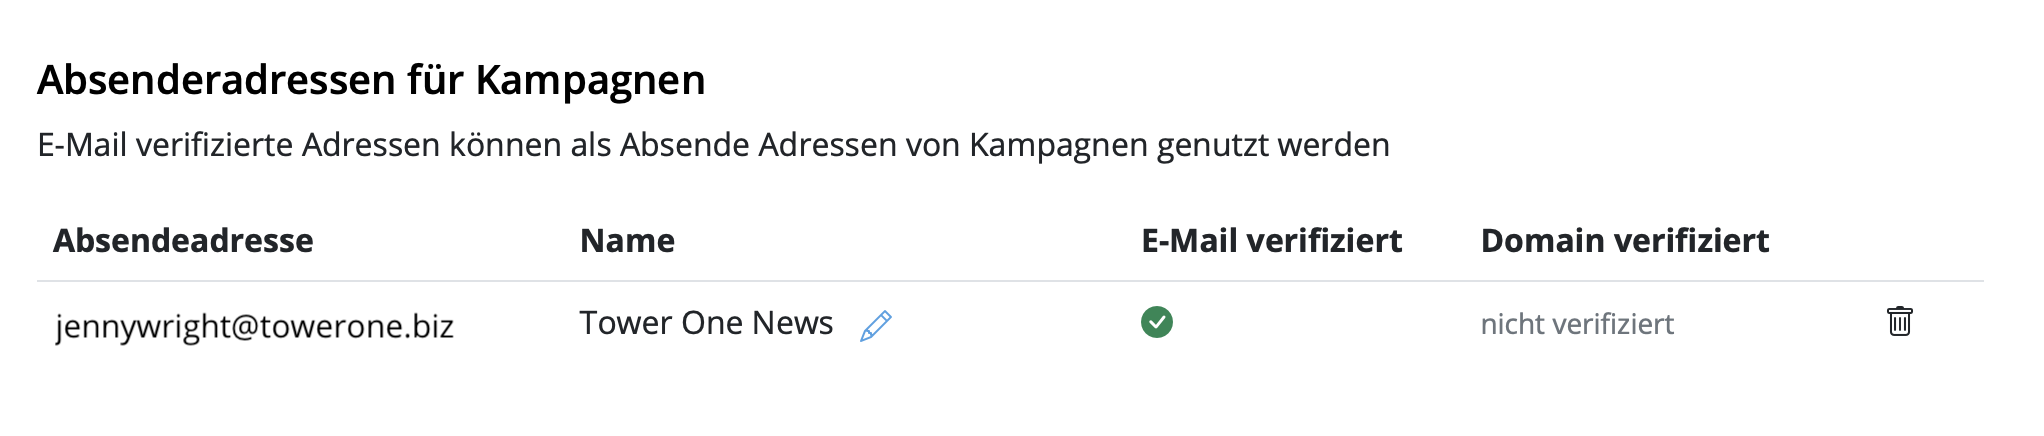
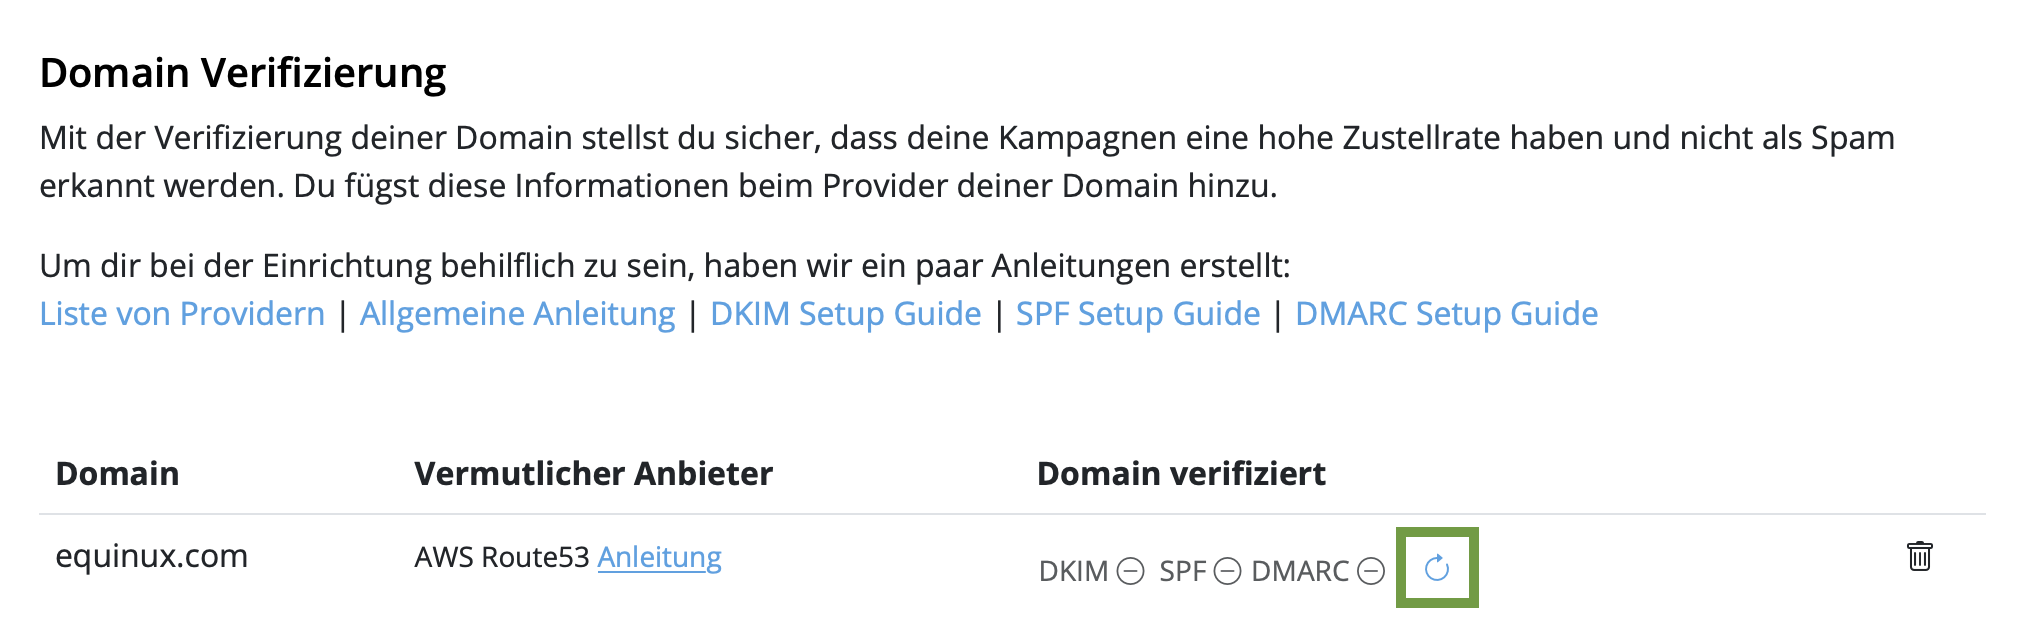
- 在项目设置中,您的域应该已经在“域验证”部分中可见。
-
如果您不是域配置的技术管理员:
-
单击 DKIM 符号在“已验证域”列中。
-
在打开的窗口中,您可以将域配置发送给您的 IT 管理员,只需输入电子邮件地址并发送即可。

- 您的 IT 管理员将收到一封包含详细说明的电子邮件。
-
单击 DKIM 符号在“已验证域”列中。
- 如果您是域配置的技术管理员:
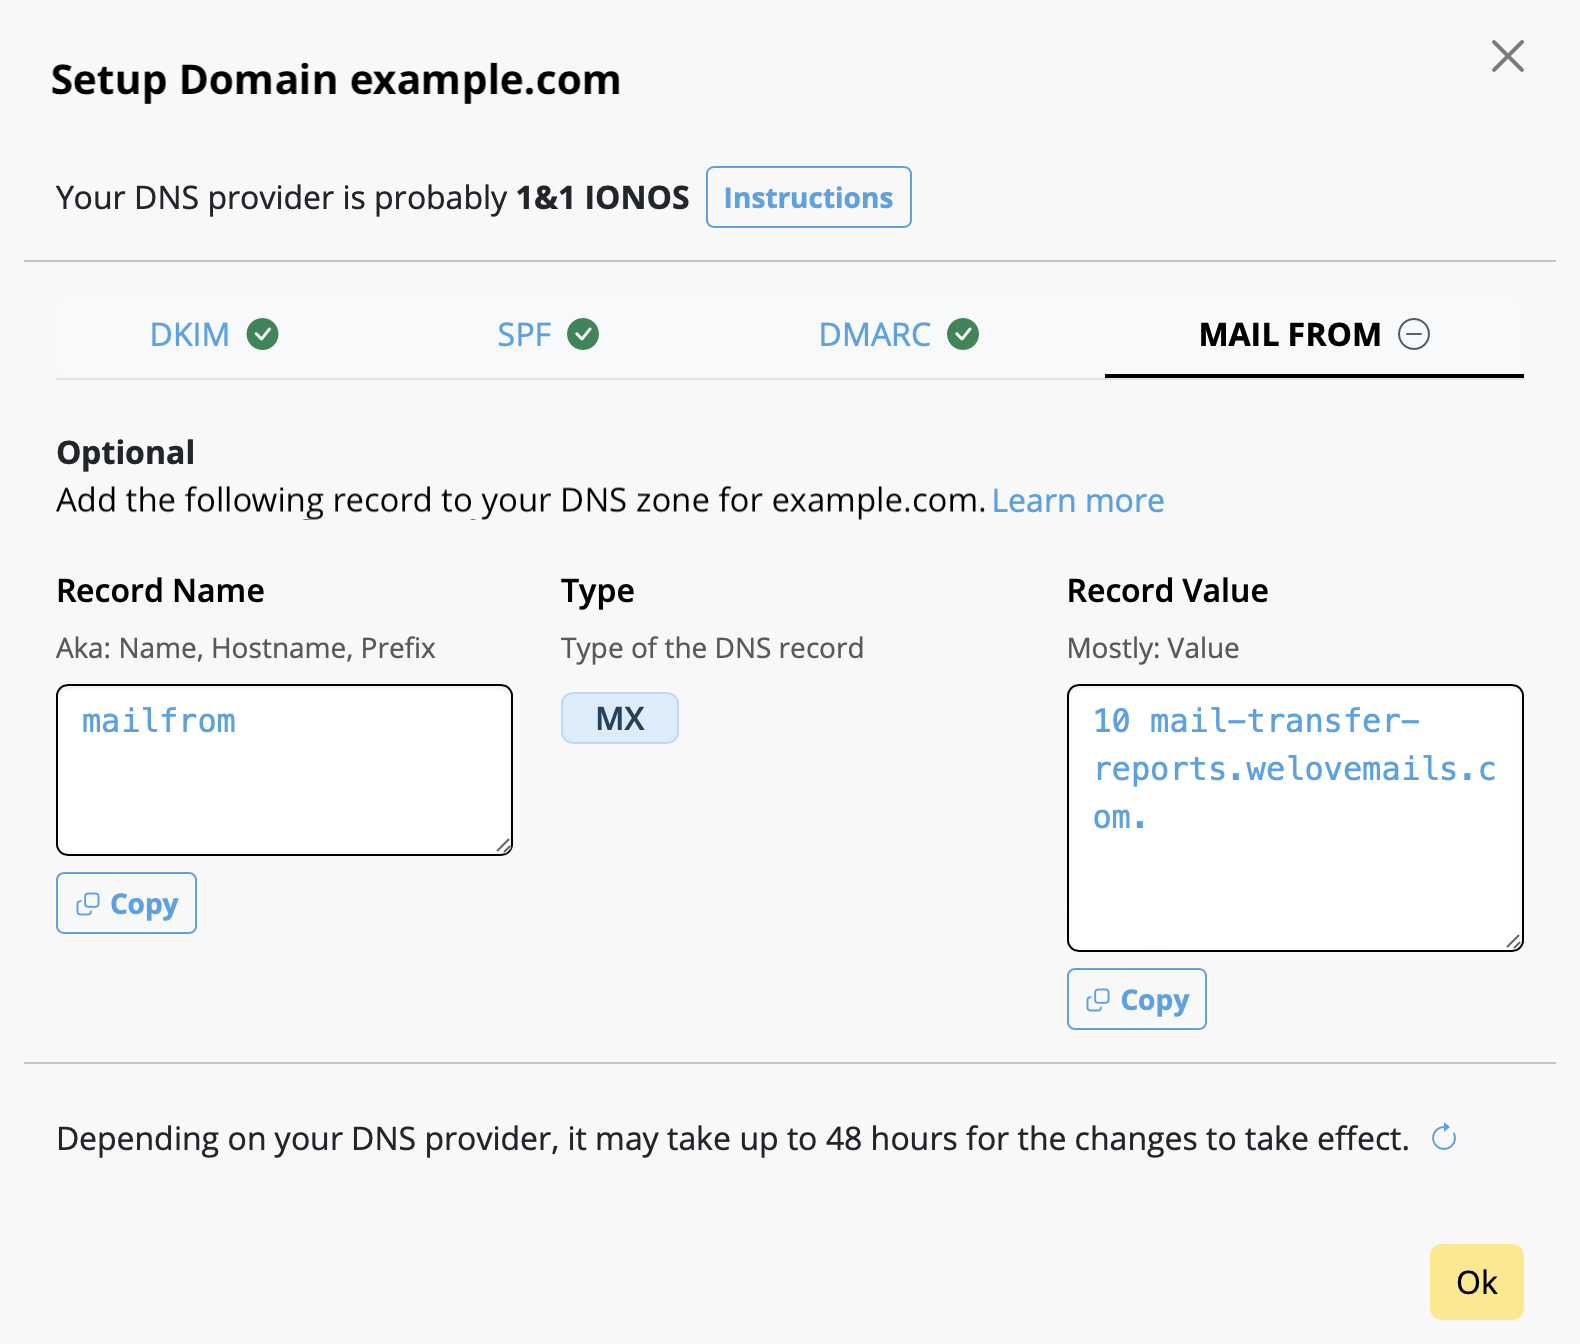
- 确定您的域的 DNS 提供商。 我们的系统应该已经识别了提供商并显示了链接到说明。
- 单击 DKIM 符号在“已验证域”列中。
- 向导将为您的域创建一个 DNS 记录,并显示记录的类型、名称和所需值。
- 根据您的 DNS 提供商,可能需要最多 48 小时才能在我们的系统中实施更改和其他系统。
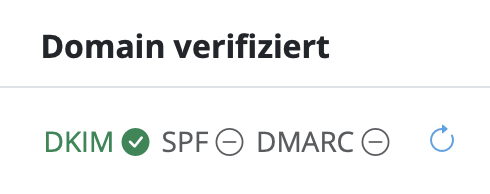
- 配置完成后并验证成功后,将在 DKIM 符号旁边显示一个绿色复选标记。
- 返回“发件人地址”。
- 在“已验证域”中找到您的域,然后单击 SPF 符号。
- 转到您的 DNS 提供商并为您的域创建一个 SPF 记录。 确切的步骤可能因提供商而异。 最好遵循说明。
- 注意: 您可能已经创建了一个 SPF 记录。 我们的系统将尝试包含必要的组件并显示基于您先前内容的完整数据。
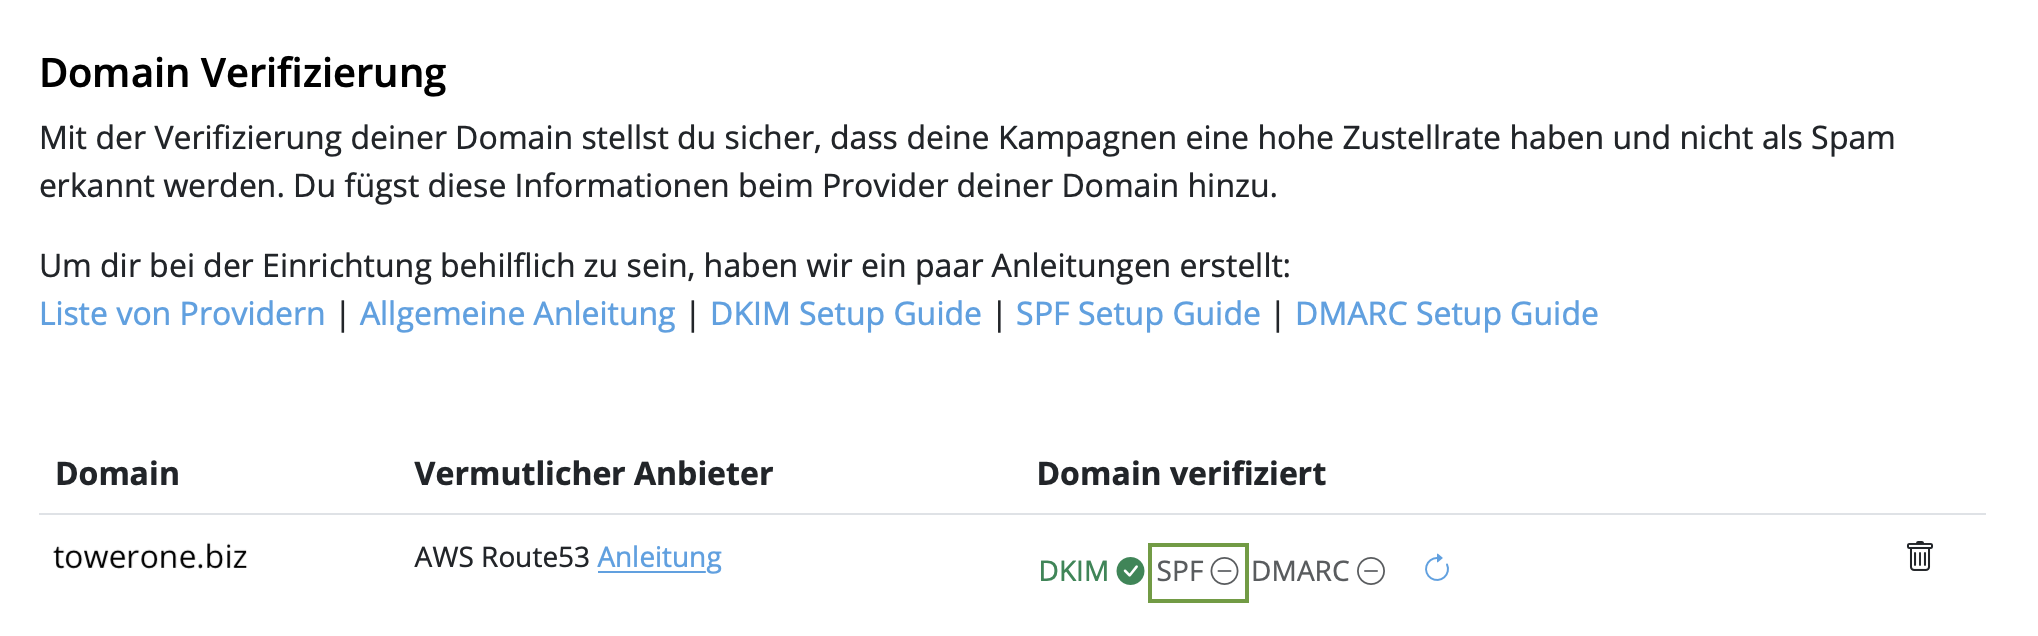
- 如果验证成功,将在 SPF 符号旁边显示一个绿色复选标记。
- 返回“发件人地址”中的“Delivery Hub”。
- 在“已验证域”中找到您的域,然后单击 DMARC 符号。
- 为您的域创建一个 DMARC DNS 记录。 此记录的详细信息取决于您的组织的策略。
- 使用建议的数据集或您自己的值。
- 如果 DMARC 验证成功,将在 DMARC 符号旁边显示一个绿色复选标记。
步骤 3:配置 SPF 以防止您的电子邮件进入垃圾邮件
现在,请确保您的电子邮件使用 SPF(Sender Policy Framework)正确验证。 SPF 有助于防止电子邮件欺骗,指定哪些服务器被授权代表您发送电子邮件。 您可以在本文中找到有关 SPF 的更多信息。。
步骤 4:配置 DMARC
配置 DMARC(基于域的消息身份验证、报告和一致性)不是必需的,但可以为您的电子邮件通信增加额外的安全层。 您可以在本文中找到更多详细信息。。
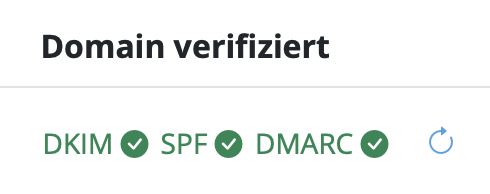
现在您已经完成了所有要求,并且您的电子邮件域已配置为通过 Delivery Hub 发送。 享受发送您的活动吧!
作为包含在您的 Mail Designer 365 设计计划中的免费活动计划的一部分,Mail Designer 365 横幅会显示在通过 Delivery Hub 发送的电子邮件的页脚中:
在切换到任何付费活动计划后,可以删除这些横幅。 登录到您的 my.maildesigner365 帐户,以探索 Mail Designer 活动计划选项。
- 自动取消订阅处理(Delivery Hub 会为您删除已取消订阅的联系人)
- 干净的电子邮件列表——您的活动仅发送给感兴趣的订阅者
- 更少的垃圾邮件投诉
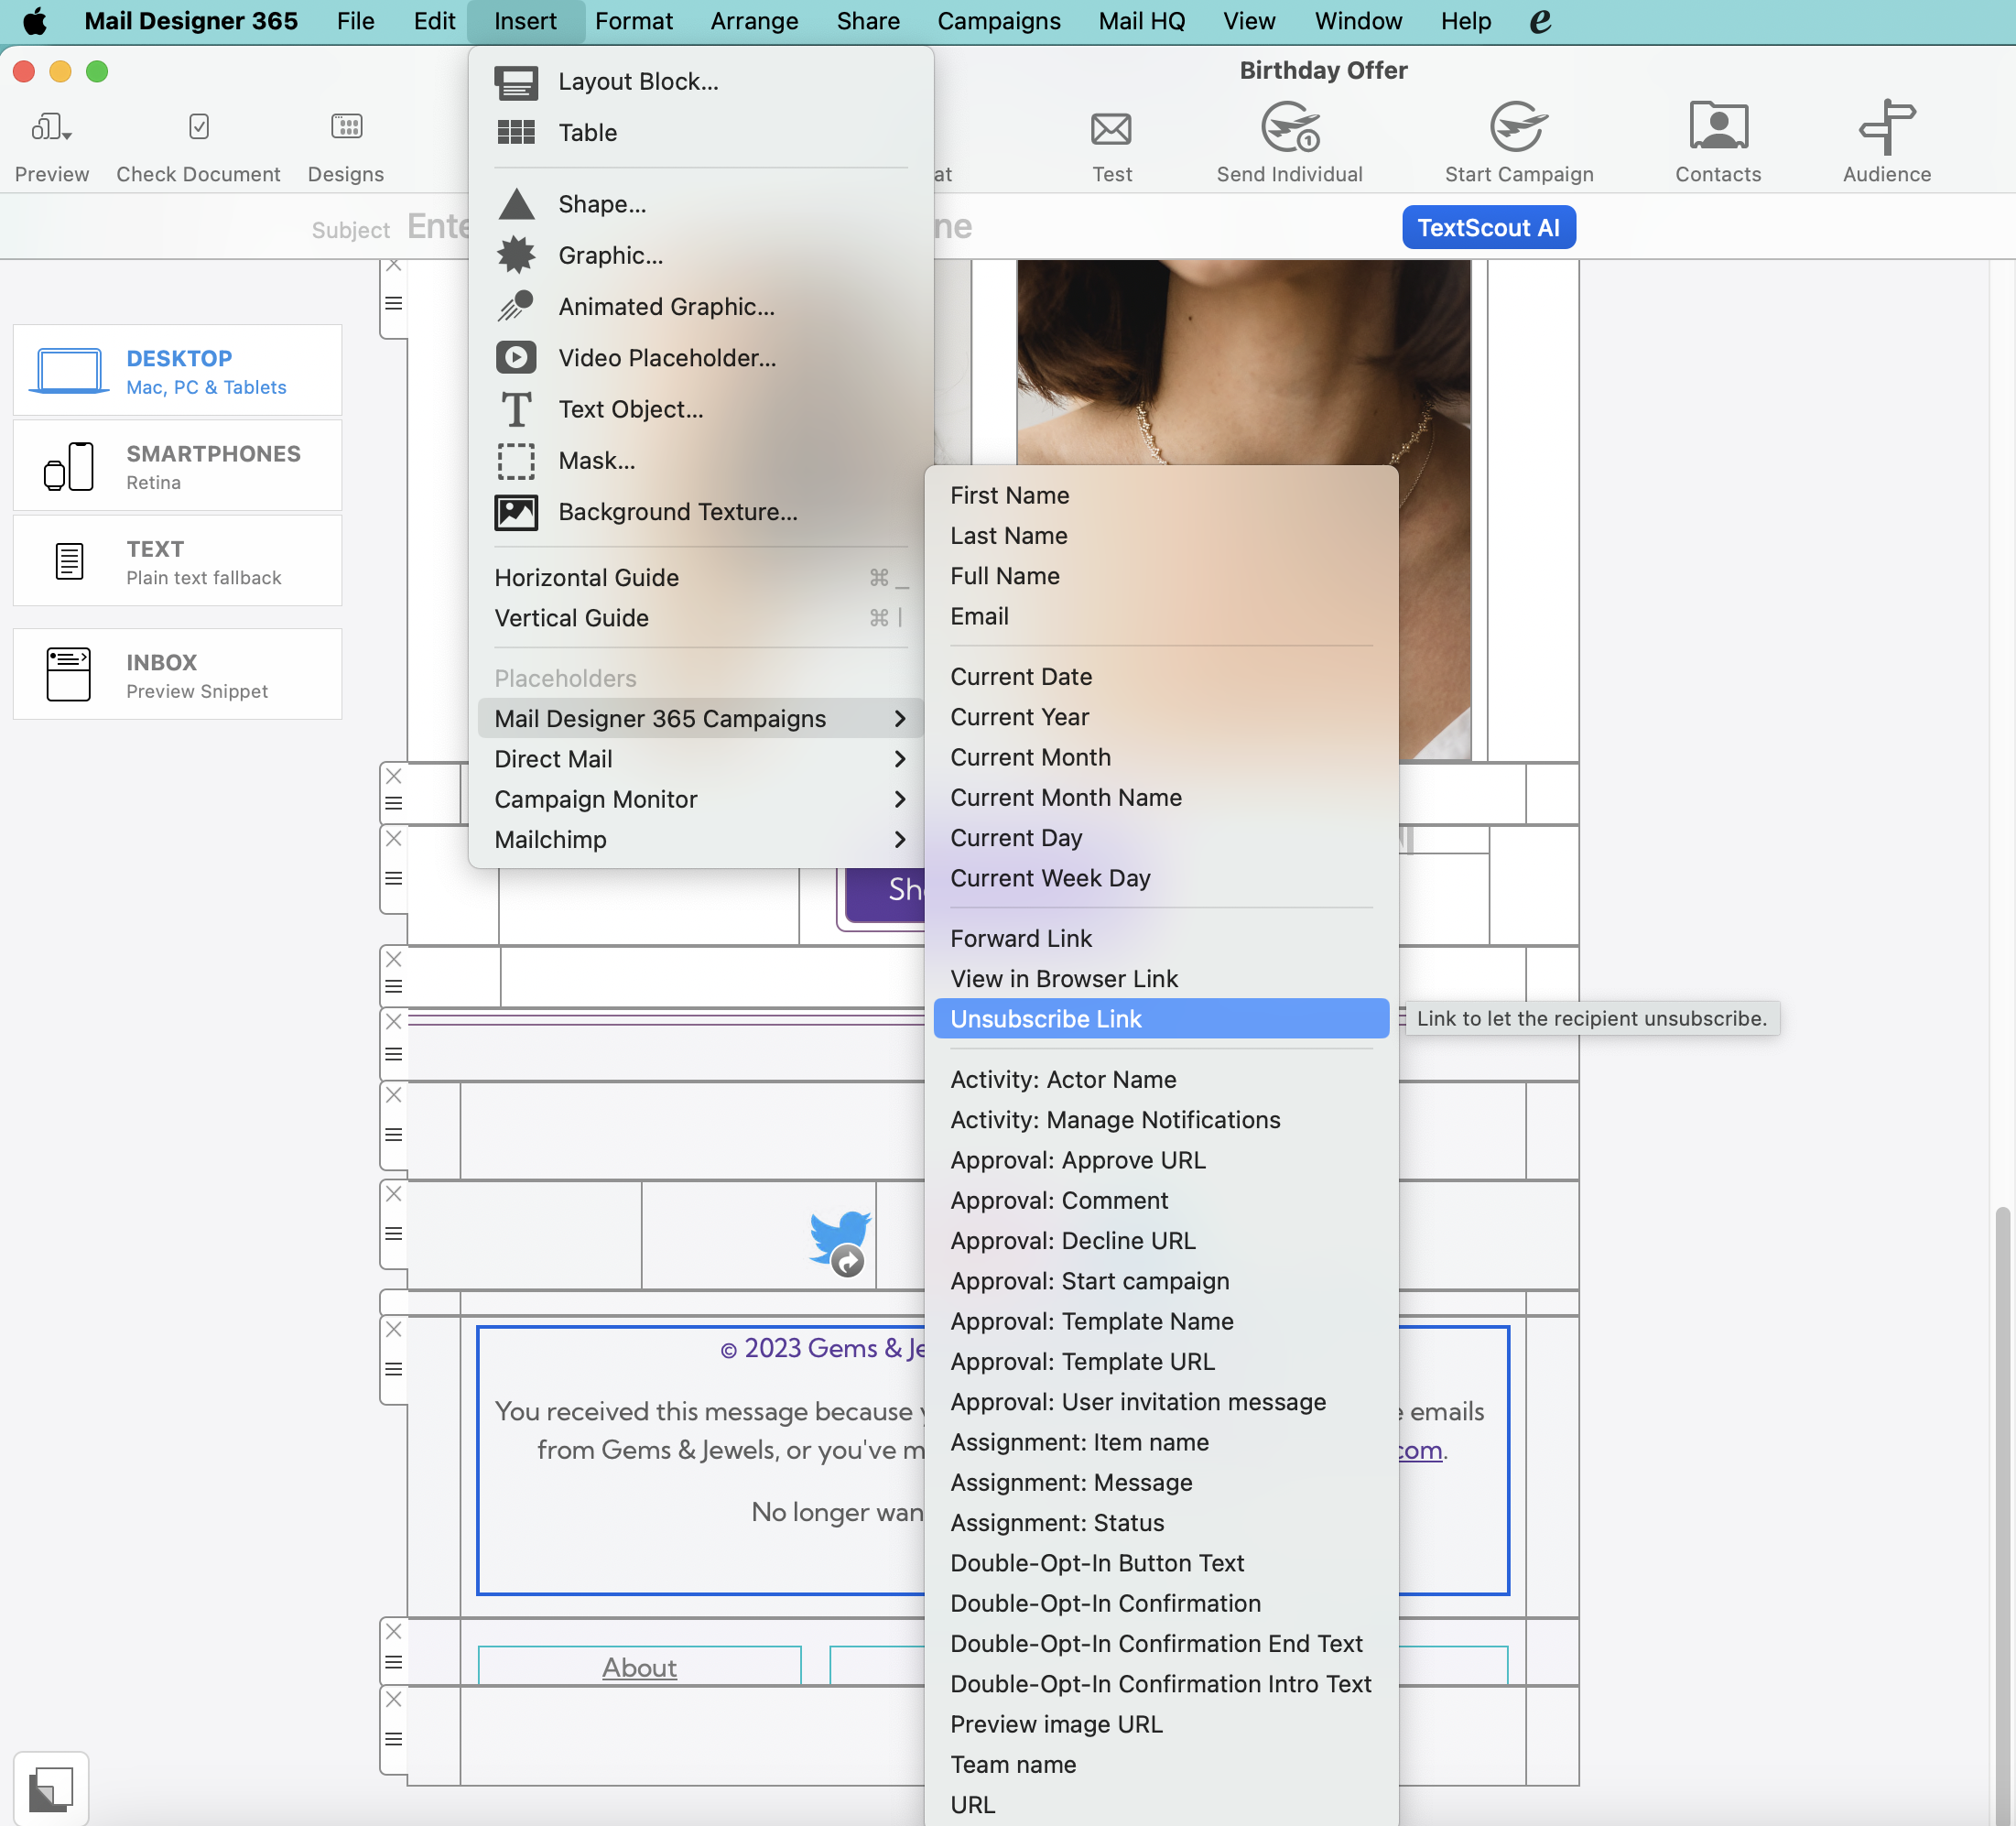
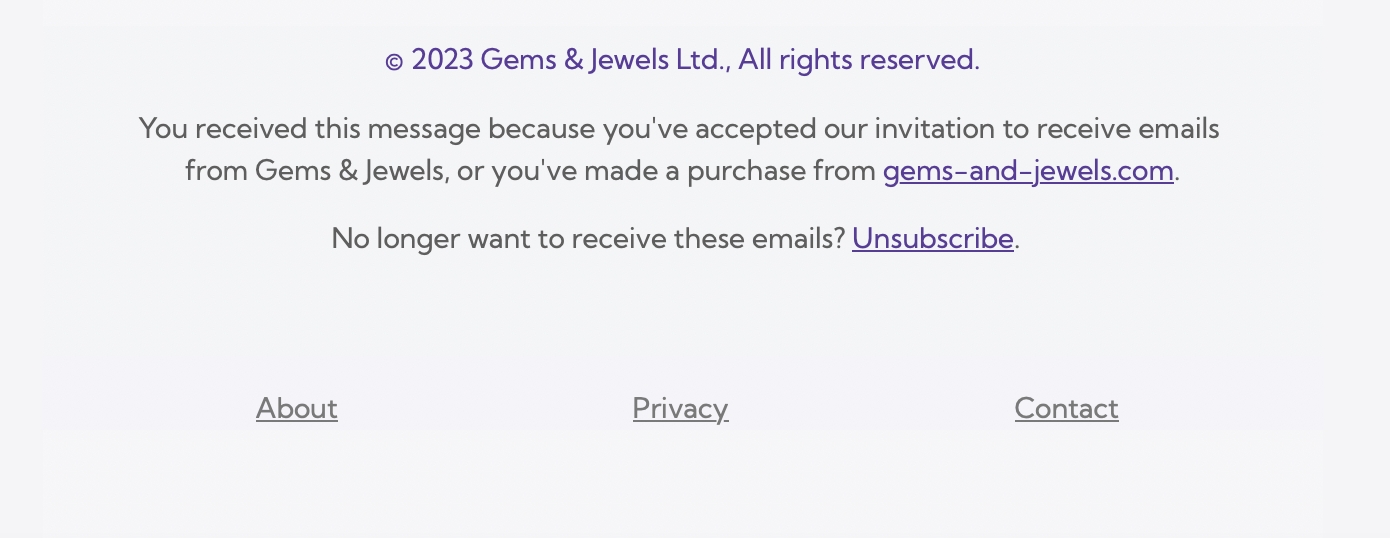
- 基于活动的取消订阅率跟踪 如何在您的电子邮件设计中插入取消订阅占位符 要向您的电子邮件添加取消订阅链接,请单击您设计中的文本区域(例如,在电子邮件页脚中),然后转到应用程序菜单并选择插入 > Mail Designer 365 活动 > 取消订阅链接:
当您通过 Delivery Hub 发送您的活动时,收件人会在您的电子邮件的页脚中看到取消订阅选项:
了解更多关于 Delivery Hub 的信息 →
Email,First Name,Last Name,Favorite Color,Location
miller@example.com,Peter,Miller,blue,New York
smith@example.com,Jody,Smith,red,San Francisco
了解一下:您可以随时使用额外的列重新导入 CSV,以增强您的联系人。所有新的占位符都将附加到您的联系人。 需要帮助?在此处下载示例 CSV 文件以供参考: '>Mail_Designer_365_Campaigns_Email_Import_Example.csv
1. Neue E-Mail-Kontakte hinzufügen
Add contacts in Mail Designer Campaigns: https://my.maildesigner365.com/team/deliveries/contacts/add Email addresses can be added via copy and paste or via CSV file.Add contacts via copy and paste
Insert your email addresses into the field separated by a comma or return. To start with, we are only using the newsletter addresses for the “Women” newsletter.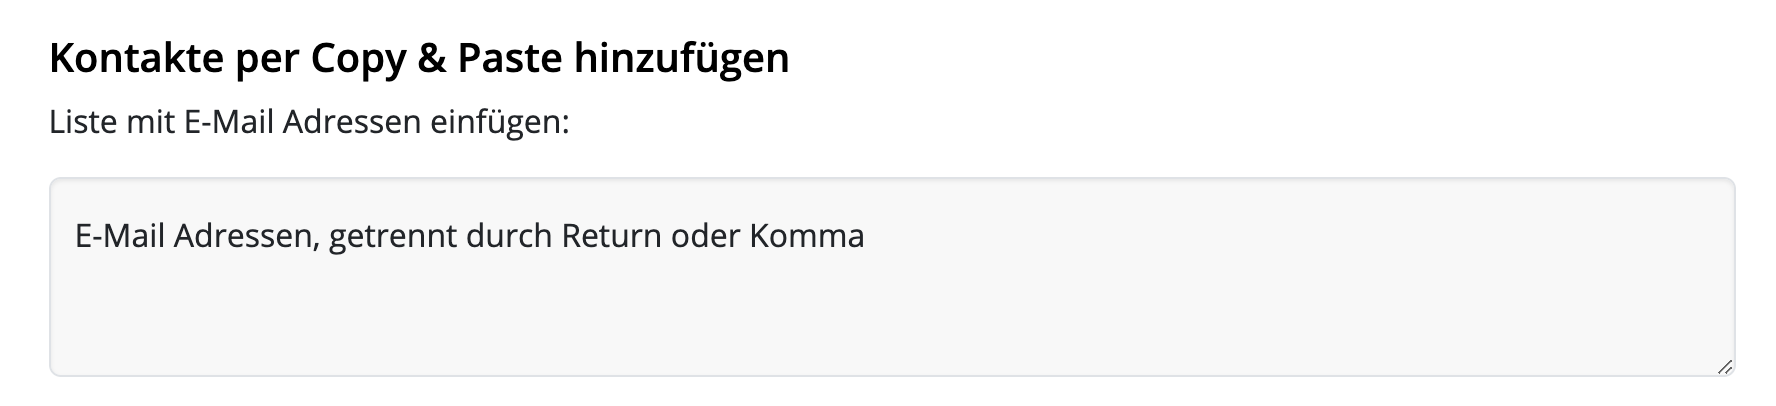 Then select below:
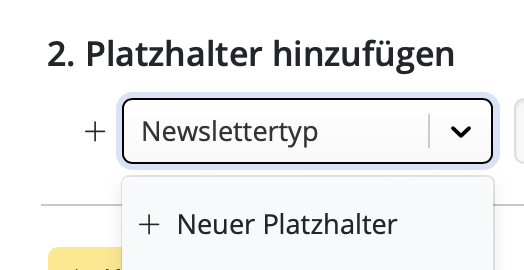
"Add placeholder"
Then select below:
"Add placeholder"
 Now you can assign a placeholder name.
What are placeholders? Placeholders are used so that we can later filter contacts according to their characteristics – for example, if we want to identify all contacts who are interested in women's fashion. Placeholders can be understood like columns in an Excel table.
In this example, we will call the placeholder “Newsletter Type”. The new placeholder is then created by clicking on “New placeholder: + Newsletter Type”.
Now you can assign a placeholder name.
What are placeholders? Placeholders are used so that we can later filter contacts according to their characteristics – for example, if we want to identify all contacts who are interested in women's fashion. Placeholders can be understood like columns in an Excel table.
In this example, we will call the placeholder “Newsletter Type”. The new placeholder is then created by clicking on “New placeholder: + Newsletter Type”.
 We can now assign a placeholder value: “Women”:
{placeholder+value-de.png}
Finally, click on "+ Add Contacts" to import all contacts and assign them the placeholder value “Women”. This way, we can later see that these contacts are interested in women's fashion.
We can now assign a placeholder value: “Women”:
{placeholder+value-de.png}
Finally, click on "+ Add Contacts" to import all contacts and assign them the placeholder value “Women”. This way, we can later see that these contacts are interested in women's fashion.
Add more contacts
Anschließend wiederholen wir das ganze für die "Männer" und "Kinder" Newsletter. Wir nutzen jeweils den bereits angelegten Platzhalter "Newslettertyp", hinterlegen dort aber neue Werte "Männer" und "Kinder".Important information:
- Gibt es eine E-Mail Adresse bereits in den Kontakten, wird sie nicht neu importiert, wohl aber der Platzhalter und sein Wert hinzugefügt. Man kann also gefahrlos immer wieder E-Mail Adressen hinzufügen – es entstehen niemals Duplikate.
- Ein Platzhalter kann mehrere Werte besitzen.
Beispiel: Frau Müller mit der E-Mail Adresse mueller@example.com interessiert sich sowohl für Frauen-, als auch für Kindermode und steht deshalb in beiden Listen. Importiert man sie einmal mit dem Platzhalter "Newslettertyp" und dem Wert "Frauen" und danach mit dem Platzhalter "Newslettertyp" und dem Wert "Kinder", so stehen bei dir danach beide Platzhalter-Werte für die Suche zur Verfügung:
我需要在发送后编辑链接时需要什么?
- 您不小心输入了错误的链接
- 您忘记更改链接,因为您复制了设计
- 您想更改链接,因为旧的URL不再存在(例如,限时优惠或直播)
如何更改电子邮件中的链接发送后
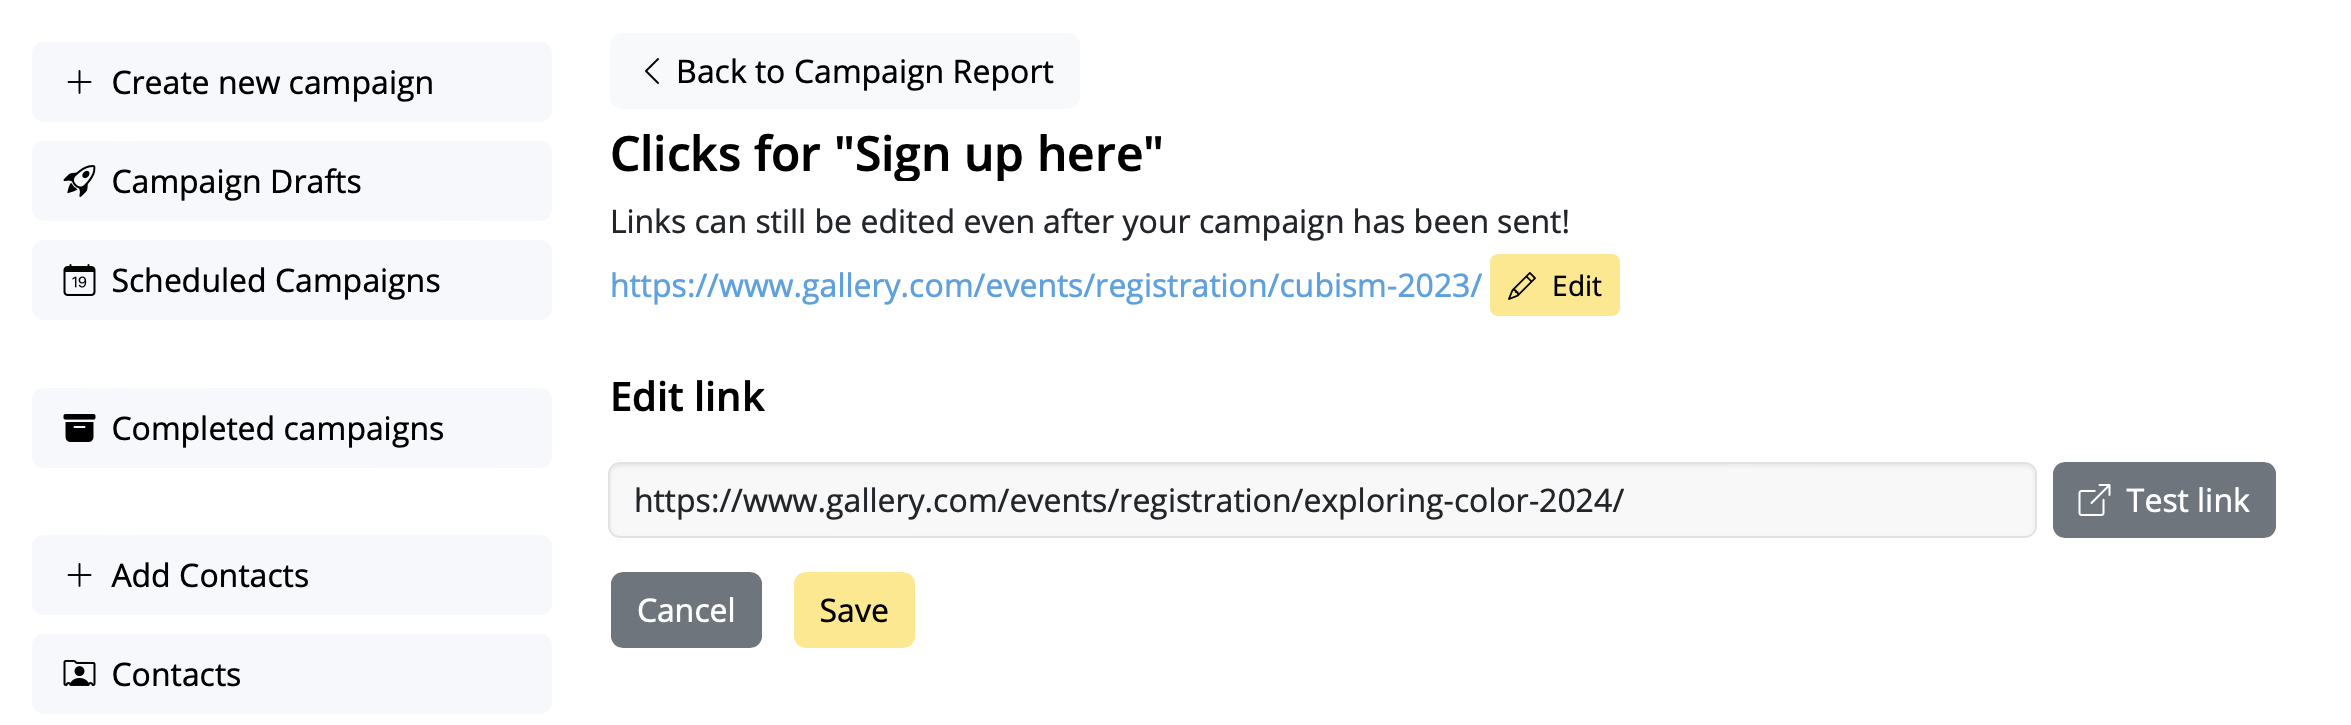
Mail Designer 365 Delivery Hub用户可以使用Link Rescue轻松更改电子邮件通讯链接,在发送活动后。 要开始,打开您选择的活动的分析视图并切换到链接概述选项卡: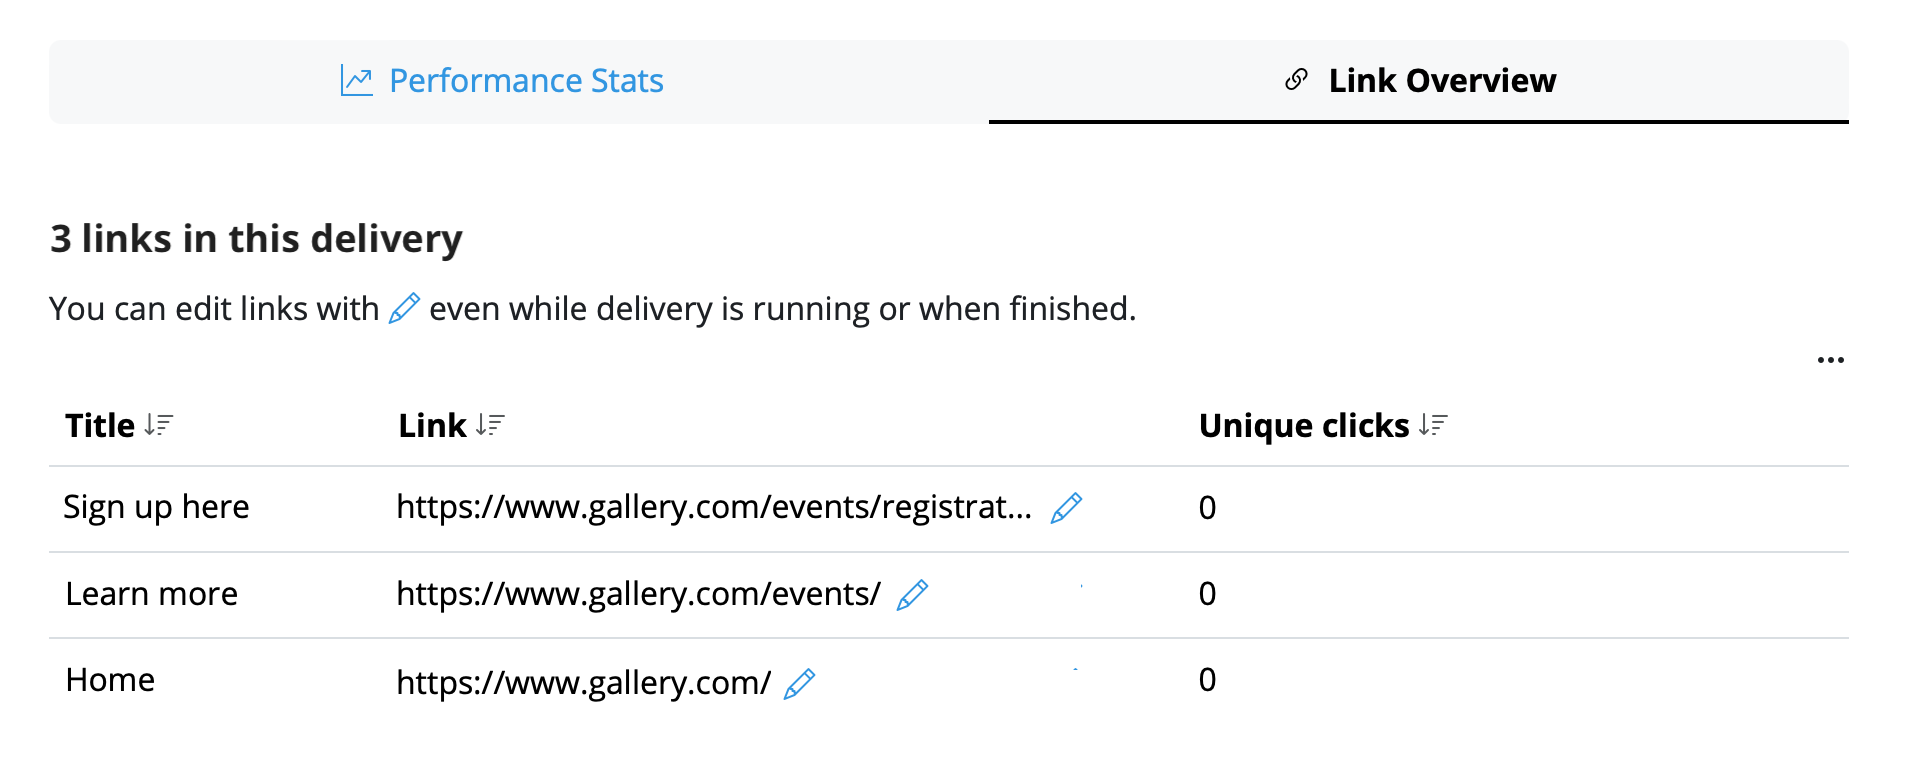 您可以在此处选择任何链接并随时编辑它。替换给定链接后,单击保存以更新所有收件人的更改,包括那些已经打开电子邮件的人!
 您的更改将立即同步,让您获得终极的安心。
重要:
Mail Designer 365 Link Rescue适用于拥有首尔计划或更高计划的Mail Designer Campaigns用户。查看所有计划层级 →
您的更改将立即同步,让您获得终极的安心。
重要:
Mail Designer 365 Link Rescue适用于拥有首尔计划或更高计划的Mail Designer Campaigns用户。查看所有计划层级 →
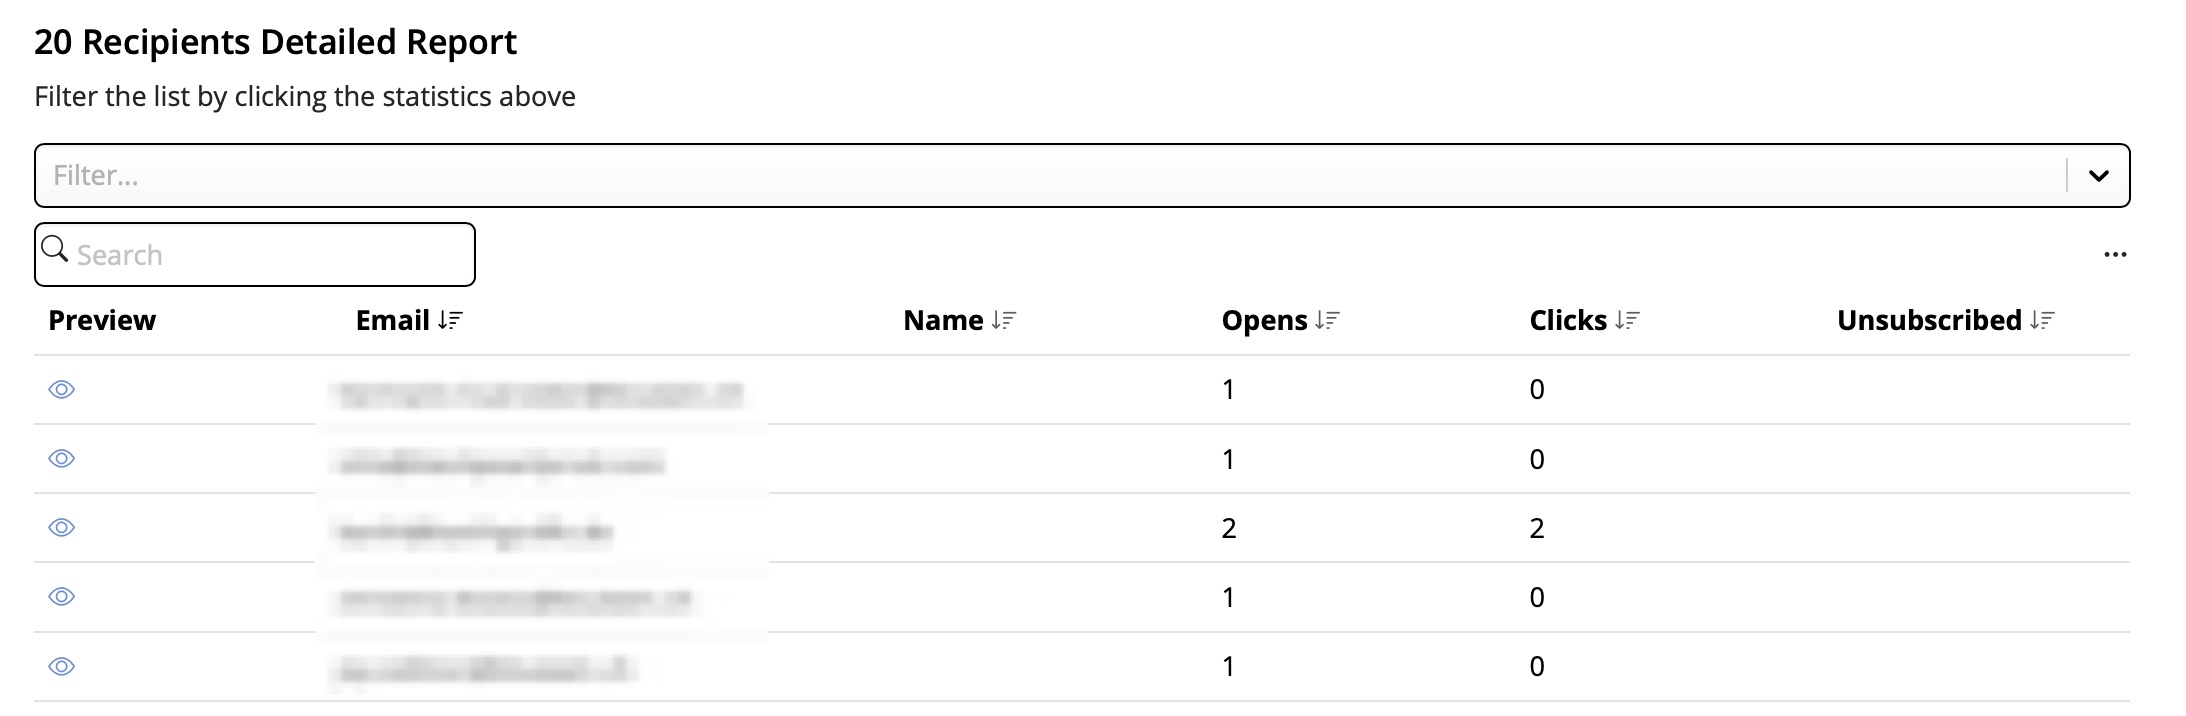
如何查看您的电子邮件活动报告
您已发送您的电子邮件活动,现在想了解其效果如何——没问题!Mail Designer Delivery Hub为您提供所有已发送活动的详细效果报告。
工作原理
您可以访问任何活动的报告,网址为https://my.maildesigner365.com/team/deliveries/campaigns/finished.
找到您选择的活动,然后单击统计信息图标以打开效果报告:
发送期间
一旦发送了电子邮件活动,您就可以使用 Delivery Hub 的实时报告工具来跟踪您的新闻通讯的进度。这包括电子邮件传递、退回和打开。
摘要中的数字将随着您的电子邮件传递给目标群体而实时更新。
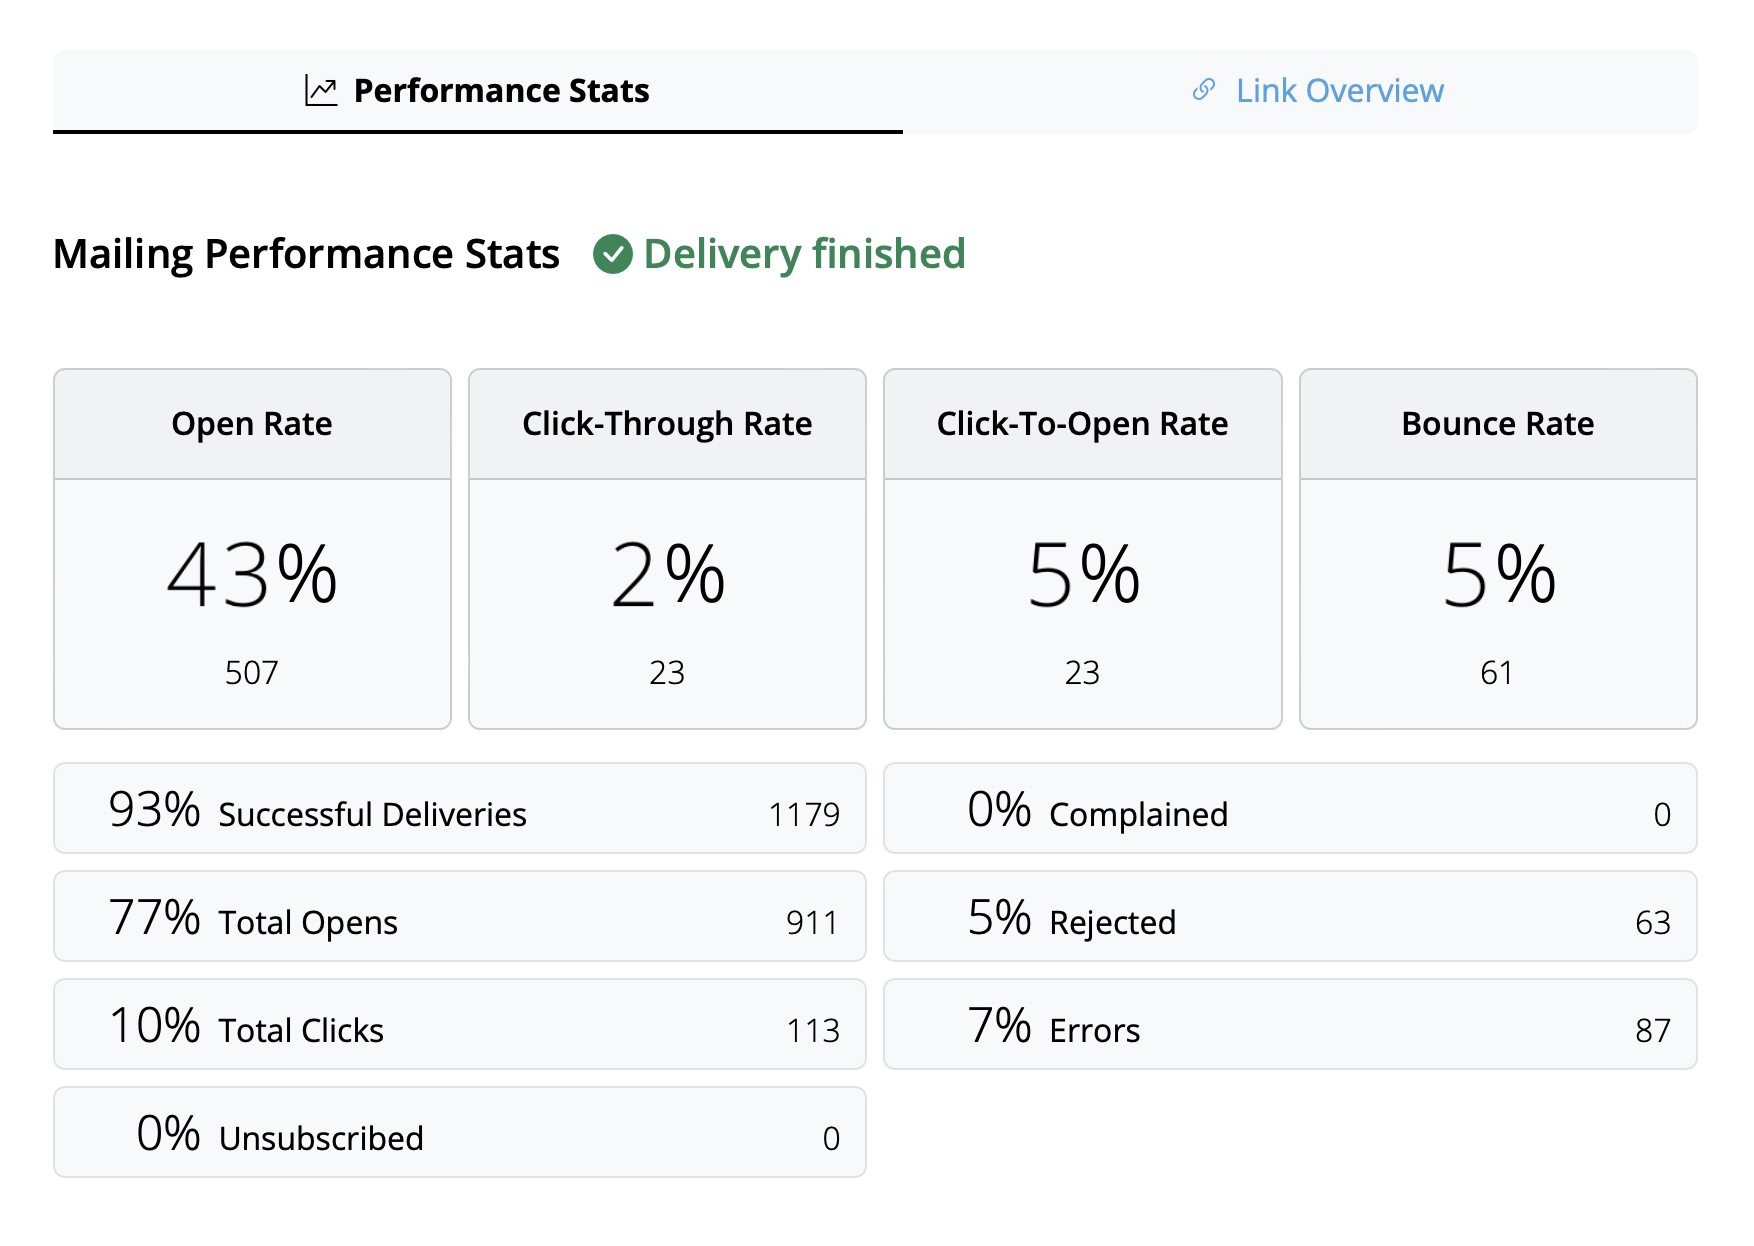
发送后
完成传递后,您可以查看所有活动统计信息的摘要。
提示:为了获得最佳效果,我们建议您在发送后 24 小时进行最终分析。这有助于确保所有收件人都有时间阅读和互动您的活动。
解读电子邮件指标
效果报告涵盖了广泛的分析数据,旨在帮助您更好地了解您的活动效果如何以及您可以改进的地方。
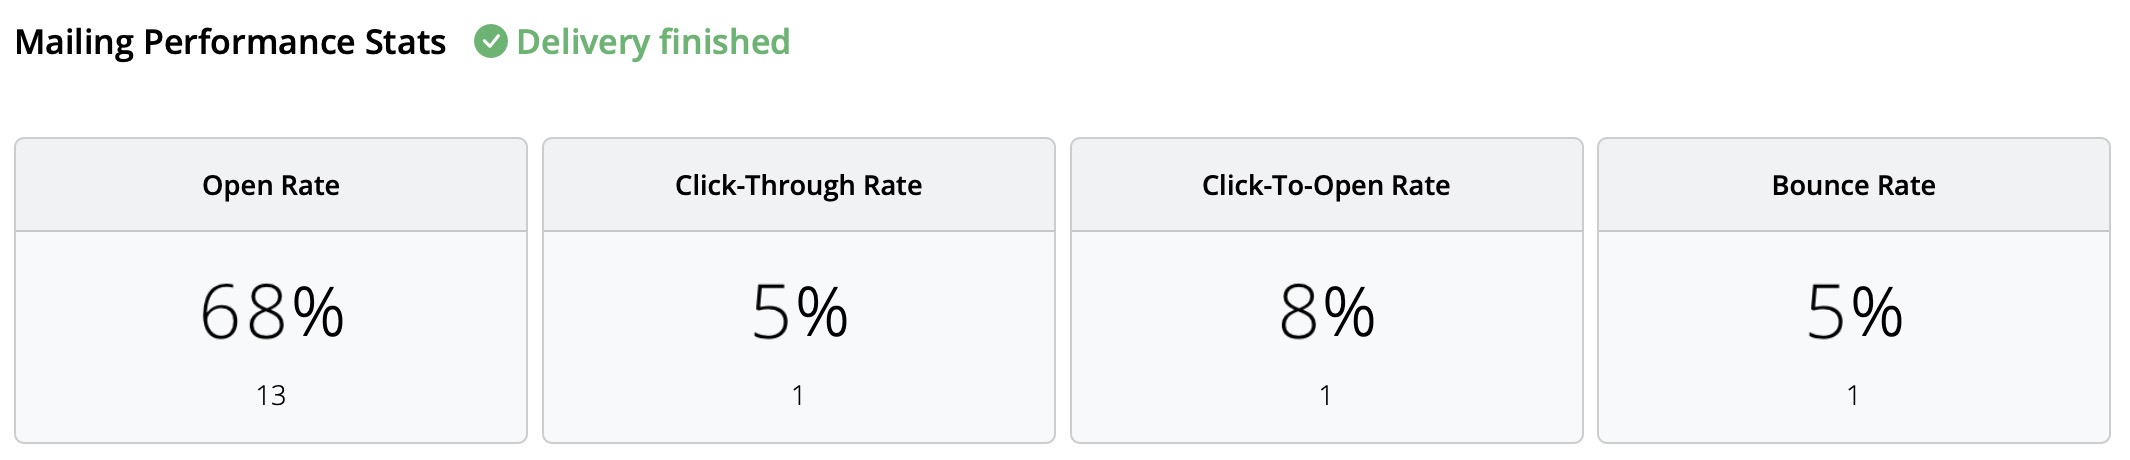
以下是重要电子邮件指标的细分,它们代表什么以及一些当前的行业基准:
- 打开率:您的电子邮件被打开的次数与成功传递的次数相比。基准可能会因行业而异,但任何高于 25% 的数字都可以被认为是良好的结果。
- 点击率:您的电子邮件中链接被点击的次数与成功传递的次数相比。这个数字通常比较低,所有行业的平均水平约为 2-3%。
- 打开后点击率:您的电子邮件中链接被点击的次数与电子邮件打开的次数相比。这有助于您了解您的电子邮件内容是否引起了读者的共鸣。一个好的目标是 10%。
- 退回率:未成功传递给收件人的电子邮件的百分比,例如因为电子邮件地址不正确或无效。这里,数字越低越好。任何高于 3-5% 的数字都应该引起关注。
- 退订率:在收到此电子邮件后退订您的电子邮件列表的收件人的百分比。您希望这个数字尽可能低,理想情况下为 0。但是,任何低于 0.5% 的数字都可以被认为是良好的结果。
提示:如果您发现退订率较高,您应该检查您发送的内容类型、电子邮件的频率并考虑对您的受众进行细分。
其他有用的统计数据
这些指标也值得一提,不应在分析您的电子邮件时忽略:
- 投诉率:这是计算将您的电子邮件标记为垃圾邮件的收件人的数量。这永远不是一个好兆头,如果您发现您的电子邮件被标记为垃圾邮件,请参阅本文以获取我们的建议 →
- 拒绝率:这是计算您的电子邮件被电子邮件提供商拒绝的次数(例如,Gmail、Outlook、Yahoo 等),并且可能表明存在更严重的问题。如果您的电子邮件被拒绝,请确保您正在从经过验证的电子邮件域发送。 了解更多 →
如何为您的网站创建注册表单
想为您的客户提供简单的方式来订阅您的电子邮件营销活动吗?
Mail Designer Delivery Hub 可以轻松地连接到您的网站,并为您的访客提供直接订阅您的邮件列表的方式。这就是它的工作原理!
创建注册表单
Delivery Hub 中的注册表单生成器易于使用,是扩展您的邮件列表的绝佳方式。
有用的信息: 注册表单在所有 Mail Designer 365 Campaigns 计划中都可用。您可以创建的表单数量取决于您的计划级别。
配置您的表单
要开始,请访问 https://my.maildesigner365.com/team/deliveries/contacts/signupForms 来配置您的新注册表单。
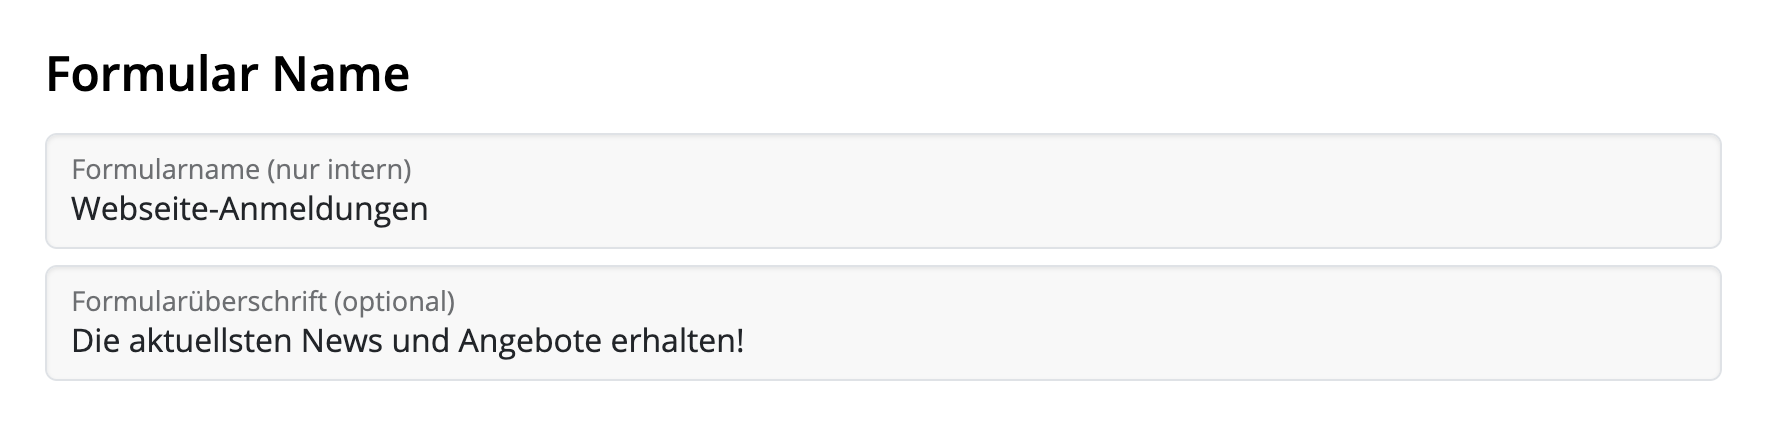
首先,为您的表单命名,例如 "网站订阅"。此名称帮助您确定联系人来源,并且不会显示给客户。
此外,您可以添加一个易记的名称,该名称将显示在您的网站上。
表单字段
在下一步中,配置您的表单字段。这是一个重要的步骤,因为它确定了联系人将如何在 Delivery Hub 中分类。
姓名和姓氏
您可以允许订阅者在您的表单中输入他们的姓名和姓氏。这对于发送个性化电子邮件很有用,但也会为订阅过程增加一个额外的步骤。
自动填充
这些自动填充字段将自动分配给通过表单订阅的新联系人。订阅者在订阅时无法看到自动填充字段的名称。
从列表中选择现有的自动填充字段,或者输入一个新的,例如 "来源",然后点击 "创建新的自动填充字段":

然后输入自动填充字段的值。例如:"网站",然后点击 "点击创建新值":

通过此表单的新订阅现在将自动分配给此自动填充字段,允许您稍后查看通过您的网站获得的联系人数量,并为他们创建个性化内容。
客户自动填充字段
对于客户来说,通常有用的是为自己分配自动填充字段,以便您知道他们对哪种类型的内容感兴趣。
例如,如果您管理一个时尚商店,并定期创建有关女性、儿童和男性时尚的电子邮件营销活动。您可以将这些选项包含在您的注册表单中,以便您的订阅者可以决定他们想要接收哪些电子邮件营销活动。
这样,您可以确保您的电子邮件内容保持相关,并减少客户稍后取消订阅的风险。
在这里,您还可以从您的列表中选择现有的自动填充字段,或者输入一个新的,如上一步所述。我们使用自动填充字段 "电子邮件类型",值为 "女性"、"儿童" 和 "男性"。这些是您的网站访客可以选择的选项。

一旦您指定了这些自动填充字段,您还可以自定义它们如何显示给用户。
点击 "显示自动填充字段标签",以输入描述显示的选择选项的最佳文本 - 例如,"我对以下类别感兴趣:"

现在,您可以选择显示类型。在大多数情况下,"复选框" 是合理的,例如,如果您想提供多选选项。如果用户只能选择一个选项(例如,位置)或可以输入自己的值(例如,出生日期),您可以从下拉菜单中选择正确的选项。

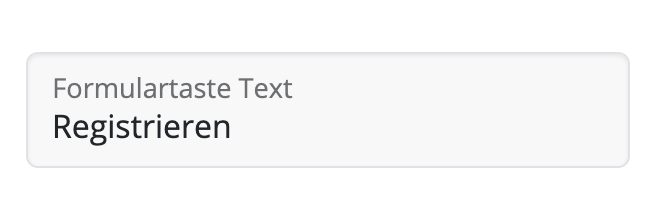
最后,您可以为您的注册表单按钮输入个性化文本:
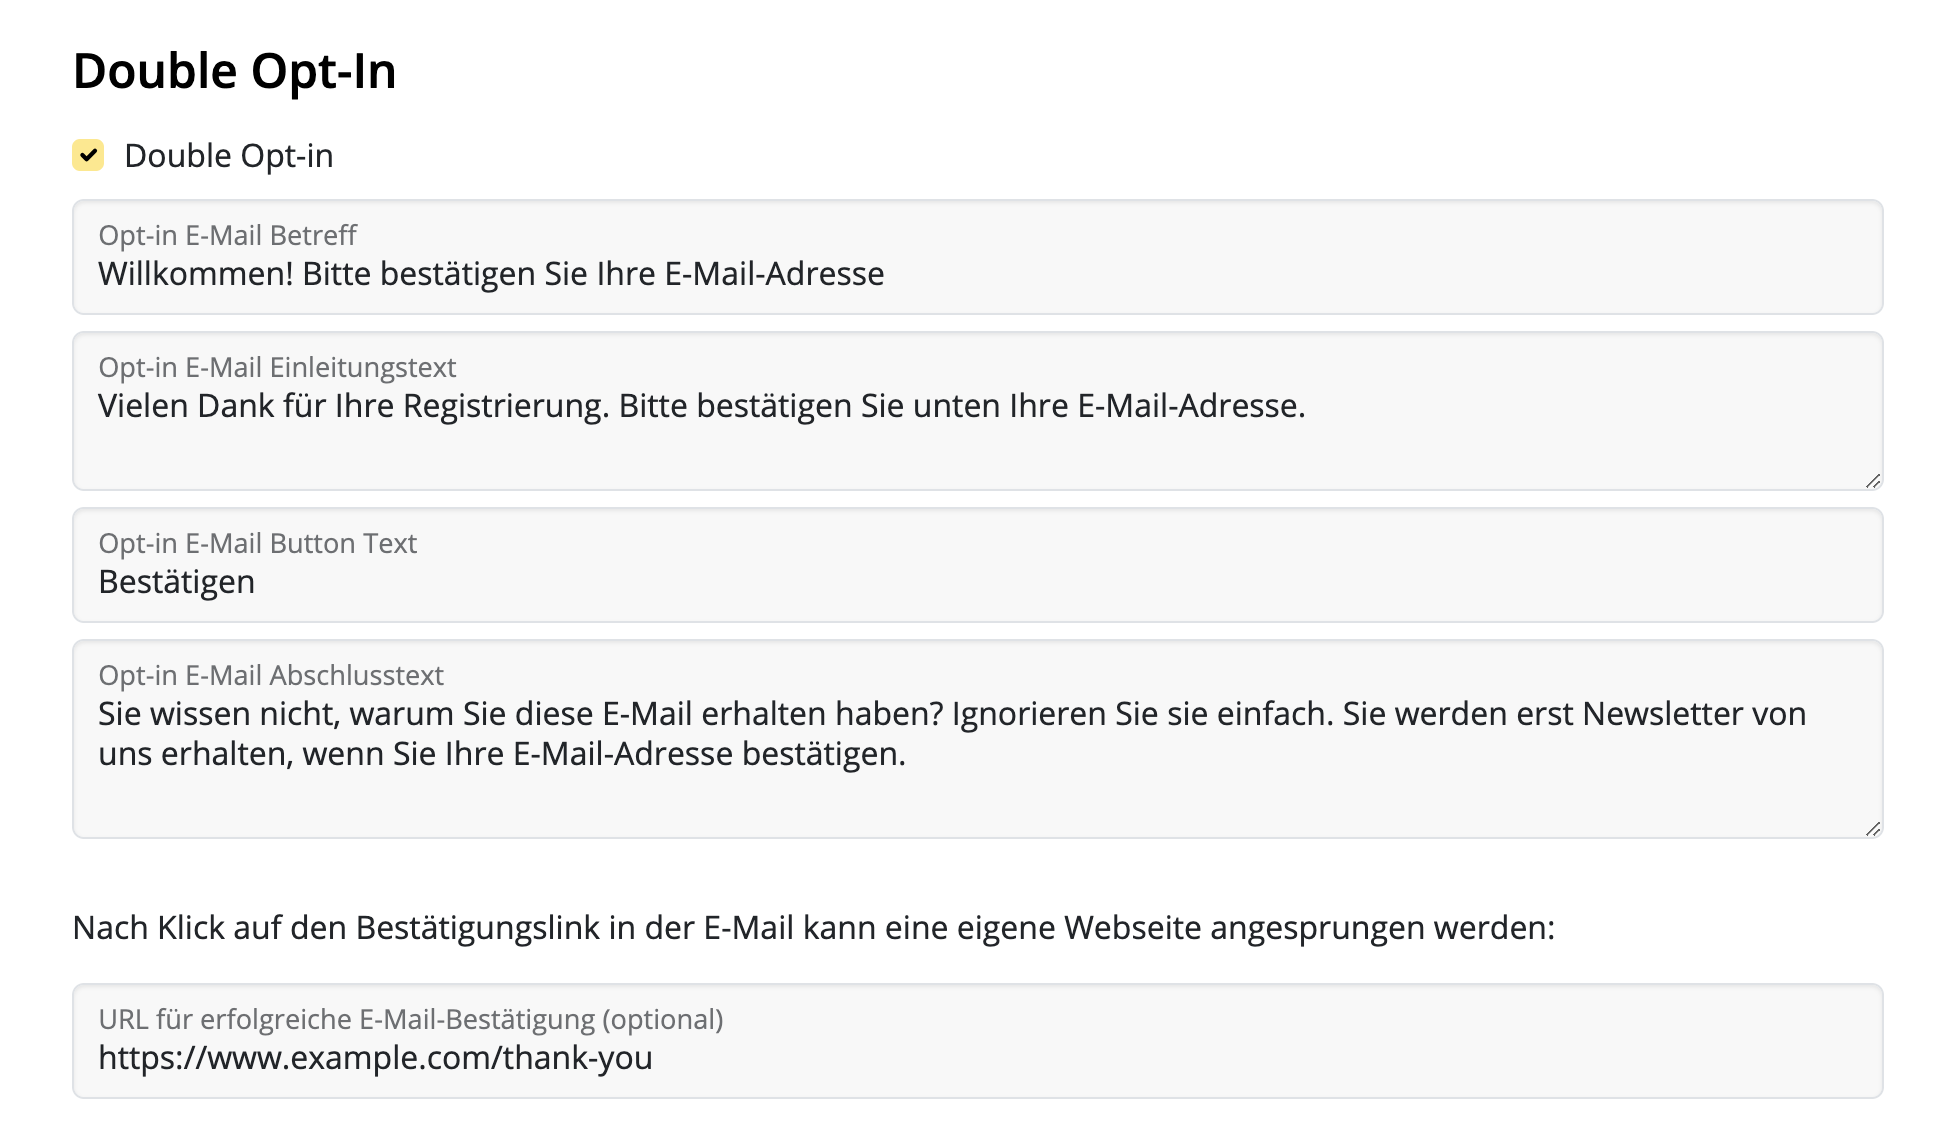
双重确认
双重确认电子邮件对于所有新订阅都是必需的,因为它有助于确保新获取的电子邮件是真实的 - 这是一个很好的措施,以防止稍后电子邮件被退回。因此,我们建议保持此选项处于活动状态。
使用 Delivery Hub,您可以自定义您的双重确认电子邮件。完成电子邮件主题、正文文本和按钮字段。
在此部分,您还可以为新订阅者配置个性化的目标页面。
布局和预览
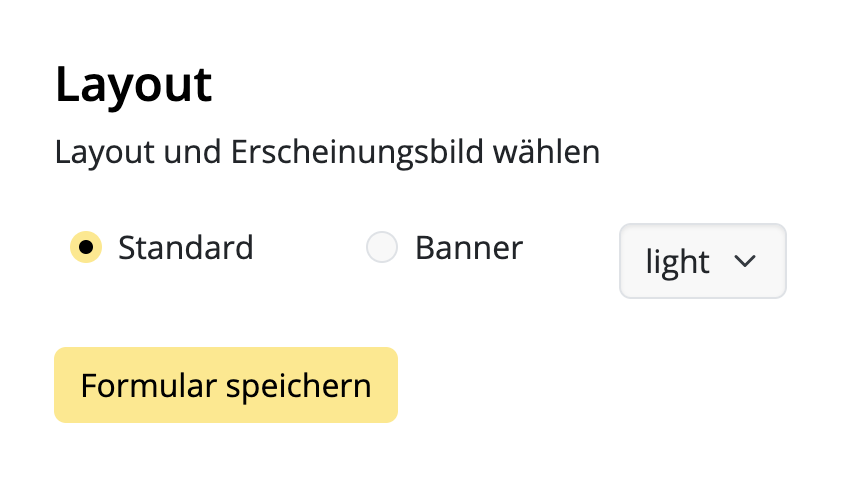
在最后一步配置中,您可以在您的注册表单中选择不同的布局选项。例如,明亮或暗色布局。
要查看布局选项的预览,请选择您的布局设置,然后点击圆形更新符号,以查看您表单的最新版本。这还包括前一步中选择的所有表单字段的预览:
如果您对布局满意,请不要忘记点击 "保存表单" 来保存表单:
将注册表单添加到您的网站
感谢 Delivery Hub 的代码生成器,将您的完成表单添加到您的网站是一个简单的过程。
- 点击 "生成代码",以创建您表单所需的代码
- 点击 "复制代码",以将表单代码复制到剪贴板
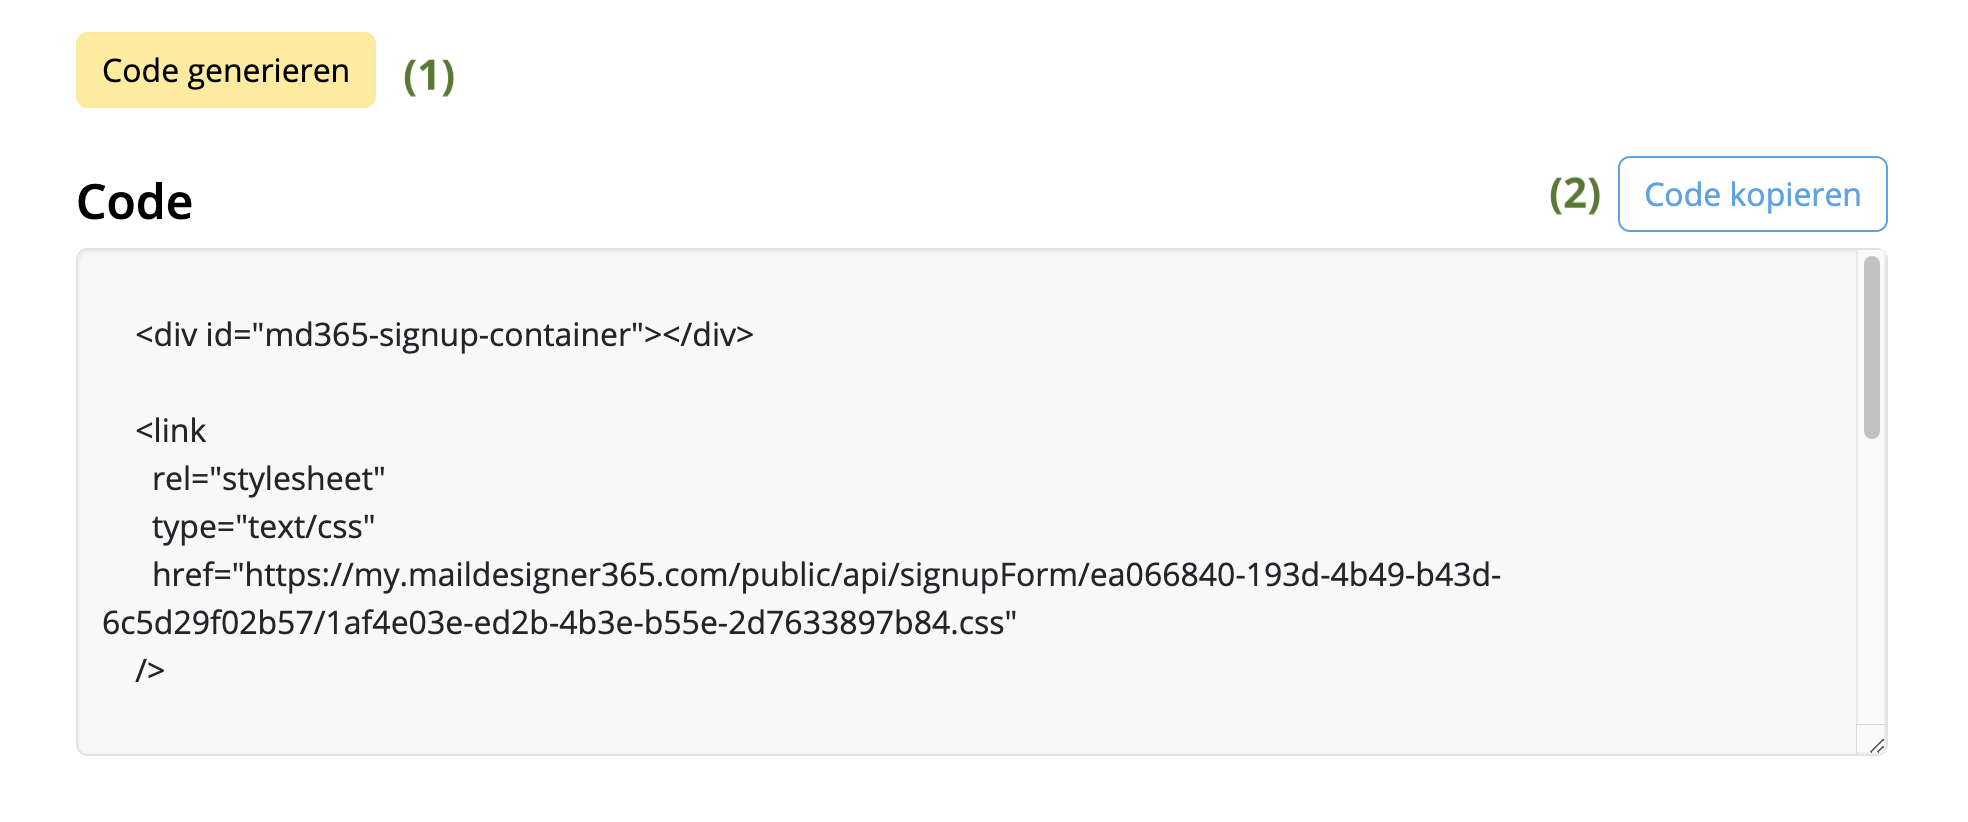
然后,您可以将此代码粘贴到您网站的所需位置,并开始获取新的订阅者!
您的下一步 - 创建受众
如果您还没有这样做,现在是配置您的邮件列表的好时机。我们称之为受众。
您可以根据称为自动填充字段的特定标准来创建您的受众,即您在注册表单中指定的自动填充字段。例如,我们的时尚商店需要至少三个受众来发送其电子邮件营销活动:女性、儿童和男性时尚。
受众可以在以下位置创建: https://my.maildesigner365.com/team/deliveries/contacts/targetgroups
创建新受众
我们从女性时尚的电子邮件营销活动开始。创建一个新的受众,并为其命名(例如,"女性")。
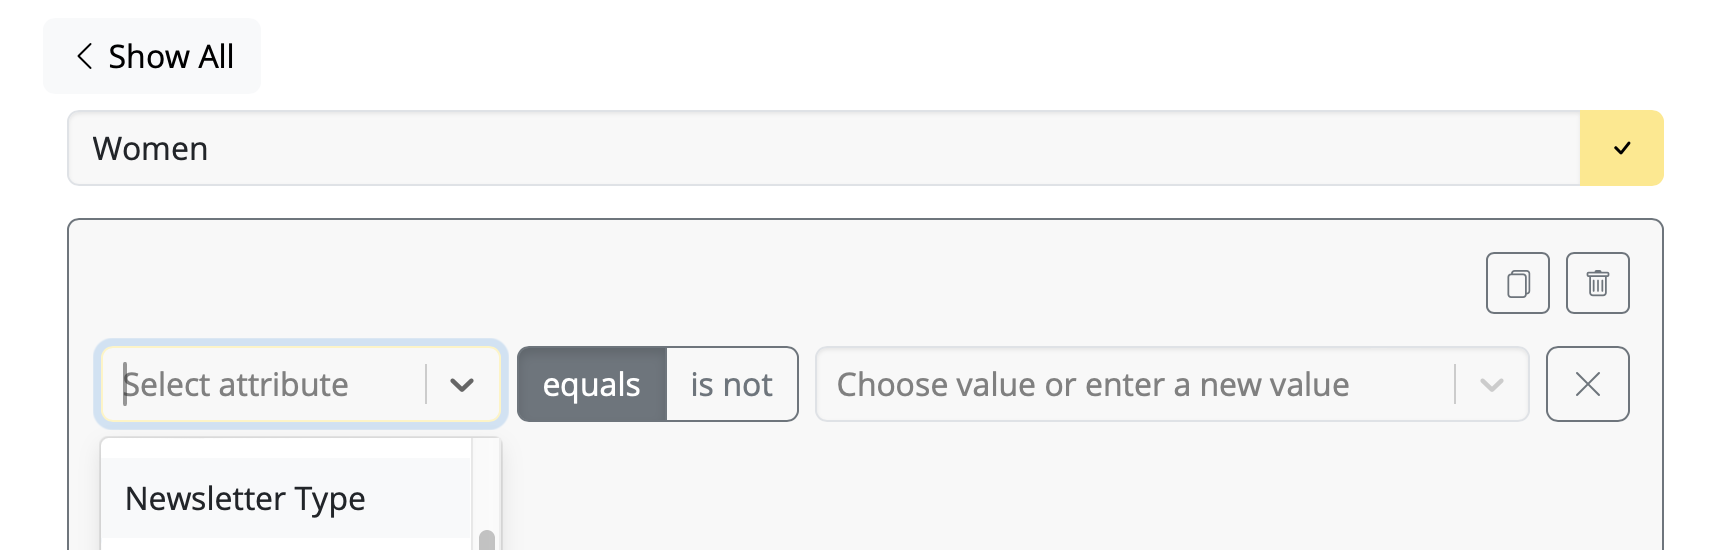
现在,选择您在表单配置期间创建的自动填充字段(例如,"电子邮件类型")。
然后,选择相应的值(例如,"女性"):

现在,所有具有自动填充字段值 "电子邮件类型 = 女性" 的联系人都显示在这里。点击以保存您的新受众。
创建额外受众
这些步骤也可以为 "男性" 和 "儿童" 列表执行,选择相应的自动填充字段值,以便您为每种类型的电子邮件营销活动拥有动态受众。
如果订阅者通过您的网站表单订阅,他们将根据所选类别自动添加到相应的受众中。
如果您想创建一个包含所有网站订阅的受众,请按照上述步骤操作,并使用您在表单配置期间指定的自动填充字段和值,即 "来源" 和 "网站"。所有新订阅者将自动添加到此列表中 - 即使他们没有选择任何可选字段。
- 打开团队管理并邀请另一个成员。
- 然后退出您的当前 Mail Designer 帐户(右上角)
- 现在打开来自您的第二个电子邮件地址的电子邮件中的邀请链接.
- 使用第二个电子邮件地址创建一个新帐户.

- 当您现在开始测试发送时,选择底部的“团队”选项。
这会将测试电子邮件发送给团队中的所有成员,包括您的第二个电子邮件地址。
触发这些电子邮件阻止的原因不是电子邮件的性质。即使是个人圣诞问候也可能会被阻止,如果它们被发送给足够大的受众。毕竟,电子邮件提供商如何知道电子邮件的内容是什么?电子邮件纯粹基于同时从同一来源发送的电子邮件数量而被阻止。
以下是 Mail Designer Campaigns 可以帮助您解决此问题的方法:
- 如果您没有自己的域名电子邮件地址,我们将自动将发件人地址替换为我们已验证的域名之一
– 此地址替换将如下所示:原始地址 - supercoolmails@yahoo.com 新地址:supercoolmails.yahoo.com@sentwith.maildesigner365.com
- 由于域名 @sentwith.maildesigner365.com 已完全通过 DKIM 认证,因此这些电子邮件不会因 DKIM 问题而被阻止。
或者,如果您有自己的域名,Mail Designer Campaigns 允许您验证您的发送地址 DKIM,以便您可以从自己的域名发送,而不会被提供商阻止。
您是 Mail Designer 的新手吗?为什么不尝试 Mail Designer 免费演示版 供 Mac 用户使用。
- 未使用该应用程序或服务
- 未能在取消期内取消您的帐户
- 您订阅的计划中缺少功能或功能
- 误操作购买
- 超出我们控制范围的特殊情况
- 违反我们的使用条款
什么是 MAIL FROM 域名?
发送电子邮件时,有两个地址会显示其来源:- 一个 FROM 地址,可见于收件人
- 一个 MAIL FROM 地址,指示消息的来源
我什么时候需要 MAIL FROM 域名?
当您使用 Mail Designer 365 Campaigns 发送电子邮件时,默认 MAIL FROM 域名会自动使用 Mail Designer 365 Campaigns 的子域名 (sentwith.maildesigner365.com)。在这种情况下,Sender Policy Framework (SPF) 身份验证有效地验证这些消息,因为默认 MAIL FROM 域名与 Mail Designer 一致,即负责发送电子邮件的应用程序。 但是,如果您不想使用 Mail Designer 365 Campaigns 的默认 MAIL FROM 域名并希望选择您自己的域名的子域名,则称为在 Mail Designer 365 Campaigns 中使用自定义 MAIL FROM 域名。 简而言之,使用自定义 MAIL FROM 域名可以为您提供使用 SPF、DKIM 或两者来获得 DMARC(基于域的消息身份验证、报告和一致性)验证的灵活性。DMARC 允许发件人域指示从该域发送的电子邮件受到一个或多个身份验证系统的保护。可以通过符合 SPF、符合 DKIM 或两种方法来获得 DMARC 验证。自定义 MAIL FROM 域名的要求
设置自定义 MAIL FROM 域名时,必须满足以下要求:- 它必须是经过验证的电子邮件地址或域名的父域的子域。
- 它不得与您用于发送电子邮件的子域相同。
- 它不得与您用于接收电子邮件的子域相同。
如何在 Mail Designer 365 Campaigns 中设置自定义 MAIL FROM 域名
要设置自定义 MAIL FROM 域名,您需要将记录添加到域的 DNS 配置中。 Mail Designer 365 Campaigns 要求用户发布 MX 记录,以便您的域可以接收邮件提供商发送的错误消息和投诉。您还需要发布 SPF 记录(类型为 TXT),以表明 Mail Designer 365 有权从您的域发送电子邮件。- 登录您的 my.maildesigner365 帐户并转到 发件人:域验证
- 在列表中找到您的域并单击 MAILFROM 选项卡:
- 现在您将看到并可以复制要添加到域的 DNS 记录中的新 MX 记录的文本
请注意,完成此操作后,根据您的 DNS 提供商,可能需要长达 48 小时才能更新设置。 绿色复选标记将指示何时完成设置:
- Open up your template in Mail Designer 365 and make the changes in your design
- Go to Delivery Hub and open your scheduled campaign
- The new version of your template will be picked automatically.
- Press Save to save your campaign with the new design
- Repeat for other scheduled campaigns using the same design
- Regular email with several contacts in the To field
- Regular email with several contacts in the BCC field
- An email to a predefined group, such as an Outlook Group
- Your email service provider or the recipient's email service provider may raise suspicions of SPAM (unsolicited junk emails) sending, potentially leading to your account's suspension or temporary freeze.
- Receiving an email with an extensive list of recipients often diminishes its perceived relevance to individual recipients, making it seem impersonal and more likely to be classified as junk mail.
- Messages sent to a large number of recipients are often flagged by Junk Mail Filtering systems as Spam, increasing the risk of your message being blocked and not reaching its intended recipients.
- Mail Designer Campaigns enables you to fully verify your domain, ensuring optimal verification for your emails to reach recipients' inboxes.
- If you don't have your own domain or prefer not to undergo the verification process, we can provide you with a custom address from a fully authenticated domain, significantly reducing the risk of your emails being marked as Spam.
- We offer intelligent list management for your contact lists, allowing you to either send emails to all contacts or create targeted groups tailored to your audiences.
仅包含图像的电子邮件通常会被标记为垃圾邮件,因为垃圾邮件过滤器依赖于文本来评估内容的合法性。如果没有文本,过滤器可能会认为该电子邮件试图隐藏可疑或有害内容,这是垃圾邮件发送者常用的策略。此外,仅包含图像的电子邮件加载速度可能会很慢,这会使收件人感到沮丧,并增加他们将您的电子邮件标记为垃圾邮件的可能性。
为了提高您的电子邮件进入收件箱的机会,请遵循这些最佳实践:
- 避免仅包含图像的布局块:不要使用仅包含图像的布局块,而是选择将文本和图像结合起来的块。这可确保您的文本显示为实际文本,而不是大型图像的一部分,这有助于过滤器和收件人更好地理解您的内容。
- 包含相关文本:使用文本清楚地解释电子邮件的目的。这为垃圾邮件过滤器提供分析的上下文,并帮助您的受众参与您的消息。
- 为图像使用替代文本:为每个图像添加描述性替代文本。这可确保即使图像未加载,收件人(和垃圾邮件过滤器)仍然可以理解电子邮件的内容。
- 保持良好的文本与图像比例:平衡的方法,即文本多于图像,可以降低您的电子邮件被标记为垃圾邮件的可能性。文本为垃圾邮件过滤器提供更多的评估材料。
- 使用图像和文本块的组合:组合这两种元素不仅可以提高可读性和参与度,还可以防止垃圾邮件过滤器将您的电子邮件解释为试图在图像中隐藏重要信息。
- 使用信誉良好的电子邮件服务提供商,例如 Mail Designer 365 Campaigns:许多电子邮件服务提供商,例如 Mail Designer 365 Campaigns,可以帮助优化电子邮件结构并提供 SPF、DKIM 和 DMARC 等身份验证协议,以提高可传递性。
通过遵循这些准则并确保您的电子邮件包含混合了精心放置的文本和图像,您可以提高其可传递性并降低其被发送到垃圾邮件文件夹的风险。
- 设置新的电子邮件列表: 创建一个新的电子邮件列表,其中包含未打开您原始电子邮件的收件人。 在短暂延迟后将电子邮件重新发送给该组,最好使用不同的主题或对内容进行轻微修改。 这可以帮助重新吸引可能错过了第一条消息的人。
- 审核电子邮件内容: 分析进入垃圾邮件的电子邮件的内容。 查找可能触发垃圾邮件过滤器(例如过度使用图像、垃圾邮件关键字或格式不良)的元素,并进行必要的调整。
- 与您的受众互动: 通过提供有价值的内容并鼓励互动来培养与收件人的积极关系。 参与的收件人不太可能将您的电子邮件标记为垃圾邮件。
If you're struggling with email deliverability—especially with Gmail users—there are proven strategies to improve sender reputation and ensure your emails land in inboxes rather than spam folders. Follow these steps to get back on track:
Steps to Improve Email Deliverability:
-
Warm Up Your Email Lists Gradually
- Treat the process as if warming up a completely new account.
- Divide your mailing into smaller batches and send them on different days. For example, start with 500 emails on Monday, 1,000 on Tuesday, 2,000 on Wednesday, and so on.
-
Focus on Engaged Recipients First
- Begin by sending emails only to contacts who have opened your emails recently (e.g., within the last 30 days for weekly senders).
- Gradually increase this timeframe as your deliverability improves.
-
Leverage Google Postmaster Tools
- Set up Google Postmaster Tools to monitor spam rates, domain reputation, and other deliverability metrics.
-
Create Test Gmail Accounts
- Subscribe a test Gmail account to your email campaigns.
- Monitor where emails land. If emails go to spam, interact with them (e.g., open, click, and reply) but do not move them out of the spam folder. This helps train Gmail’s algorithms.
-
Adjust Based on Metrics
- Use Google Postmaster Tools to track your spam rates. If spam rates are too high, reduce the timeframe of your engaged recipients or maintain the current level of sending until the rates stabilize.
-
Monitor Progress
- As Gmail deliverability improves and emails stop landing in spam, expand your email list incrementally to include less recently engaged recipients.
How Mail Designer Campaigns Can Help:
Mail Designer Campaigns provides several built-in features to optimize email deliverability and improve your sender reputation:
- Professional Email Authentication: Ensure your emails are authenticated with SPF, DKIM, and DMARC, reducing the likelihood of being flagged as spam.
- Engagement Tracking: Identify active and inactive recipients in your mailing list, allowing you focus on your most engaged contacts first.
- Custom Domain Support: Addd your own domain to Mail Designer Campaigns to reinforce trust with email providers like Gmail.
- Clean and Optimized Designs: Mail Designer 365 helps you to create email content that is visually appealing while avoiding spam-triggering elements, increasing inbox placement rates.
- Advanced Segmentation: Mail Designer Campaigns allows for advanced segmentation, such as creating lists of only people who have opened the email in the past X days, and options for sending to only a portion of your subscriber list. This ensures that your emails reach the most engaged recipients first, improving overall deliverability.
By following these best practices and leveraging Mail Designer Campaigns' tools, you can rebuild your sender reputation, enhance Gmail deliverability, and achieve more successful email marketing campaigns.
电子邮件营销并没有消失,它只是发生了变化。虽然现在收件箱比以往任何时候都更加拥挤,但如果操作得当,电子邮件营销仍然是与受众联系的最有效方式之一。原因如下:
- 人们更看重质量而不是数量:订阅者对他们订阅的电子邮件更加挑剔,因此提供有价值、引人入胜且相关的内容至关重要,这样才能脱颖而出。普通或重复的电子邮件已经不再适用。
- 这是一个个人选择:与在 WhatsApp 等平台上的未经请求的消息不同,电子邮件让收件人拥有控制权——他们选择接收您的消息。对于许多人来说,这使得电子邮件比其他渠道上的侵入性消息更受欢迎。
- 仍然是投资回报率的强大来源:电子邮件营销继续提供数字营销中最高的投资回报率之一。当您专注于个性化和价值时,电子邮件可以比几乎任何其他媒体更好地推动转化。
虽然自动化和 WhatsApp 等消息应用程序正在增长,但它们服务于不同的目的。与其取代电子邮件,不如补充完善的营销策略。因此,电子邮件营销并没有消失。它只是变得更具竞争力,这很好,因为它促使品牌变得更好。
如果您没有预热过的域名或自定义电子邮件地址,Mail Designer 365 提供了一种专业的解决方案,用于发送电子邮件活动,而无需使用您自己的域名。
它是如何工作的?
Mail Designer 365 使用其 Mail Designer Delivery 服务,确保您的活动从受信任的预配置电子邮件域可靠且安全地发送。这避免了潜在的问题,例如因未准备好的域或垃圾邮件文件夹中的电子邮件而导致的可传递性问题。
为什么选择 Mail Designer Delivery?
- 无需设置麻烦:您无需购买、预热或配置您自己的域名。
- 受信任的声誉:Mail Designer 的发送基础设施经过优化,以确保高可传递性。
- 专业的外观:您的电子邮件使用经过身份验证的域发送,为您的活动提供抛光和专业的外观。
- 符合 GDPR 的发送:所有数据均按照 GDPR 处理,确保收件人的隐私。
有什么陷阱吗?
虽然使用共享域是一个快速解决方案,但从长远来看,始终建议使用 自定义电子邮件域(例如,您的姓名@您的公司.com)。这让您拥有完全的控制权并提升您的品牌形象。Mail Designer 365 支持使用工具配置 SPF、DKIM 和 DMARC 身份验证,以实现最大的可传递性。
准备好开始了吗?
Mail Designer 365 非常适合快速专业地发送个人电子邮件或数千名收件人。立即使用我们的交付服务启动您的活动,并在不担心技术设置或可传递性的情况下接触到您的受众!
是的,使用 Mail Designer 365,您可以跟踪电子邮件是否已被打开。Mail Designer Delivery 内置的电子邮件跟踪功能为您提供每封电子邮件和每项活动的详细统计信息。
无论您是使用直接发送还是发送新闻通讯活动:如果您使用 Mail Designer 365 内置的交付服务发送电子邮件,您将获得访问详细分析的权限,包括打开率、点击率和许多其他重要指标。
您可以在此处查看您的 新闻通讯活动 分析:
https://my.maildesigner365.com/team/deliveries/campaigns/finished
详细跟踪也适用于 直接发送 电子邮件。您可以在此处找到相关统计信息:
https://my.maildesigner365.com/team/deliveries/direct/finished
无论您选择哪种发送方法,Mail Designer 365 均提供以下分析:
- 打开率和总打开次数
- 点击率和总点击次数
- 交付状态和退回
- 退订(退订率)
- 详细链接点击跟踪

- 收件人级别统计信息
此 性能分析 帮助您更好地了解您的电子邮件活动的成功与否,并相应地改进您的内容。
提示:为了获得准确的结果,我们建议您在发送后至少 24 小时检查您的统计信息。这可确保您的收件人有足够的时间打开并参与您的电子邮件。
Step 1: Create the $AttributeFields Variable
Start by creating a variable named $AttributeFieldsThis variable will contain the text string that defines the placeholder content used in your Mail Designer 365 email template. All values must be separated by commas.
Scenario A: FileMaker Field Names Match the Email Placeholders
Method: Use FileMaker field names that directly match the placeholders in your email design. Build the$AttributeFields variable by listing these field names, separated by commas.
In Mail Designer, you simply use the field name as the placeholder.
Format:
$AttributeFields = "Table::Field1,Table::Field2,Table::Field3"
Example Definition of $AttributeFields in FileMaker:
$AttributeFields="CityHotel::GUEST_FIRST_NAME,CityHotel::GUEST_LAST_NAME,CityHotel::GUEST_EMAIL,CityHotel::BOOKING_METHOD"
In Mail Designer 365, you can reference the values later using these placeholders:
GUEST_FIRST_NAME
GUEST_LAST_NAME
GUEST_EMAIL
BOOKING_METHOD
Scenario B: FileMaker Field Names Do Not Match the Email Placeholders in Mail Designer
Method: Build the$AttributeFields variable by manually mapping each placeholder name to the corresponding field or variable using the format:
$AttributeFields = "PLACEHOLDER_NAME:" & FieldName_or_Variable & ", …
Example Definition of $AttributeFields in FileMaker:
"BOOKING_DATE:" & RESERVATION_DATE & "," &
"BOOKING_TIME:" & RESERVATION_TIME & "," & …
Scenario C: Using FileMaker Variables as Placeholders
Method: If your FileMaker variable has the same name as the placeholder in Mail Designer 365, you can directly assign it like this:$AttributeFields = "$city,$country"
This tells Mail Designer to use the value of $city for the placeholder named “city”.
Example:
The FileMaker variable $city contains “Munich”. If your Mail Designer template includes a placeholder named “city”, then define:
$AttributeFields = "$city"
The script will reveal the content “Munich” and pass it to Mail Designer to populate the “city” placeholder.
The Best Scenario D: Mixing All Methods
You can combine the approaches above into a single$AttributeFields string.
Method:
Mix matching field names, manually mapped fields, and variables in the $AttributeFields variable.
Example:
$AttributeFields = "BOOKING_DATE:" & RESERVATION_DATE & "," &
"CityHotel::BREAKFAST_TYPE," & "$city"
In Mail Designer 365 you can then reference them with the name BOOKING_DATE, BREAKFAST_TYPE and city
在 Mail Designer 365 模板中,您将找到占位符,显示您的 FileMaker 字段如何在设计中直接栩栩如生(Mail Designer 文件):

打开此 Mail Designer 文件,然后直接转到“文件”>“保存”以将其保存在您的项目中。
您还没有 Mail Designer 应用程序吗?

如果您在试用期内有任何问题或遇到任何问题,请随时 联系我们。

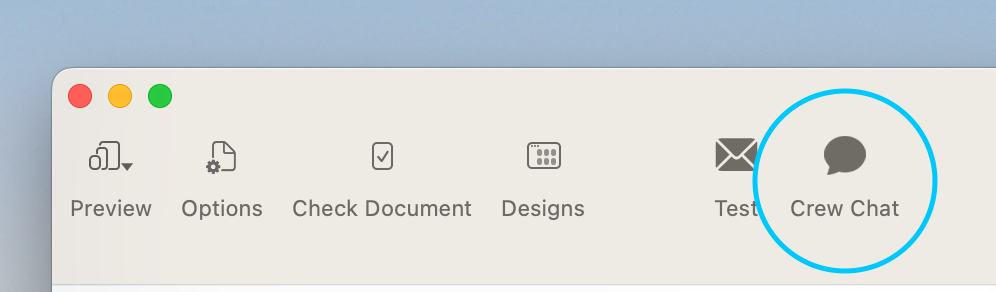
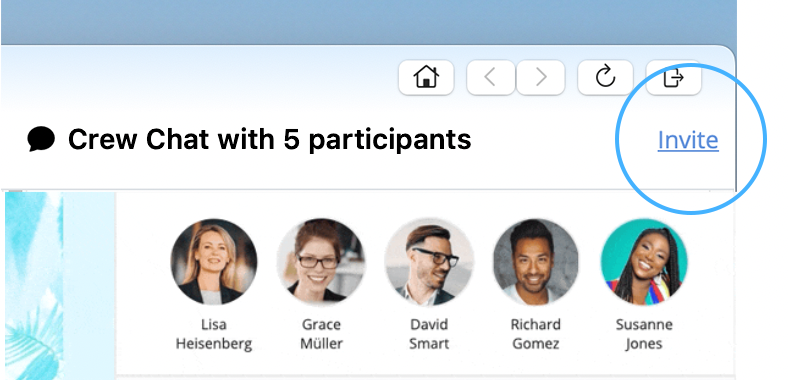
在设计中,单击工具栏中的“Crew Chat”以开始与同事的讨论 — 或邀请我们提供帮助。
以下是如何将 Mail Designer 支持成员邀请到你的 Crew Chat 中:
1. 登录 my.maildesigner365.com
2. 选择你的项目,然后点击“设置”,再点击“邀请参与者”
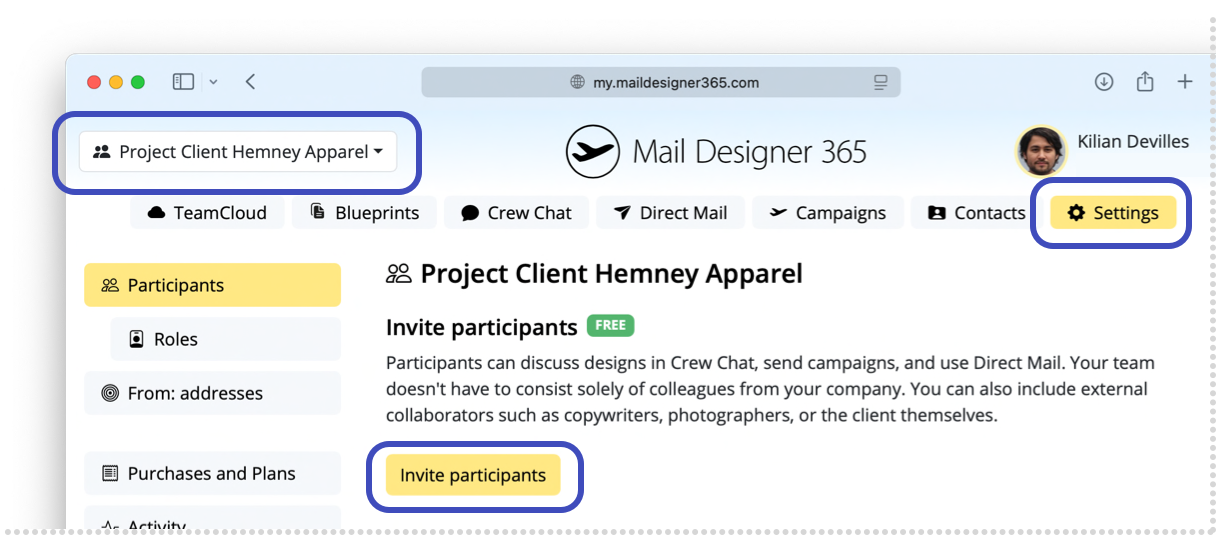
3. 输入我们的电子邮件地址:support@equinux.com,然后点击“邀请”
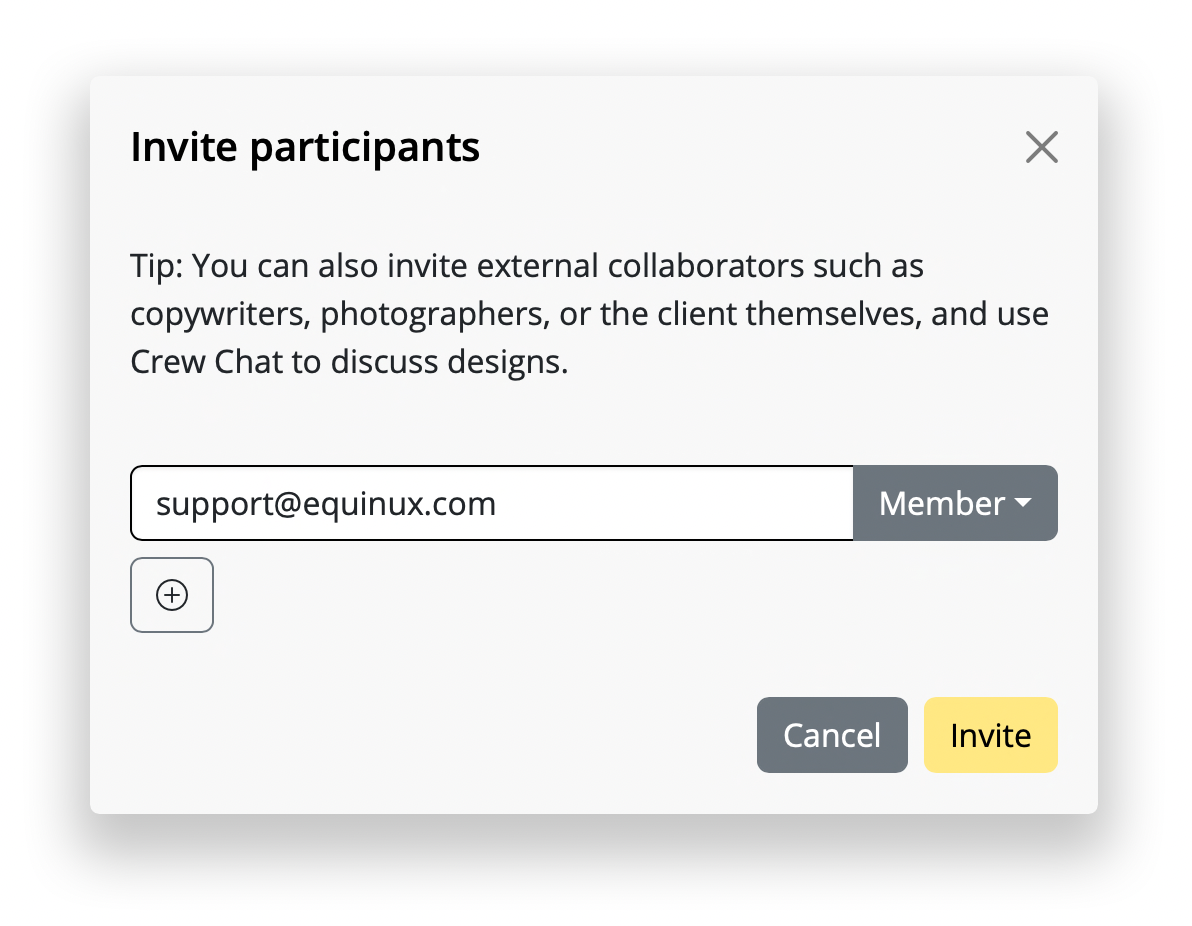
你现在会看到成员“equinux Support”列在待处理的邀请中。
一旦我们加入你的项目(你将通过电子邮件收到通知),你可以打开你提出问题的设计(或任何设计),然后点击工具栏中的 Crew Chat 按钮。
然后点击右上角的“邀请”。
选中成员“support@equinux.com”,然后点击保存。
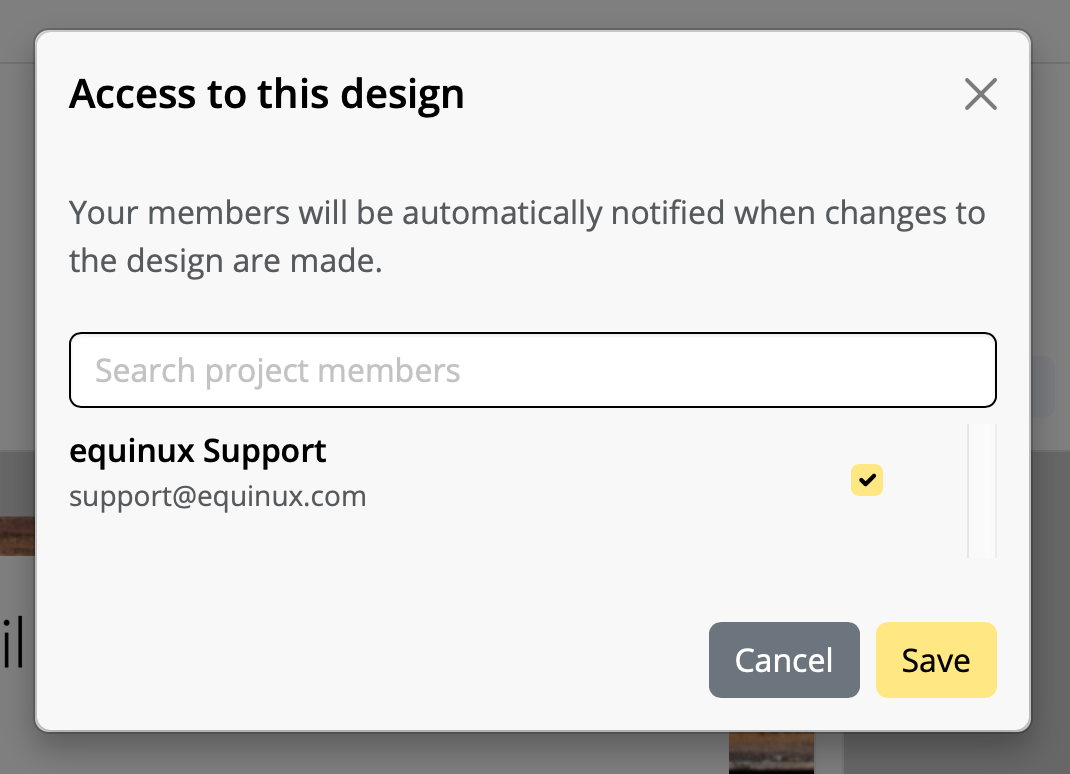
现在在 Crew Chat 中说你好,我们很快就会与你联系。
请注意:在没有计划链接到您的帐户的情况下,我们无法保证您的设计将保存一年以上并可用。
续订我的计划 ...
相反,您必须按住该链接以打开一个菜单,其中包含可用的操作,例如撰写发送到该地址的电子邮件或将其添加到联系人。
在运行 iPadOS 26.1 或更高版本的 iPad 上,点击 mailto: 链接将继续像往常一样工作。
您免费的 30 分钟启动会议让您有机会从我们的电子邮件设计专家那里获得实践建议。以下是一些关于如何使用它的想法:
- 在专家布局支持下设计您的第一个新闻通讯
- 有效使用图像效果、文本样式和表格
- 获取有关使用 Direct Mail 或 Campaigns 发送电子邮件的帮助
- 创建有针对性的电子邮件组,以进行更好的细分
- 修复“发件人”地址和域设置问题
- 使用占位符或连接到 FileMaker 以进行个性化设置
“此网站已被阻止,以防止自动创建电子邮件” 为了防止此错误对收件人产生影响,Mail Designer 会自动禁用电子邮件活动中 mailto: 链接结构的跟踪。
技术说明:
Mail Designer 的链接跟踪通过重写链接来工作,以便它们首先通过跟踪 URL,然后再打开最终目标。对于标准 Web URL(https://),此方法可以可靠地工作,因为浏览器可以安全地重定向请求。但是,mailto: 链接的行为不同。它们不是打开网页,而是触发用户的默认电子邮件应用程序并尝试创建新消息。在最新的 macOS 版本中,如果通过重定向或重写的链接启动,苹果会将此行为视为潜在的安全风险。
因此,macOS 会阻止跟踪的 mailto: 链接,以防止不必要的或自动化的电子邮件创建。由于此限制是在操作系统级别强制执行的,因此 Mail Designer 无法覆盖它。
为了确保收件人获得流畅且安全的体验,Mail Designer 默认情况下会禁用 mailto: 链接的跟踪。这些链接将继续按预期工作,但单击它们不会被跟踪。