
DKIM setup helps inbox providers recognize that your newsletters really come from your domain. It is a small one-time task that can improve deliverability, protect your sender identity, and make your email setup ready for today’s sender requirements.
You do not need to be an email security expert to complete it. This guide explains what domain verification changes, what you may notice if your domain is not verified, and how to add the DKIM record provided by Mail Designer 365.
- What is DKIM?
- Why domain verification matters
- What happens if your domain is not verified?
- How to set up DKIM in Mail Designer 365
- What to check if DKIM is not verified yet
- How DKIM works with SPF and DMARC
- DKIM setup checklist
What is DKIM?
DKIM stands for DomainKeys Identified Mail. It adds a digital signature to the emails sent for your domain. Receiving services such as Gmail and Yahoo can check that signature to confirm that the message is connected to your domain and was not changed on its way to the recipient.
The setup happens in your domain’s DNS settings. Mail Designer 365 gives you a record name and value, and you add those details at the provider that manages your domain. Once the record can be found, Mail Designer 365 marks DKIM as verified and signs your campaigns for that domain.
If you would like a little more background, see our DKIM overview. For the setup itself, you can simply follow the values shown in your account.
Why domain verification matters
Inbox providers use several signals to decide where an email belongs. Domain authentication is one of the clearest signals you can control. A valid DKIM signature tells the receiving service that your sending platform is authorized to use your domain.
This matters for everyday senders as well as larger mailing programs. Gmail requires SPF or DKIM for all senders to personal Gmail accounts, while higher-volume senders need SPF, DKIM, and DMARC. Yahoo has similar authentication requirements. Setting up all three methods gives your campaigns a solid technical foundation without changing how you design or send them.
Authentication is not a guarantee that every message will land in the inbox. List quality, recipient engagement, spam complaints, content, and sending patterns still matter. Think of domain verification as an important foundation that removes one avoidable source of delivery trouble.
What happens if your domain is not verified?
First, there is no need to panic. After you confirm an individual From address in Mail Designer 365, you may still be able to send campaigns. An unverified domain does not automatically mean that every email will fail.
However, inbox providers have less evidence that the message is genuinely connected to your organization. Depending on the recipient provider, your sending volume, and your other authentication settings, you may notice:
- more messages being placed in spam or junk folders;
- temporary delays while a provider applies additional checks;
- some messages being rejected, particularly when stricter bulk-sender rules apply;
- less consistent delivery between Gmail, Yahoo, and other inbox providers.
These outcomes are possibilities, not a prediction that your next campaign will disappear. The practical response is to complete domain verification before an important send, especially if you are growing your list or increasing your sending volume. It is easier to establish authentication now than to troubleshoot inconsistent delivery later.
If a campaign has already gone to spam, domain verification is still a good place to start, but it may not be the only fix. Our guide on how to stop emails going to spam also covers permission, list hygiene, content, and sending habits.
How to set up DKIM in Mail Designer 365
Mail Designer 365 prepares the DKIM details for you. You only need access to the DNS settings for your domain, or a colleague or provider who can make the change for you.
- Log in to your my.maildesigner365 account.
- Confirm your From address first. If it is still pending, follow the guide to add and verify a sender email address.
- Go to Campaigns > From: addresses.
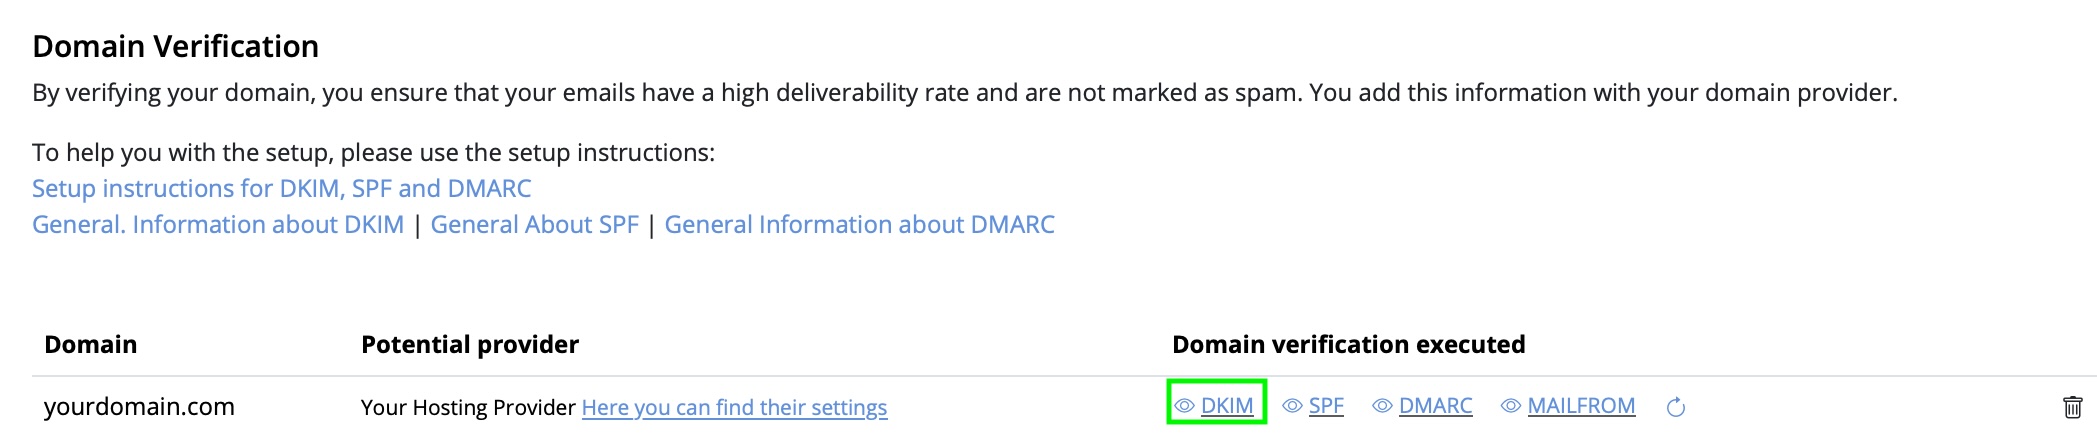
- Under Domain Verification, find your domain and open the DKIM details using the eye icon.
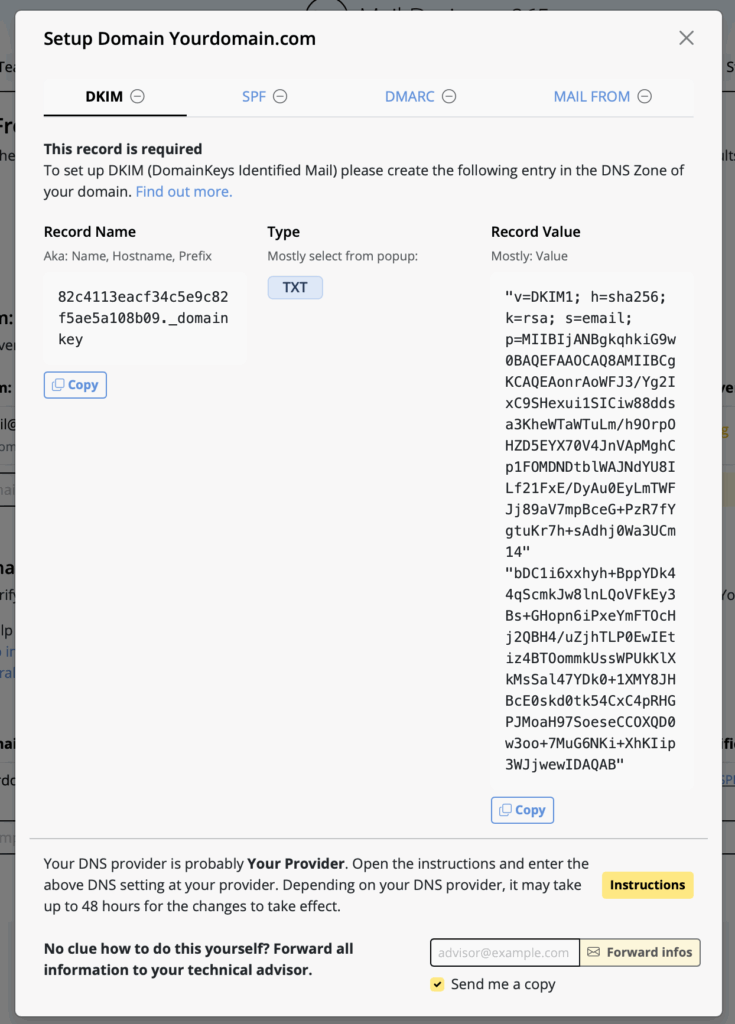
- Copy the record name, record type TXT, and record value exactly as shown.
- Open the DNS settings at the provider that manages your domain and add the new record.
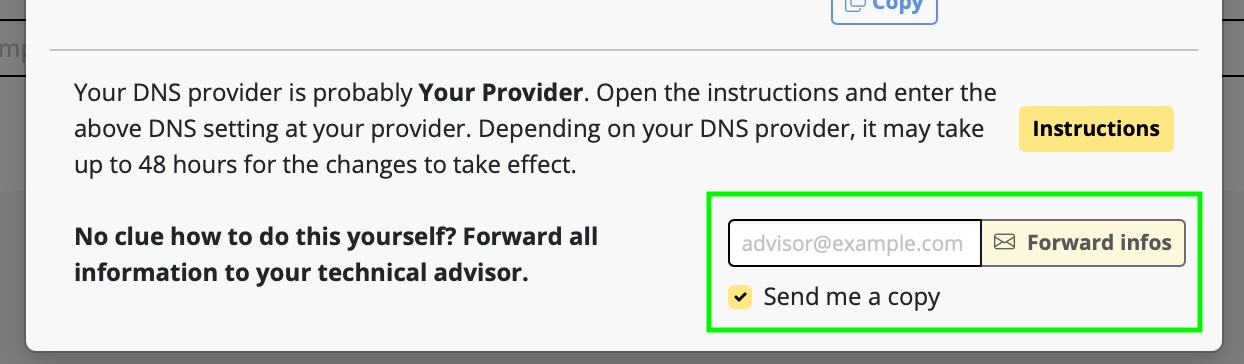
- If someone else manages your DNS, use the forwarding option in the DKIM window to send them the instructions.
- Return to Mail Designer 365 and refresh the verification status. DNS updates can take up to 48 hours to appear.
Once the check succeeds, the domain appears as DKIM verified. You do not need to repeat the setup for every From address that uses the same verified domain.
What to check if DKIM is not verified yet
A pending status shortly after the change is normal. DNS providers update at different speeds, so allow up to 48 hours before assuming something is wrong.
If the status still has not changed, compare the DNS entry with the values in Mail Designer 365:
- Make sure the record was added to the correct domain.
- Use TXT as the record type.
- Copy the record name and value exactly, including any dots, underscores, quotation marks, or other characters shown.
- Check that your domain provider did not add the domain name a second time to the record name.
- Refresh the status in Mail Designer 365 after saving the DNS change.
Leave existing DNS records in place while verification is pending. If you are unsure, forward the Mail Designer 365 instructions to your domain provider, IT team, or website administrator. They can add the record without needing access to your newsletter designs or contact lists.
How DKIM works with SPF and DMARC
DKIM is one part of domain authentication. SPF lists the services allowed to send for your domain, while DMARC tells receiving providers how to evaluate authentication and helps keep the visible From domain aligned with those checks.
You can review DKIM, SPF, and DMARC together under Domain Verification in Mail Designer 365. We recommend setting up all three. This matches the direction of current sender requirements and gives inbox providers a clearer, more consistent picture of your email.

For all three records in one walkthrough, use the complete domain setup guide for Mail Designer 365.
DKIM setup checklist
- Your From address is confirmed in Mail Designer 365.
- You opened the DKIM record for the correct sending domain.
- The TXT record name and value match the details shown in your account.
- You allowed time for the DNS change to become visible.
- Mail Designer 365 shows the domain as DKIM verified.
- You also reviewed the SPF and DMARC status for the domain.
Once DKIM is verified, you can get back to the part your readers see: creating useful campaigns with a recognizable sender, clear content, and an easy way to unsubscribe. Keep the DNS record in place, and check your Domain Verification overview again if you ever change providers or see unexpected delivery issues.