
Completing a 101domain DKIM setup helps mailbox providers confirm that messages sent with Mail Designer 365 are authorized by your domain. DKIM, SPF and DMARC strengthen sender trust, reduce the risk of domain spoofing and support more reliable inbox placement, while Custom MAIL FROM aligns the technical return path with your sending domain. Follow the steps below to publish the required records at 101domain and verify each status in Mail Designer 365.

Why verify your sending domain?
Domain verification allows mailbox providers to confirm that Mail Designer 365 is authorized to send using your domain. A correctly authenticated domain strengthens trust in your From address, makes it harder for attackers to impersonate your brand and supports more reliable delivery to inboxes instead of spam folders.
- DKIM adds a cryptographic signature that receiving servers can validate.
- SPF identifies the services permitted to send email for your domain.
- DMARC tells receiving servers how to handle messages that fail authentication and can support reporting.
- Custom MAIL FROM aligns the technical return path used for bounces with your sending domain.
These records work together. Verification confirms that the published DNS values match the values supplied by Mail Designer 365. It is separate from confirming an individual sender address, so complete both checks before sending a campaign.
Before you start
You need access to both your Mail Designer 365 account and the 101domain account portal. The domain must use DNS records managed by 101domain. If it uses third-party name servers, add the records with that DNS provider instead.
Do not delete existing DNS records. If your domain already has an SPF record beginning with v=spf1, do not create a second SPF policy. Mail Designer 365 will show the values required for your specific domain.
Steps 1–6: Find your DNS details in Mail Designer 365
Step 1: Sign in to Mail Designer 365
Go to my.maildesigner365.com and sign in to the account you use for your campaigns. Open the Mail Designer 365 project whose sender domain you want to configure.
Step 2: Open Settings
Open Settings from your Mail Designer 365 account.
Step 3: Go to From: addresses
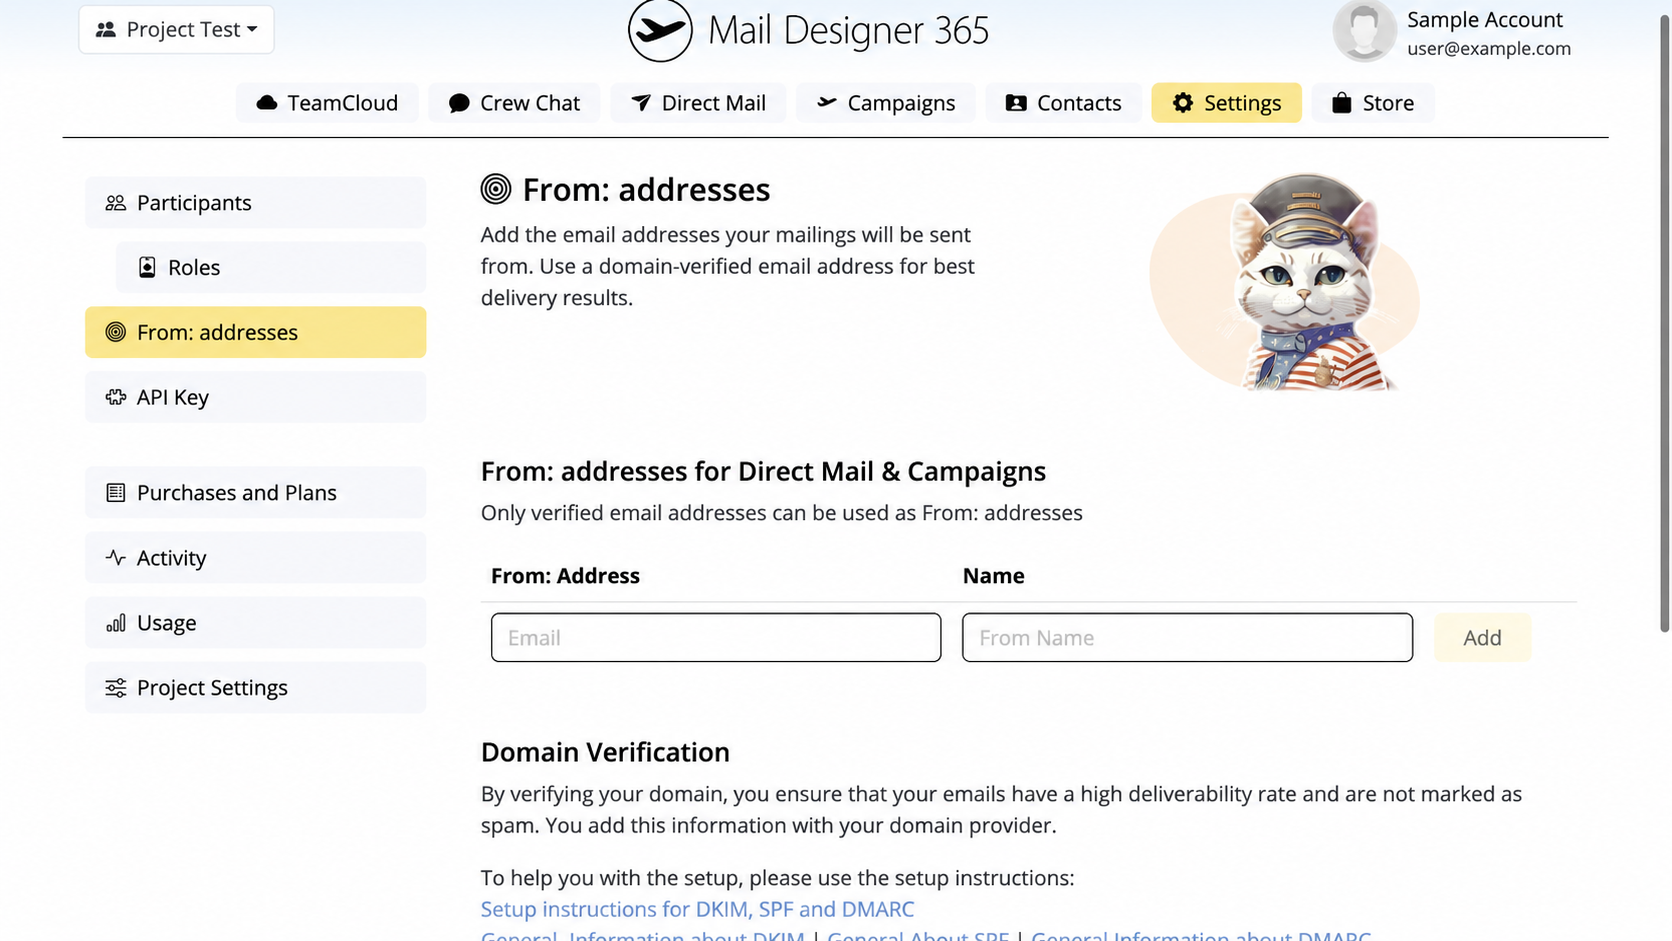
Select From: addresses. The page contains the From: addresses for Direct Mail & Campaigns section and, farther down, Domain Verification.
Step 4: Add and confirm your sender address
If your sender email address is not listed yet, enter the complete address in Email and the name recipients should see in Sender name. Select Add. Mail Designer 365 sends a confirmation message to that address. Open the message, confirm the address and return to From: addresses.
Step 5: Scroll to Domain Verification and add the domain
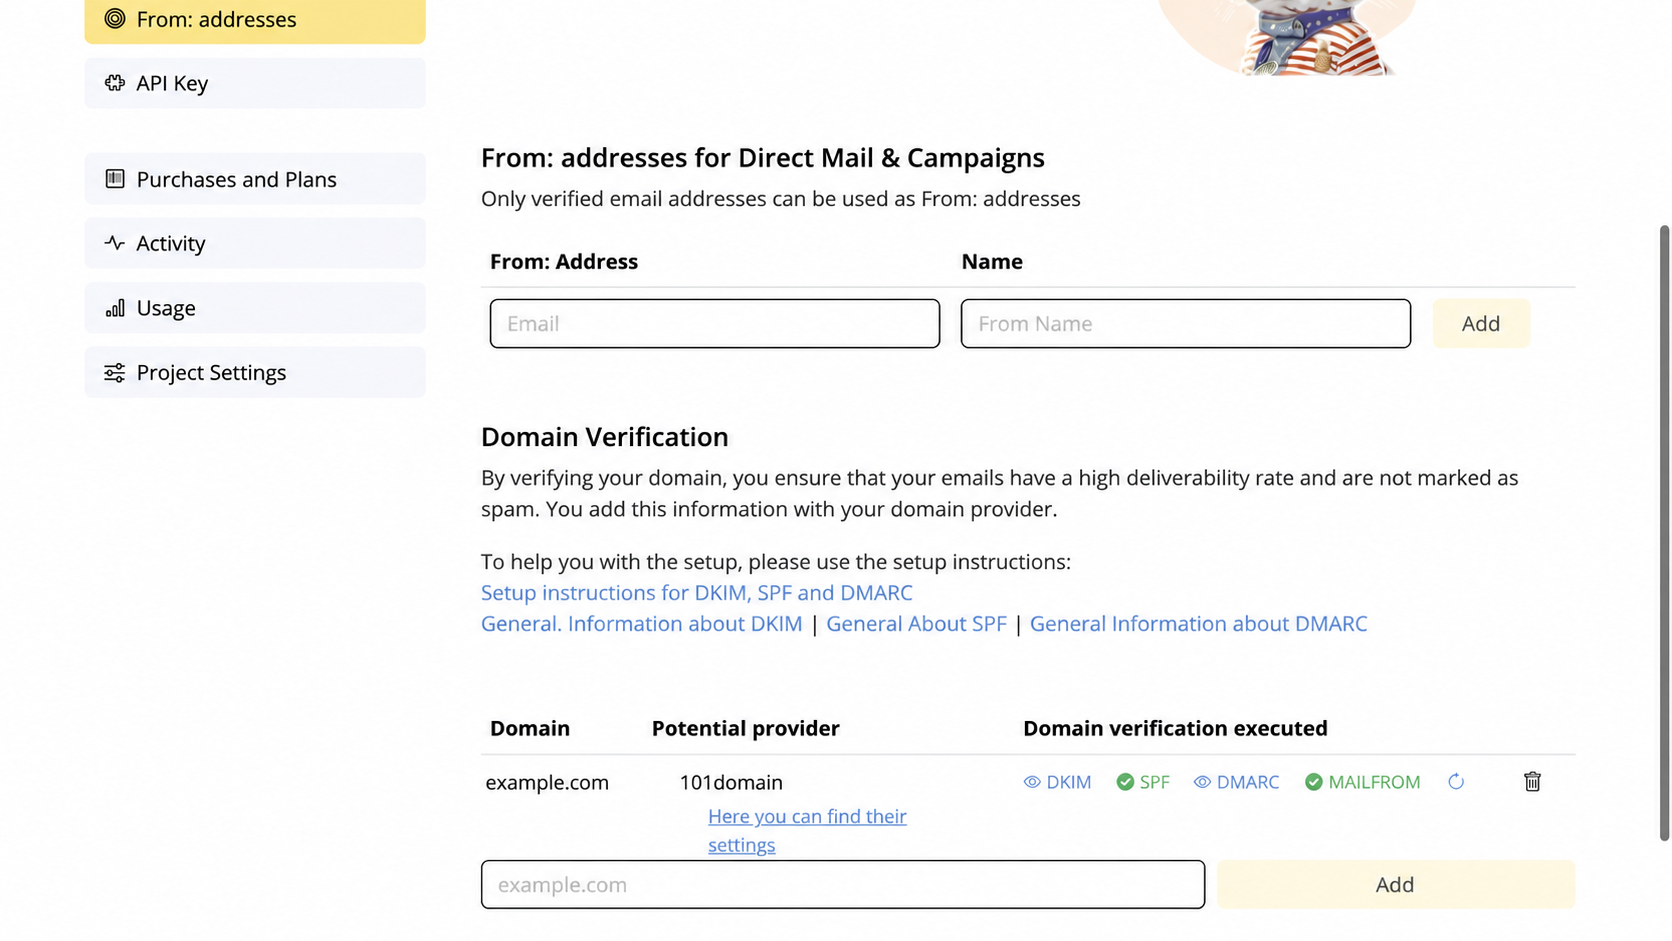
Scroll down to Domain Verification. If the domain is not listed, enter the domain itself in the field with the example.com placeholder, then select Add. Enter only the domain, for example example.com, not www.example.com and not an email address.
After you select Add, Mail Designer 365 opens the Setup Domain dialog. The domain row on the From: addresses page gives you separate controls for DKIM, SPF, DMARC and MAIL FROM.
Step 6: Open the DKIM details
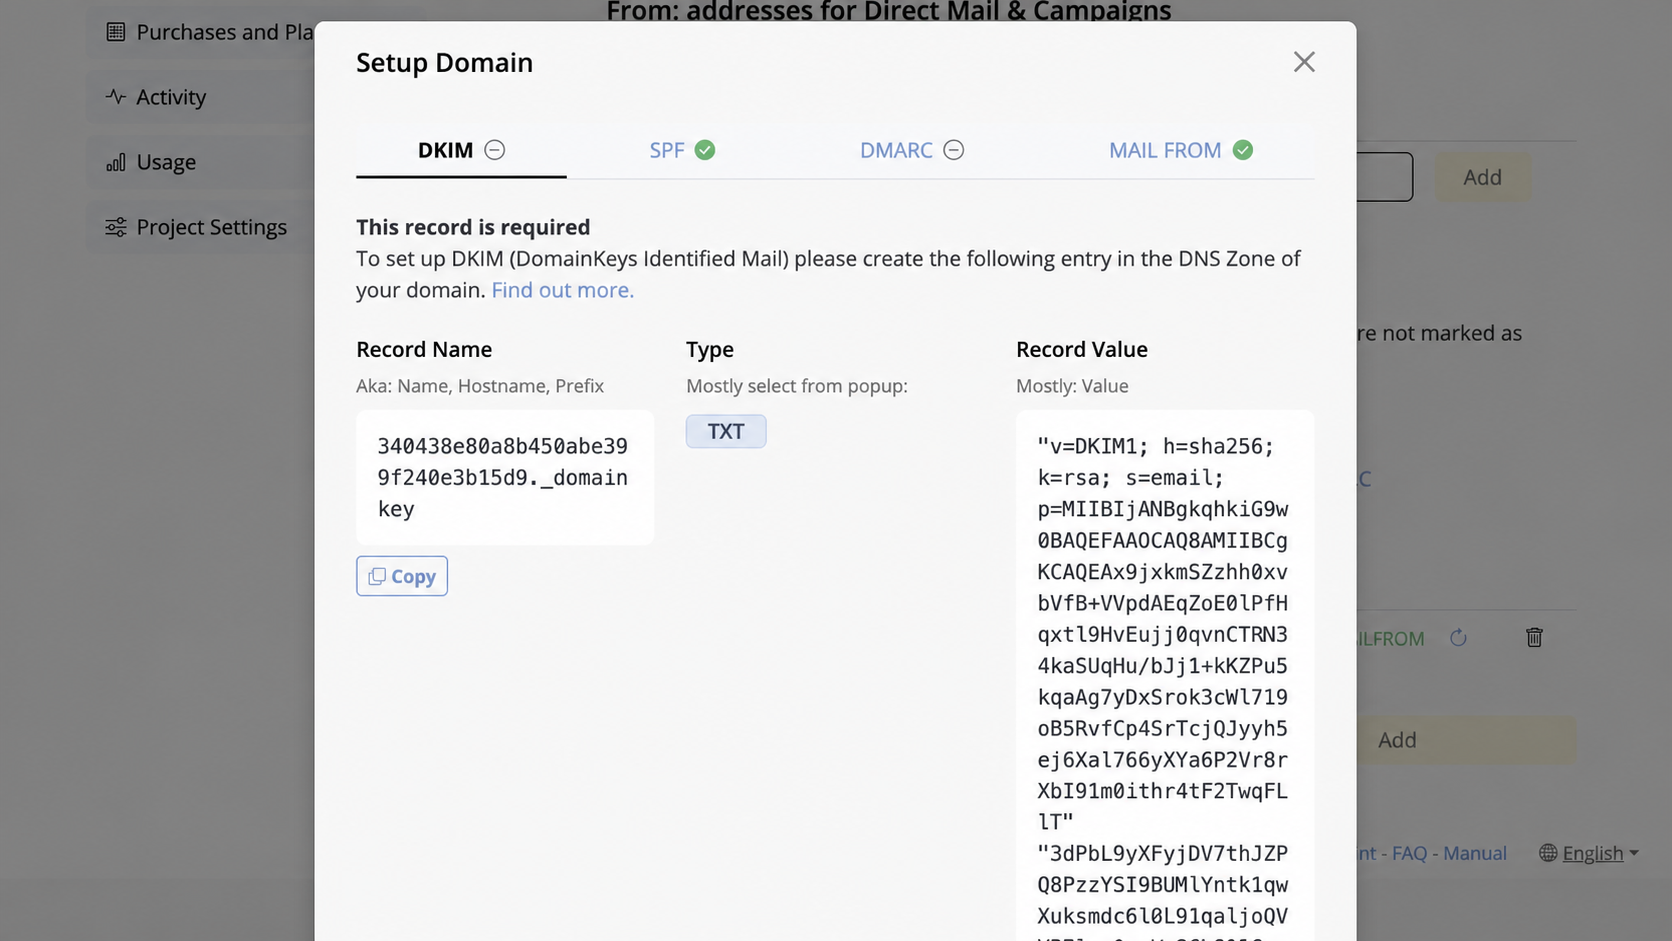
The setup dialog opens on DKIM automatically. If you return later, select DKIM in the row for your domain to reopen these details.
The current dialog labels these three pieces of information Record Name, Type and Record Value. It also explains that Record Name may be called Name, Hostname, Prefix or Record name at your provider. Leave this window open or use the Copy buttons. The values are unique to your domain, so do not copy the example values shown in this article.
Prefer expert help? We can do this for you.
The Mail Designer 365 Design Service can help with your complete sending setup, from a polished email design to configuring your sending account and domain authentication.
101domain DKIM setup: Open DNS Records and add DKIM
Step 7: Open the DNS Records area at 101domain
Before entering any records, place the two websites next to each other: keep the Mail Designer 365 Setup Domain dialog open on the left and open 101domain DNS Records in a second browser window on the right. This makes it easier to use Copy in Mail Designer 365 and paste each value directly into the matching 101domain field.
- Sign in to 101domain.
- Select Manage Name Servers.
- Select the domain you are verifying in Mail Designer 365.
- Choose I want to edit my name server records and continue.
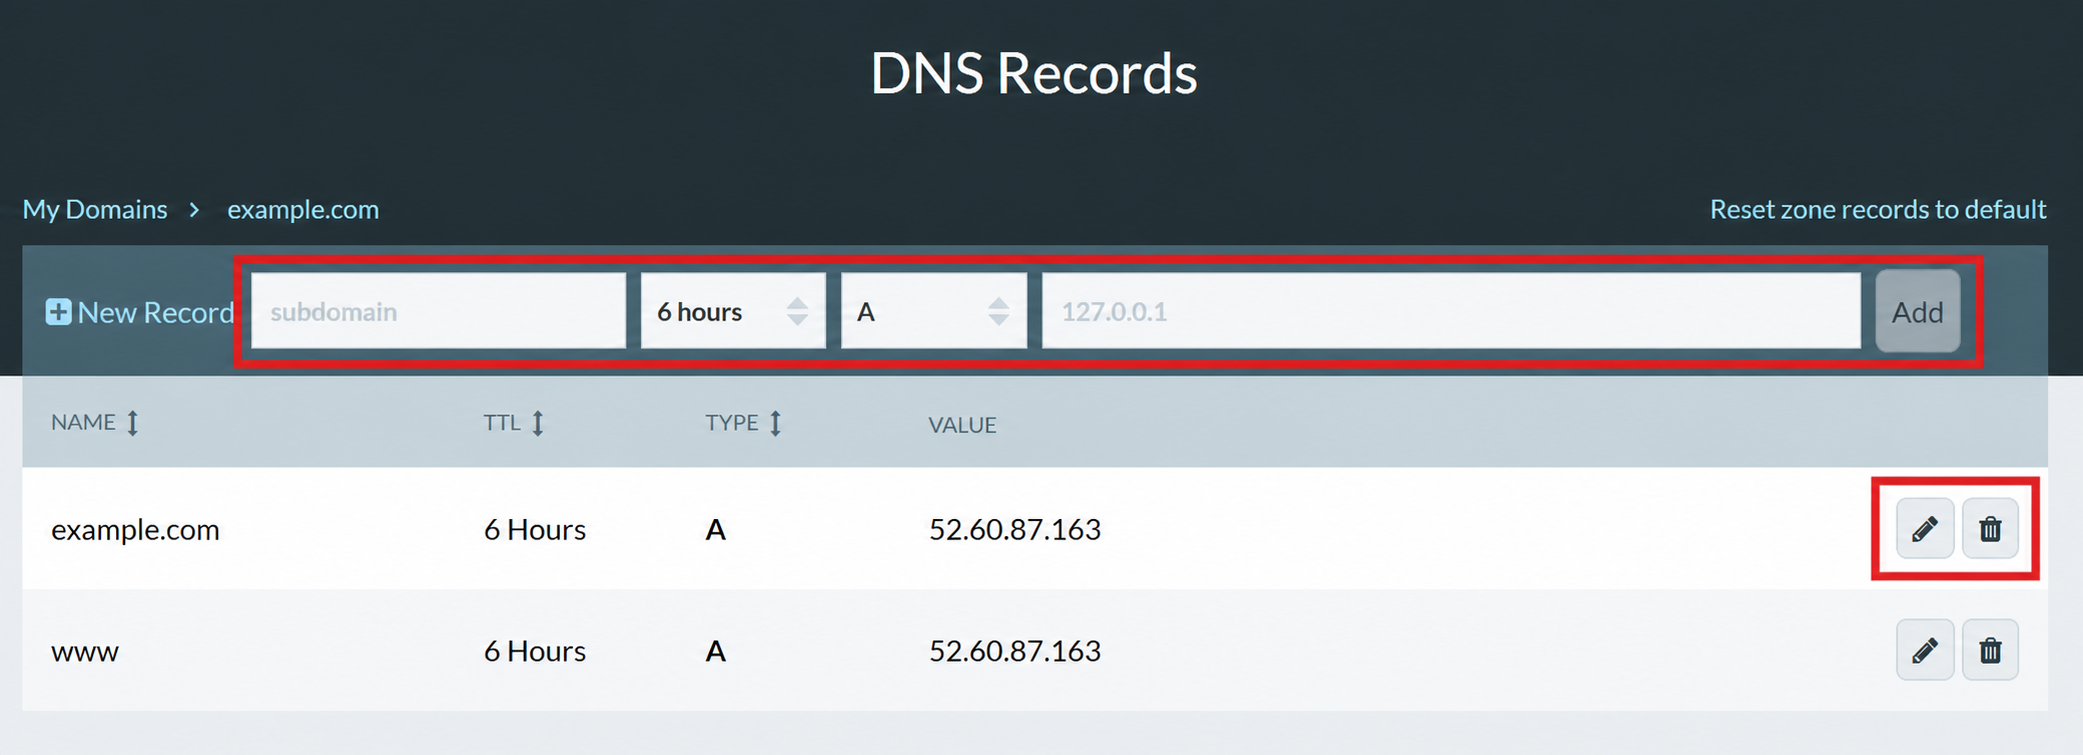
You should now see the DNS Records list and a New Record form. The official 101domain screenshot shows the fields in this order: subdomain, TTL, record type and value.
Step 8: Enter the DKIM record
Keep DKIM selected in Mail Designer 365. Create one new record at 101domain and transfer the fields as follows:
| Value in Mail Designer 365 | Where it goes at 101domain |
|---|---|
| Record Name | Subdomain field, converted as explained below |
| Type: TXT | Record type selector |
| Record Value | Value field |
| No special TTL requested | Keep the existing or default TTL |
- In Mail Designer 365, select Copy beside Record Name. Convert it to the relative subdomain label required by 101domain: remove the final .example.com portion if Mail Designer shows the complete domain name. For example, selector._domainkey.example.com becomes selector._domainkey. If Mail Designer already shows only that relative label, paste it unchanged.
- At 101domain, choose TXT as the record type.
- Back in Mail Designer 365, select Copy beside Record Value. Paste the entire value into the value field at 101domain.
- Keep the default TTL unless your DNS administrator requires a different setting.
- Compare the beginning and end of the pasted value with Mail Designer 365, then select Add at 101domain.
DKIM values are long and may wrap onto several lines visually. Do not add line breaks, remove quotation marks or copy only the visible first line. Use Copy for the complete value; only the Record Name may need the 101domain subdomain conversion described above.
Steps 9–10: Add SPF and DMARC
Step 9: Add or update SPF
Keep the two websites side by side and select SPF in the Mail Designer 365 Setup Domain dialog. Mail Designer 365 marks SPF as required. If you closed the dialog, return to Settings > From: addresses > Domain Verification and select SPF in your domain row.
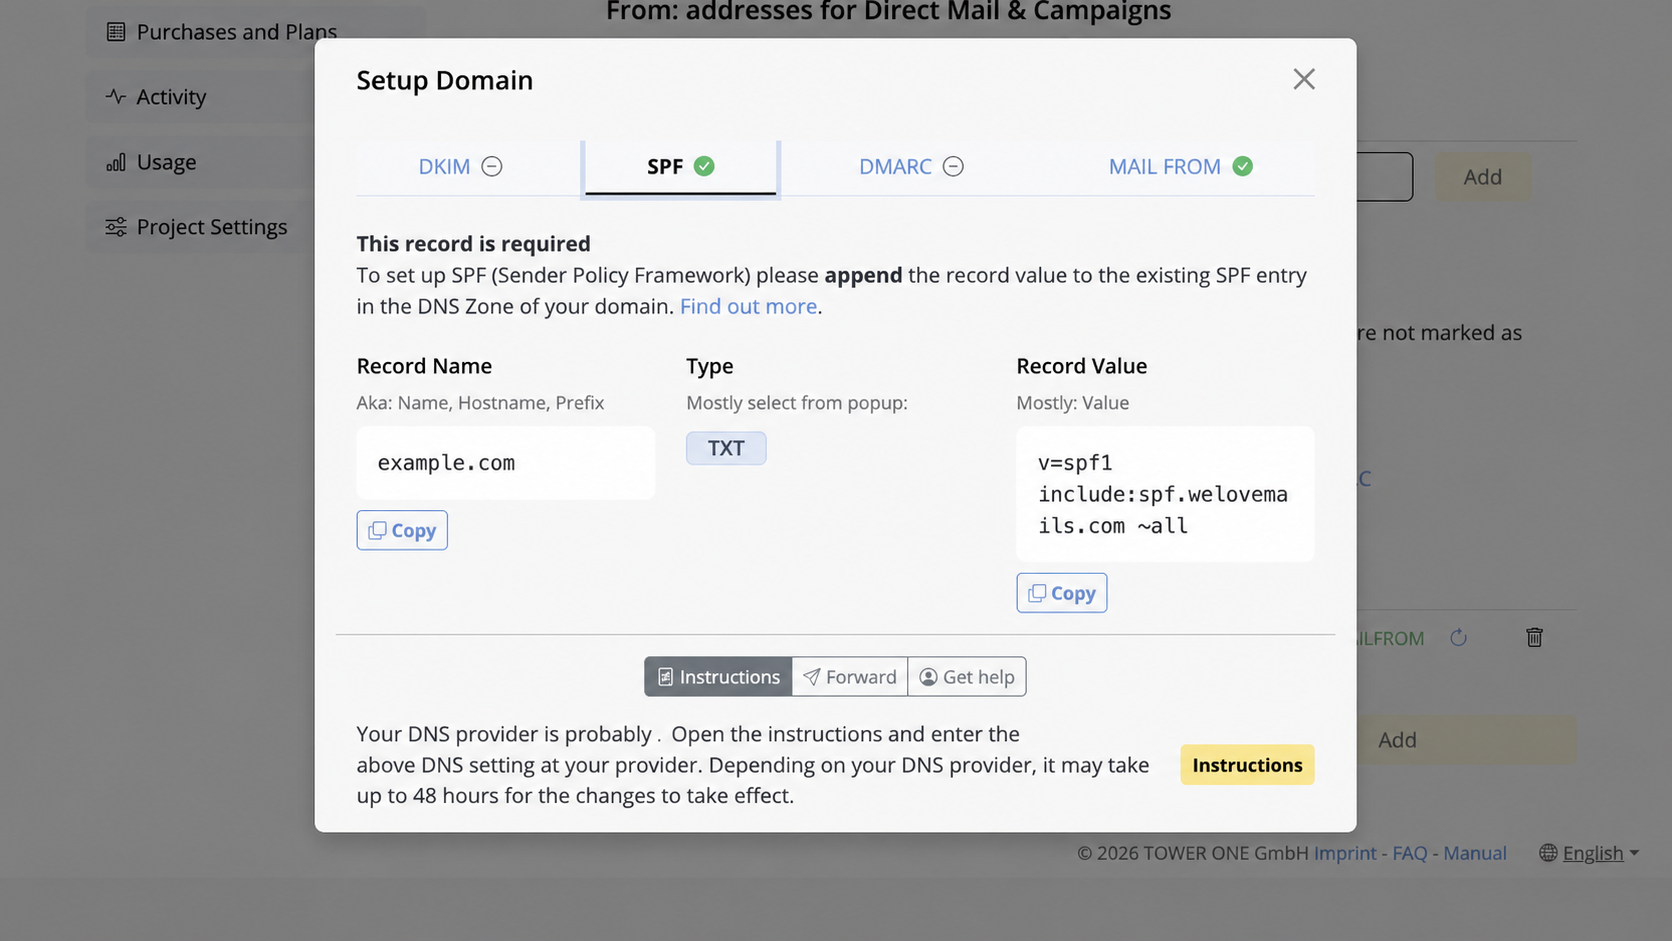
- Check Record Name in Mail Designer 365. If it is your bare domain, such as example.com, leave the 101domain subdomain field empty. The 101domain technical reference also identifies @ as root-domain notation; use it only if the current form requires a value.
- Choose TXT as the record type.
- Select Copy beside Record Value and paste it into the 101domain value field.
- Keep the default TTL.
- Check for an existing TXT record at the same name before selecting Add.
A domain must not publish two separate SPF policies. If no TXT value beginning with v=spf1 exists at that name, add the value shown by Mail Designer 365. If an SPF record already exists, do not add the Mail Designer value as a second record. The required include: authorization must be merged into the existing SPF policy before its final ~all or -all mechanism. Ask your DNS administrator to make this change if you are unsure; an incorrect merge can stop legitimate services from sending for your domain.
For example, an administrator may need to place the Mail Designer include: mechanism before the existing final ~all or -all. This is only the structure of a merge, not a value to publish:
Existing: v=spf1 include:existing-service.example ~all
Combined: v=spf1 include:existing-service.example include:mail-designer-value.example ~all
Use the exact authorization displayed in your Mail Designer 365 account.
After saving, confirm that 101domain shows only one SPF TXT record for the domain and that it contains both the existing senders and the Mail Designer authorization.
Step 10: Add DMARC
Select DMARC in the Mail Designer 365 Setup Domain dialog. Mail Designer 365 currently marks this record as optional, but adding it gives receiving mail systems instructions for messages that fail authentication.
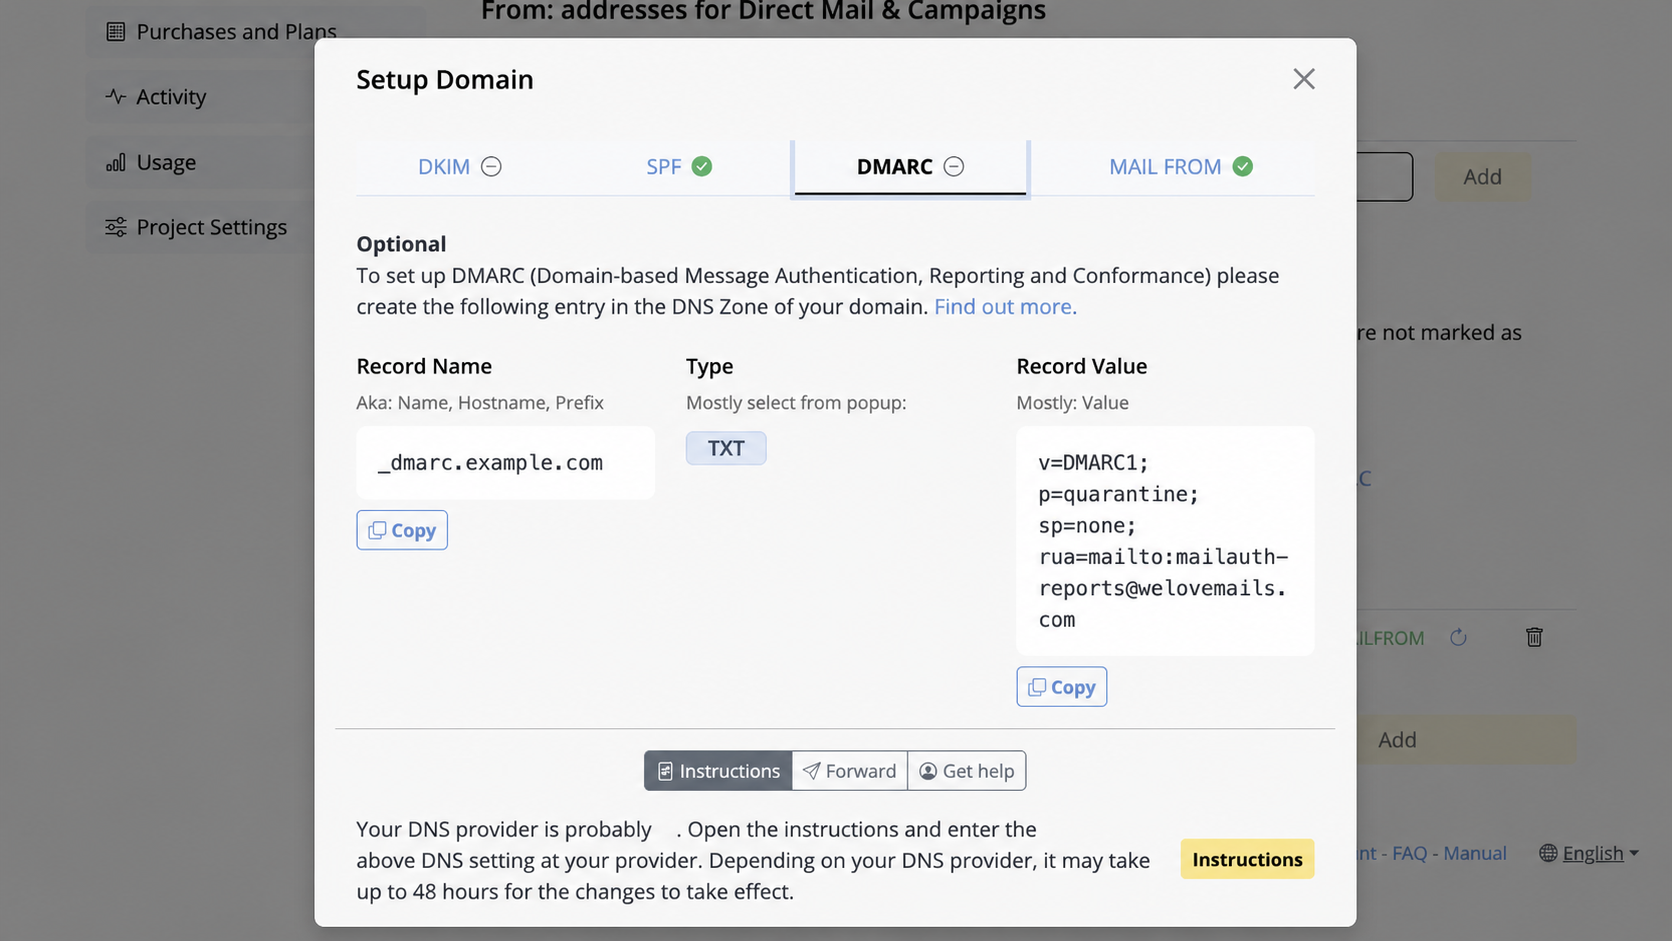
- Select Copy beside Record Name. In the 101domain subdomain field, enter only the relative label. For example, convert _dmarc.example.com to _dmarc. If Mail Designer already shows only _dmarc, paste it unchanged.
- Choose TXT as the record type.
- Select Copy beside Record Value and paste the complete DMARC policy into the 101domain value field.
- Keep the default TTL and select Add.
Before adding the record, search the existing DNS Records list for a TXT record whose name begins with _dmarc. A domain should have only one DMARC policy at that name. If one already exists, review and update the existing policy instead of creating a duplicate. Do not replace an organization’s established DMARC reporting addresses or enforcement policy without approval from the person responsible for the domain.
After saving, compare the complete value shown by 101domain with the value in Mail Designer 365. Check especially that semicolons and any reporting email address were copied intact.
Step 11: Set up Custom MAIL FROM
Mail Designer 365 treats Custom MAIL FROM as a separate authentication stage and gives it its own tab. Custom MAIL FROM aligns the return path used for bounced messages with your sending domain.
Select MAIL FROM in the Setup Domain dialog. Unlike DKIM, SPF and DMARC, this section can require more than one DNS record, typically an MX record and a TXT record. Create every record displayed by Mail Designer 365:
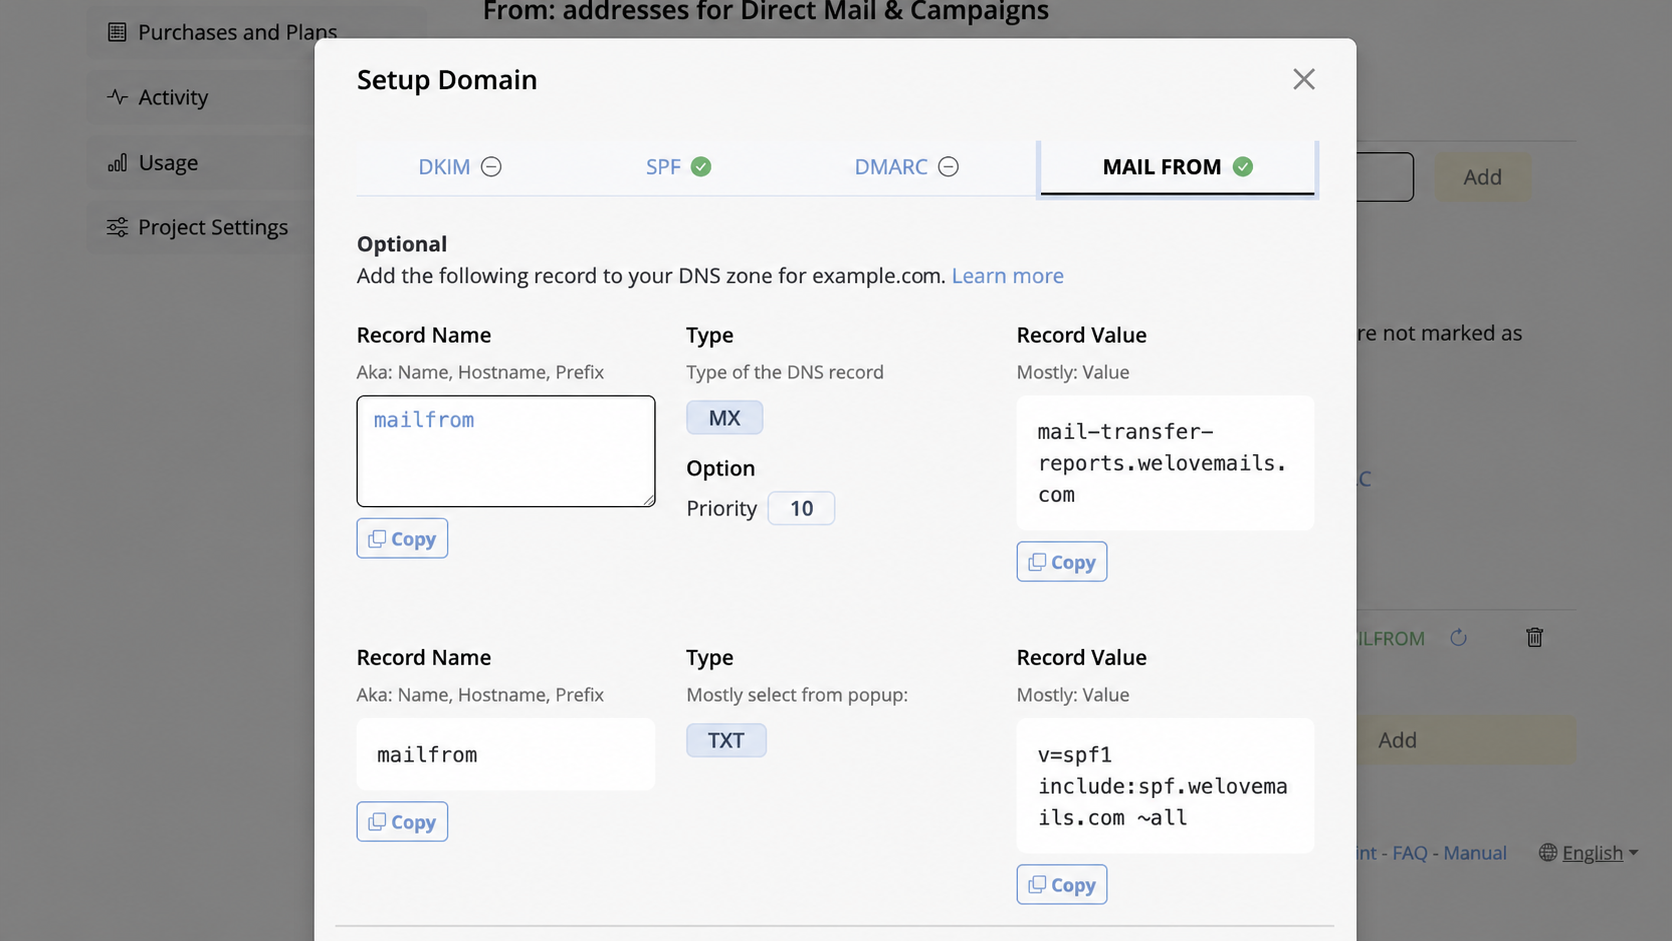
| Value in Mail Designer 365 | Where it goes at 101domain |
|---|---|
| First Record Name | Subdomain field; remove the final domain suffix if it is shown |
| Type: MX | Record type selector |
| Priority | MX priority field |
| First Record Value | Mail server or value field |
| Second Record Name | Subdomain field; remove the final domain suffix if it is shown |
| Type: TXT | Record type selector |
| Second Record Value | Value field |
- For the first displayed record, use Copy beside its record name and value. In the 101domain subdomain field, remove the final domain suffix if Mail Designer supplied a complete name; a relative label such as mailfrom can be pasted unchanged.
- Select the exact record type shown by Mail Designer 365. Do not change an MX record into TXT.
- If an MX priority is displayed, enter that priority in the appropriate 101domain field.
- Keep the default TTL and select Add.
- Repeat the process for the second record and any additional record shown in the MAIL FROM tab.
Check each record separately after saving. The name, type, value and MX priority, when present, must all match Mail Designer 365. A green status beside MAILFROM in the domain row indicates that this part of the setup has been recognized.
Step 12: Test and verify the records in Mail Designer 365
Return to Settings > From: addresses and scroll down to Domain Verification. The domain row shows separate status indicators for DKIM, SPF, DMARC and MAILFROM. Select the refresh icon at the end of the row to ask Mail Designer 365 to check the DNS records again.
A green check means that Mail Designer 365 has found and verified that part of the setup. If an item is still pending, select its name to reopen the required data and compare the record type, name, value and any MX priority with the saved 101domain record.
A new DNS record may remain pending while cached DNS information updates. The Mail Designer interface notes that this can take up to 48 hours. Do not keep adding duplicate records while you wait. Leave the correct entries in place and check again later.
Finally, return to the sender-address section at the top of the page. Make sure the address you added in Step 4 has also been confirmed using the verification message sent to that inbox. DNS verification and sender-address verification are separate checks; complete both before using the address for a campaign.
Troubleshooting a 101domain DNS setup
The DNS records are not displayed at 101domain
The domain may be using third-party name servers. Check the active authoritative name servers and manage the records with that DNS provider.
Mail Designer 365 still shows the record as pending
Compare the record type, name and value character by character. Check for a missing underscore, a truncated DKIM value or extra quotation marks. Also compare the complete saved record name with the complete Record Name in Mail Designer 365. A repeated domain suffix is a common general DNS-entry mistake, but it is not documented here as automatic 101domain behavior.
An SPF record already exists
Do not add another independent SPF record. Review the combined SPF value shown by Mail Designer 365 or ask your domain administrator to merge the required authorization safely.
Frequently asked questions
Official references and last review
- 101domain account portal
- 101domain: Managing Name Server Records
- 101domain DNS record field and type reference
- Mail Designer 365: Set up DKIM for an email address
- Mail Designer 365: Complete domain-authentication walkthrough
Provider interface and instructions last checked: September 10, 2026. Article last reviewed: September 10, 2026.
Prepare Your Sending Domain in Mail Designer 365
Review the authentication details for your domain, publish them with your DNS provider, and verify the result before your next campaign.