email templates for EmailOctopus: complete upload guide

email templates for EmailOctopus are easy to create, export, and test with Mail Designer 365. Follow this practical guide to prepare a polished campaign for your EmailOctopus audience.

Send custom made HTML email templates using the EmailOctopus email marketing platform.

email templates for EmailOctopus

How to export your HTML email to EmailOctopus

  1. Build your HTML email design in Mail Designer 365 and select "Share” > “Website / HTML…
  2. Enter the image URL prefix for the online server where you will be hosting your images. You will need this later on so that your images can be located and displayed accurately in your design. (Learn more about this step here.)
  3. Following export, select the images in the folder and upload them to the server from the previous step.
  4. Sign in to your EmailOctopus account and create a new campaign.
  5. Give your campaign a name and a subject.
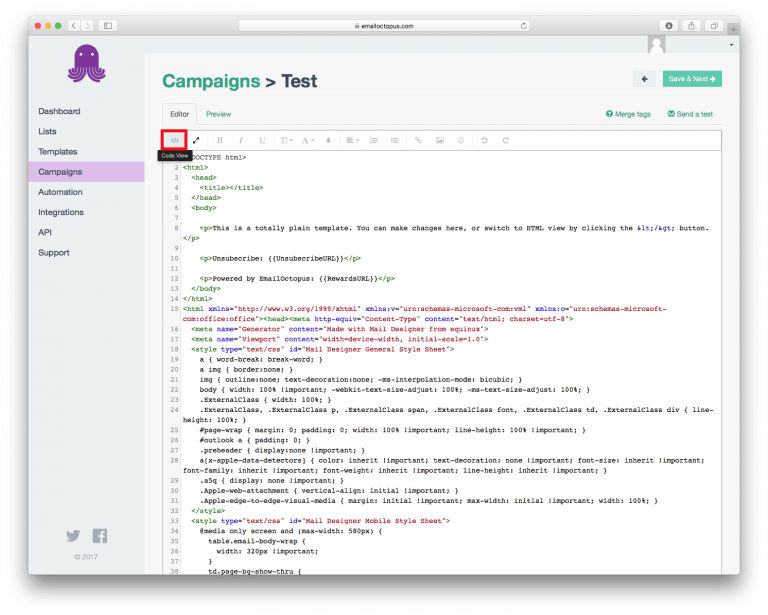
  6. Choose the template "Totally plain" and locate the "Code view" in the top left corner.
  7. Locate the content.html file in the HTML export folder. Right click the file, and open it with a text editor. Copy the entire code and paste it into the code editor to upload your newsletter.
  8. You can now use your Mail Designer 365 HTML design with the automation tools provided in the EmailOctopus platform.

Use your HTML email design with the EmailOctopus platform.

Need support?

Our team is always on hand ready to give you support. If you have specific questions regarding HTML export to EmailOctopus, or just need some extra help getting set up, get in touch!

That's not all!

Mail Designer 365 works seamlessly with all leading email marketing services. You can check out our full range of integrations and compatible platforms on our integrations page.

Start using Mail Designer 365 with EmailOctopus...

Mail Designer 365 helps you create stylish, professional HTML emails on your Mac to use with EmailOctopus. Mail Designer 365 helps you and your team create stylish, professional HTML emails. Sign up free today to see what you can achieve.


Try for free

email templates for EmailOctopus: a 7-step preflight checklist

email templates for EmailOctopus work best when the design, export settings, and campaign details are checked together. Use this checklist before every upload:

  1. Finish the responsive layout. Preview desktop and mobile versions in Mail Designer 365, checking type size, spacing, and button placement.
  2. Confirm links and calls to action. Open every link and make sure each button leads to the intended landing page.
  3. Add useful image descriptions. Clear alt text improves accessibility and helps when recipients block images.
  4. Export the finished HTML. Use the Mail Designer 365 export workflow so the email package contains the HTML and visual assets needed by EmailOctopus.
  5. Upload to EmailOctopus. Create a campaign, choose the HTML import option, and add the exported newsletter design.
  6. Review campaign details. Check the subject line, preview text, sender information, audience, and tracking settings.
  7. Send test emails. Test the imported design on desktop and mobile inboxes, then verify links, images, personalization, and unsubscribe behavior.

This workflow keeps email templates for EmailOctopus consistent with the source design. If the preview differs from your draft, correct the layout in Mail Designer 365, export again, and replace the imported HTML instead of patching several versions.

Keep each EmailOctopus template focused

Give every campaign one primary message and one clear action. A focused layout is easier to scan and test. Save successful email templates for EmailOctopus as reusable starting points, while updating the copy, links, and imagery for every new send.

Privacy Settings / Datenschutz-Einstellungen